So after our big discussion a couple of weeks ago about color – I feel ready and inspired to start adding more color into the home decor around here!
To be honest when it comes to something like this I have a fairly impatient soul. I have grand plans and I want to start them NOW. :)
Then the sensible side of me steps in and reminds the impatient side that big, grand changes take time and money.
I’m going to do some saving and plotting for my big, grand plans because I don’t have large quantities of either of those things. :)
So to keep the impatient side of me happy – I decided to add some fun colorful artwork to the walls.
I have been wanting to do some stitched furniture silhouettes for a while and my original thought was to use neutral colors.
But I added in some color instead and I’m soooo happy with the result!
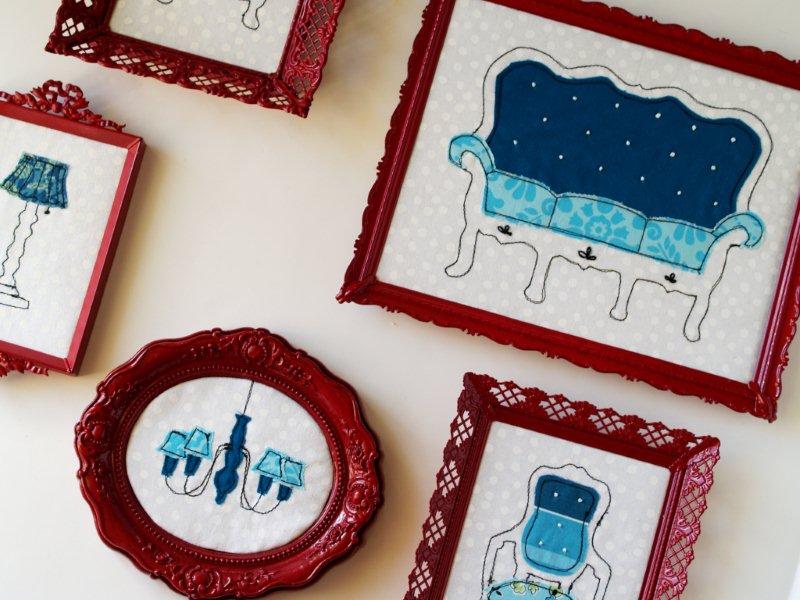
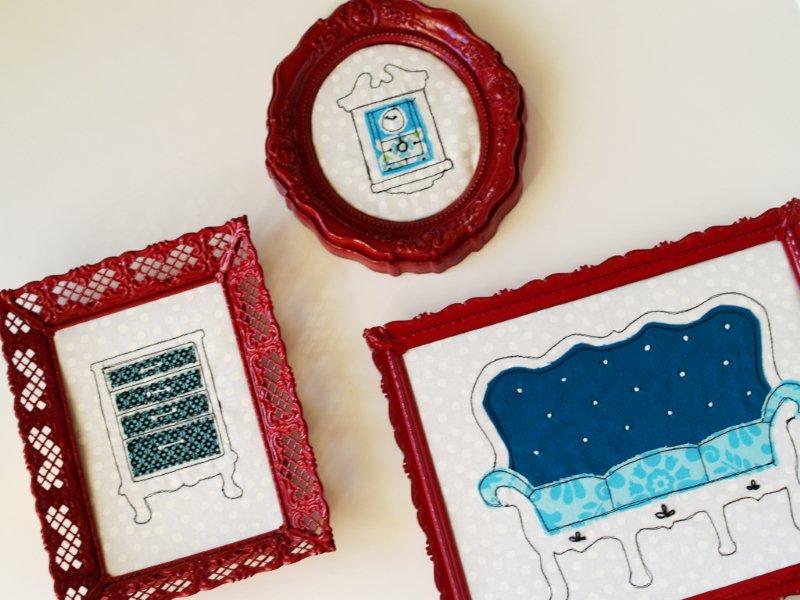
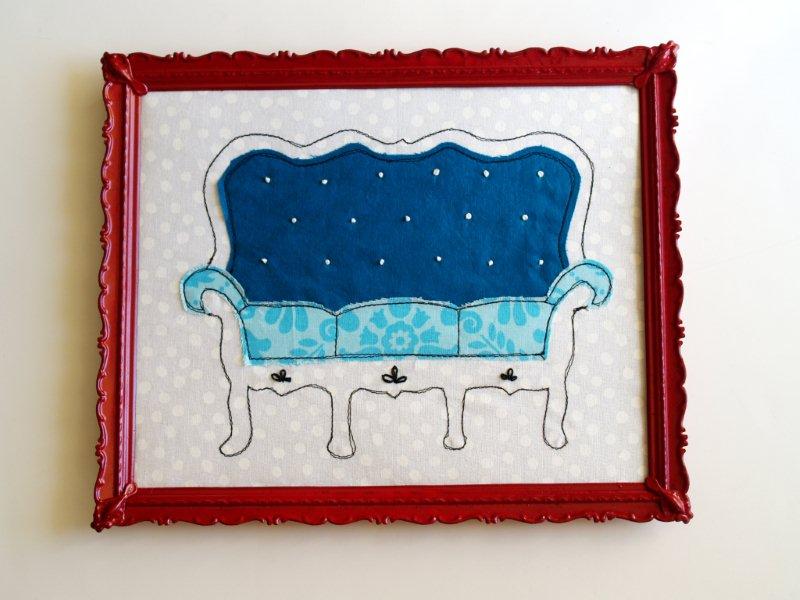
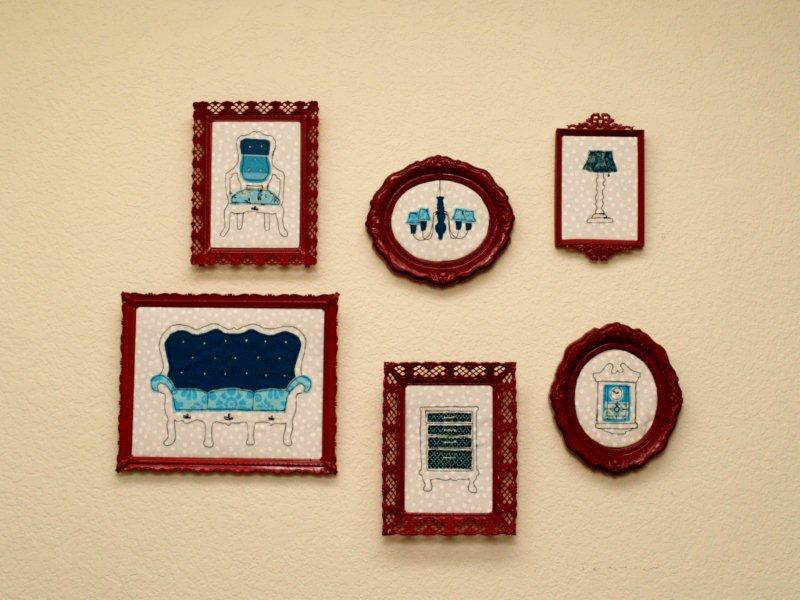
Check it out – my pretty new furniture silhouettes in fabulous shades of teal, paired with these great red frames!
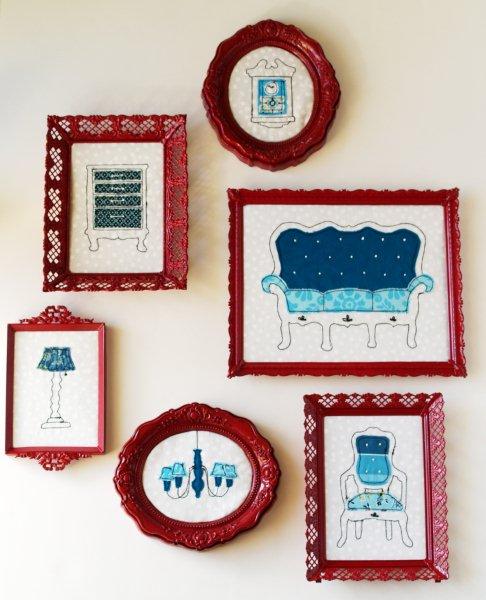
Aren’t they fun?
I have a tutorial for you if you love them and would like to make your own!
These aren’t difficult – you just need a sewing machine and some very basic embroidery skills.
Here’s what you’ll need to make your own.
• Frames
• Spray Paint
• White or light colored fabric for backgrounds
• Small pieces of similar colored fabrics for all the accent pieces
• Contrast thread (I used black)
• Embroidery Floss (white and black)
• Fusible Fleece
• Cardboard for backing
• Hot Glue
• Patterns (Pattern 1 – large couch, Pattern 2 – all other furniture)
I started with 6 frames that I’d been gathering from yard sales.
They are 1-8 x 10, 2-4 x 6, 1-3 x 5 and two oval 4 x 5’s. Feel free to adjust the images to fit the frames you have!
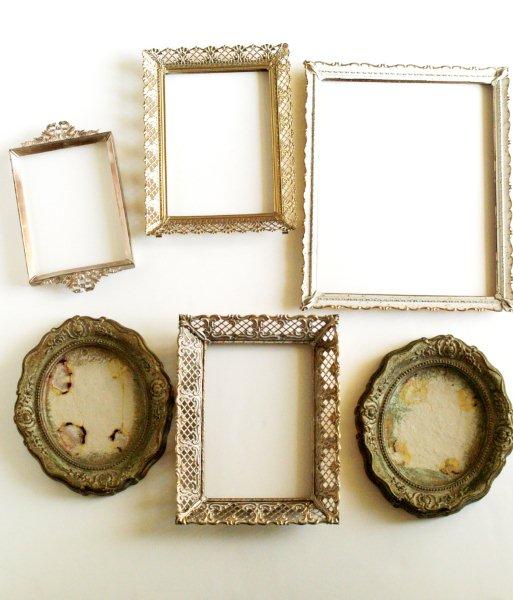
I spray painted them all red. I don’t have a picture until the end. But trust me. That’s what I did. ;)
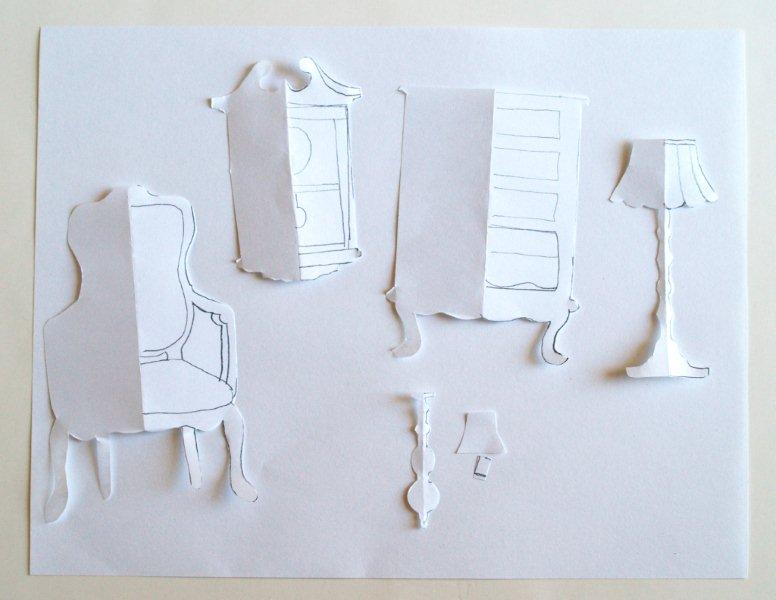
I have the patterns for you up above, but here’s a little bit of info as to how I made the patterns – in case you’d like to design your own tiny furniture. :)
I started by looking at a lot of different silhouettes of furniture online. I printed a bunch of them out and then drew out HALF of the piece of furniture using the different elements that I liked.
Here’s an example with the sofa. You can see how I folded the paper so that the image would be even and the size that would fit in my frame.
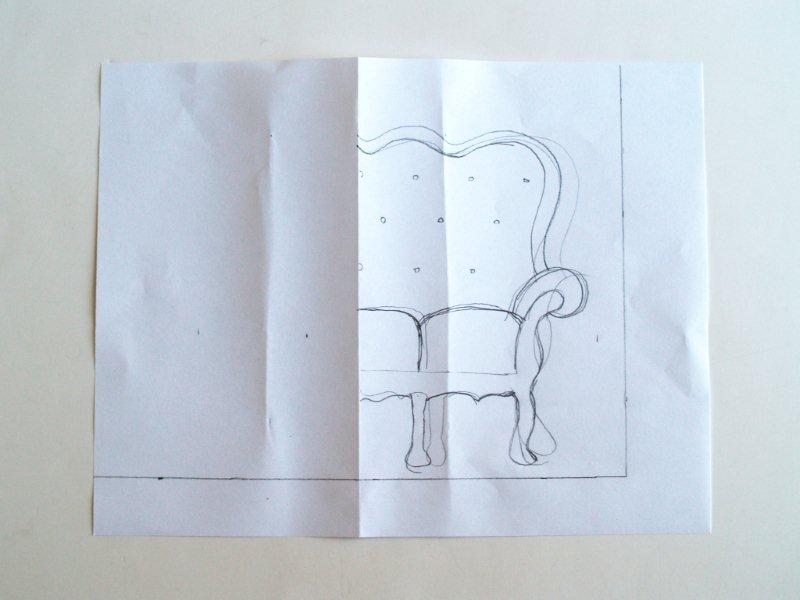
I folded the paper in half and cut out the traced image. This makes it super easy for both sides of the furniture to match and look the same.
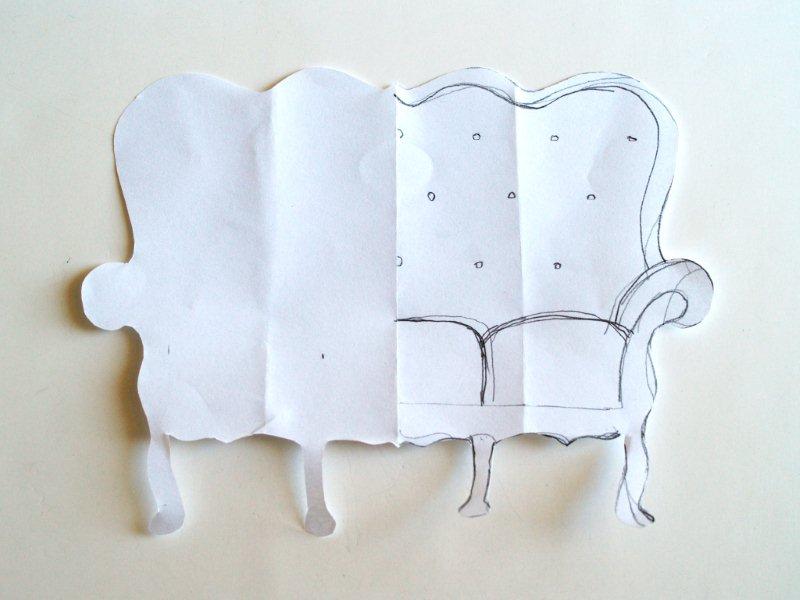
Then I repeated the process for all the other pieces.
So from here on – I’m going to show you the steps for putting together the Sofa Silhouette. You’ll just repeat the steps for the other pieces.
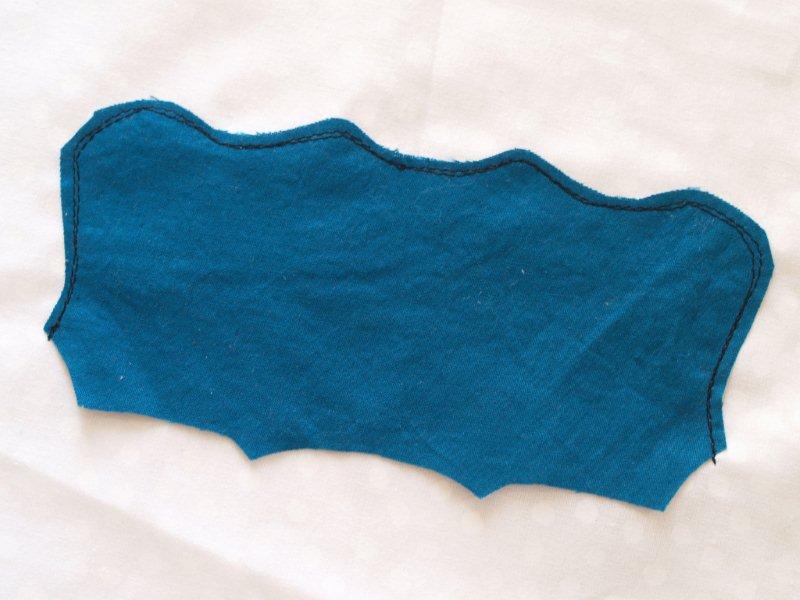
Cut out the section that will be the back cushion and the section that will be the seat and arm cushions.This will leave a border of the pattern around the top and the base.
Save this border piece – we’ll use it in a minute. Or two.
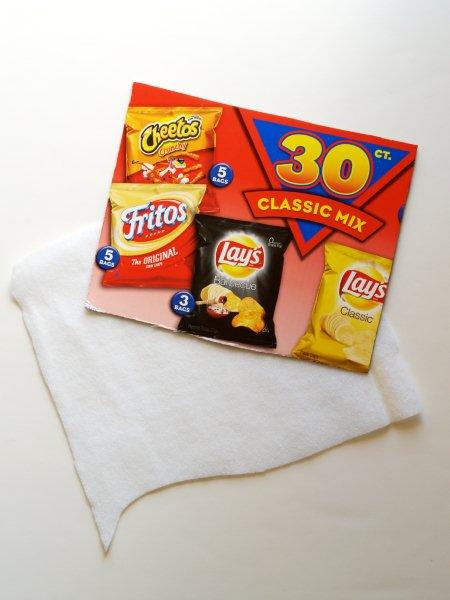
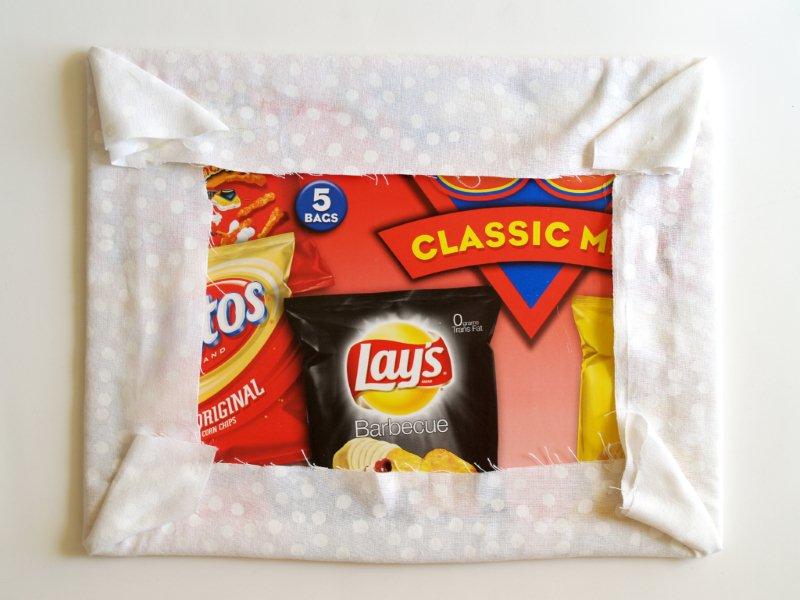
Cut out a piece of your background fabric a few inches larger on all sides than your frame.
Don’t bother to iron it or anything. Have I mentioned I’m a bit impatient??
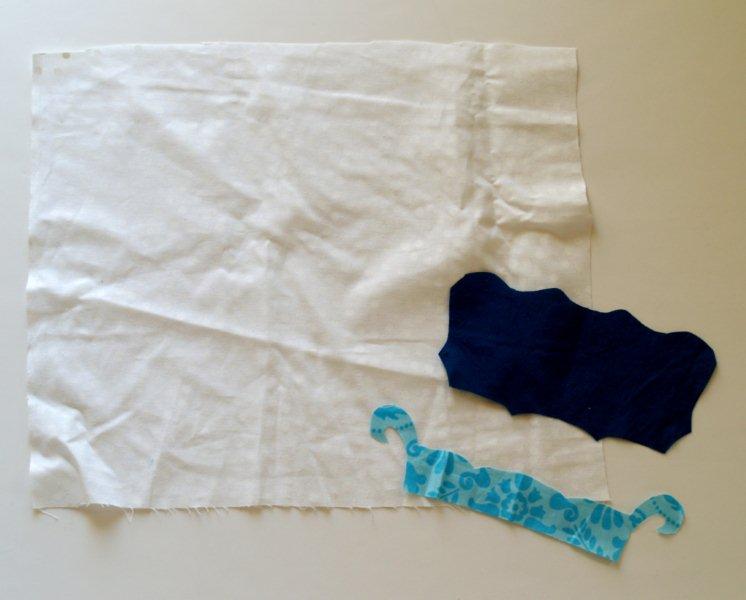
With all your furniture, layer the pieces that will be on the bottom first.
For the sofa, that is the back piece. Decide on your placement based on the whole sofa pattern.
Sew on the back piece, close to the edge, on all sides except for the bottom.
For all the stitching I used two rows – this made the stitching darker and gave everything that fun, sketched look.
Layer the seat and arm cushion piece so that it covers the bottom of the back piece just a little. Sew all the way around.
Sew down between the three cushions as well.
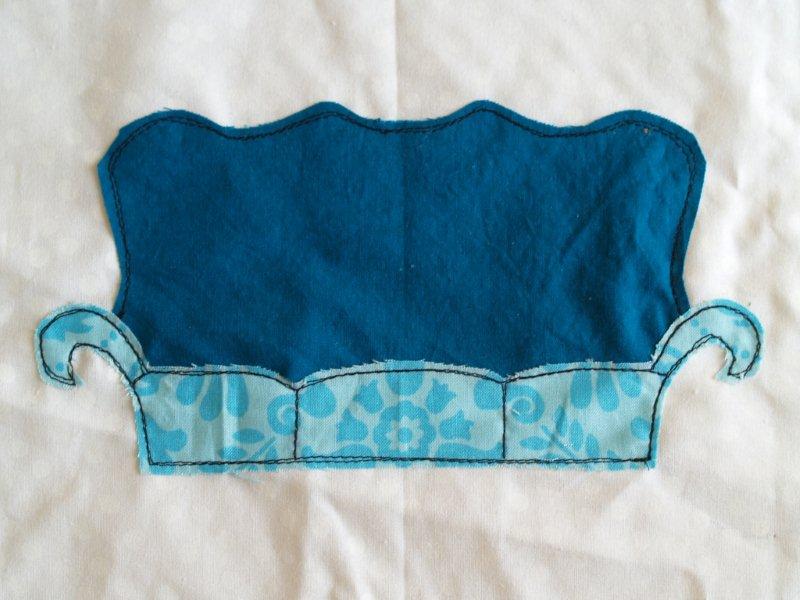
Lay the sofa border piece that you saved over the stitched cushion pieces.
Trace around the piece with your disappearing marker.
Sew over all the marked lines – still using two lines of stitching.
You can see that my stitching lines aren’t perfect. That’s the fun thing about this – it doesn’t have to be perfect. In fact, the messier your stitching, the better it looks!
Cute right? Now we’ll add in a little bit of embroidery to finish it off.
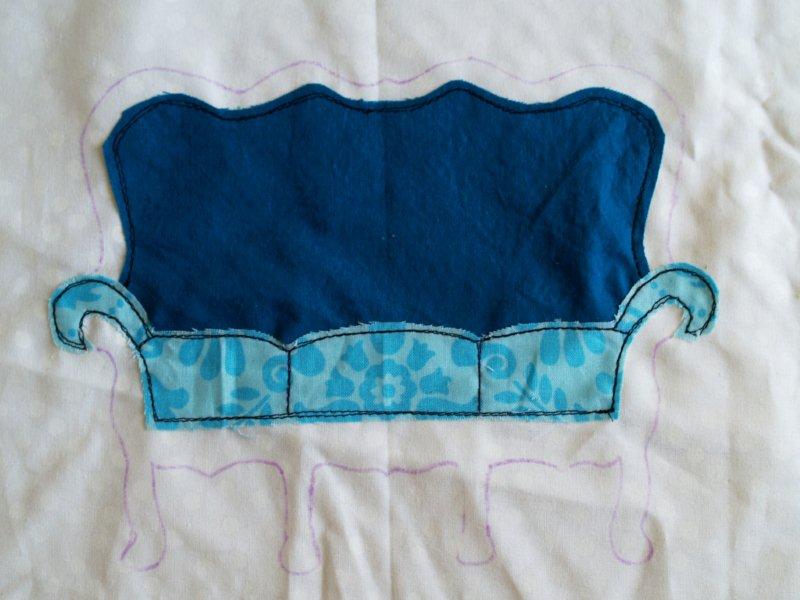
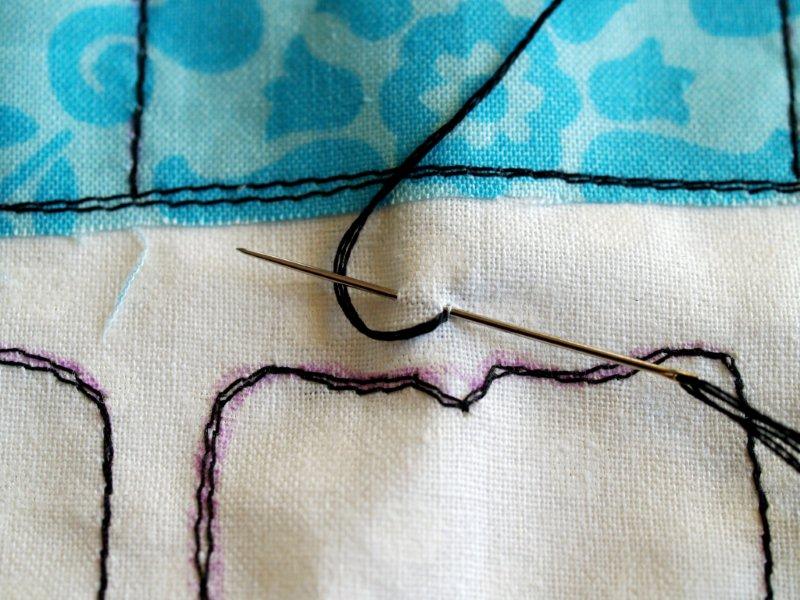
For the back, mark out the dots for the cushion buttons. We’re going to use French Knots for those.
To make a french knot, bring your needle (threaded with 3 strands of embroidery floss) up at the point you’d like your knot.
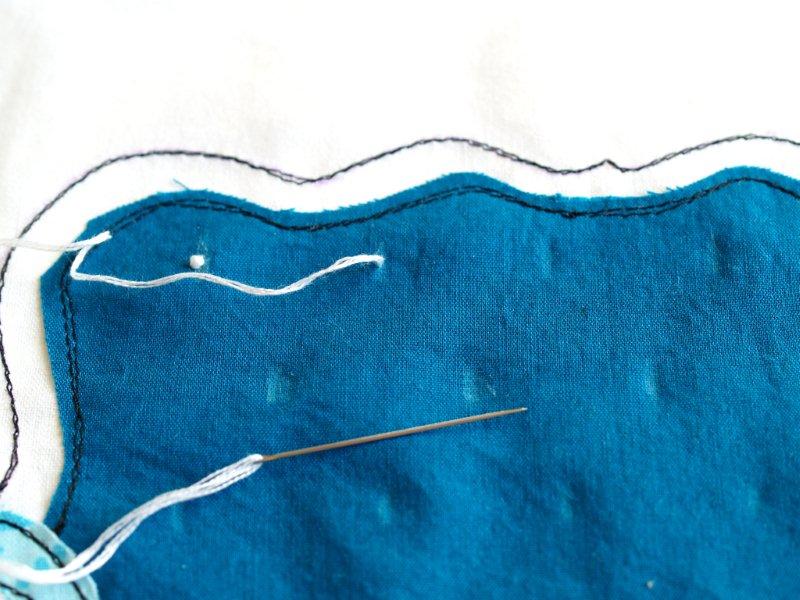
Close to the point that the thread comes out of the fabric, hold your needle and wrap the thread around the needle 3 times.
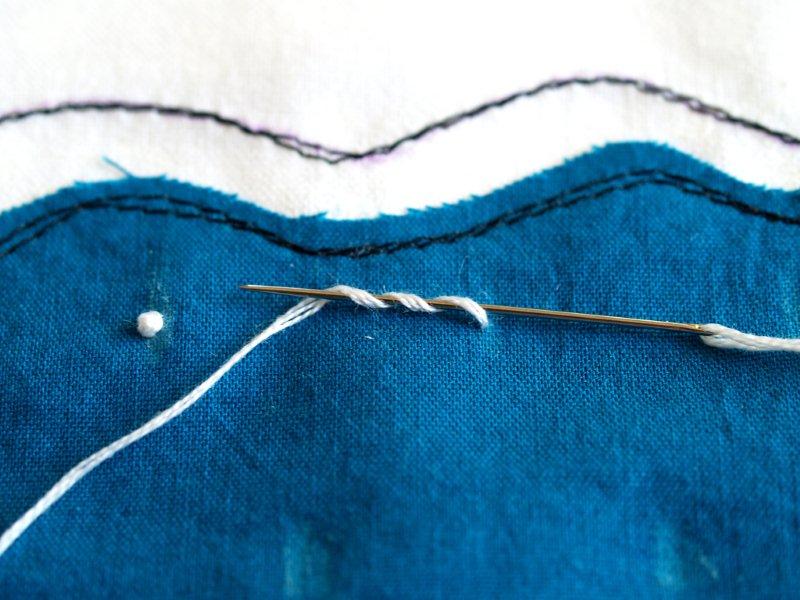
Hold the end of the thread with your thumb, and with your other hand put the needle poing back in right next to where you brought it up.
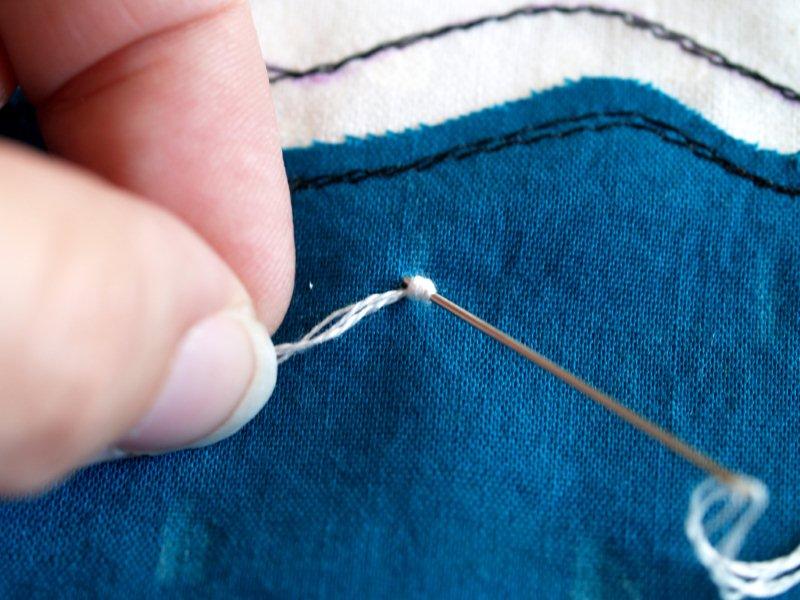
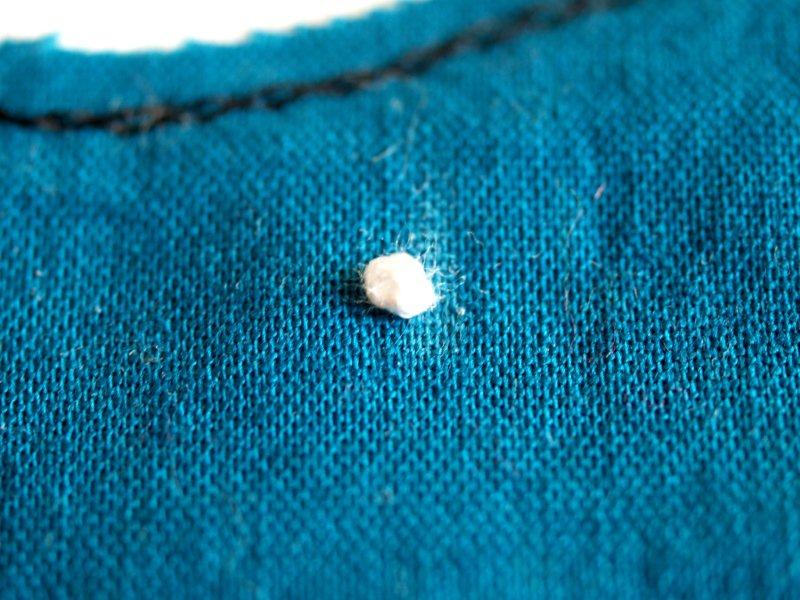
Pull the needle through the wrapped thread, holding lightly to the end until it’s all pulled through. This will form a French Knot!
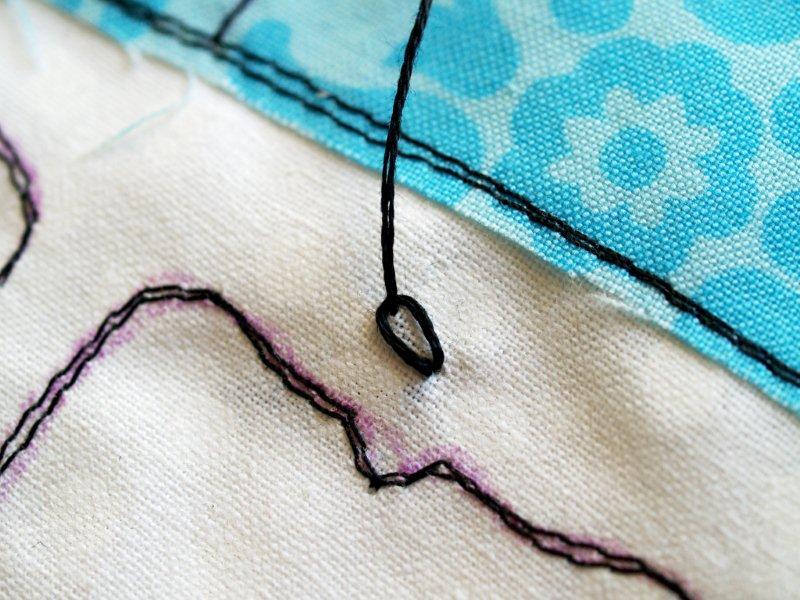
For the little loops at the bottom of the couch, we’re going to do a Daisy stitch.
Bring your thread up (black floss this time) at the bottom center of the three teardrop shapes.
Put your needle back in at that point and bring it partially back through at the top of the left teardrop shape.
Wrap the tail of the thread loosely around the point of the needle.
With the thread still wrapped around the needle, pull the needle through the fabric.
This will make a little loop with the thread coming up inside the loop at the top. Don’t pull too tight or it won’t have an pretty arched shape.
Put the needle back through at the top of the teardrop shape on the outside. This will hold the little loop in place.
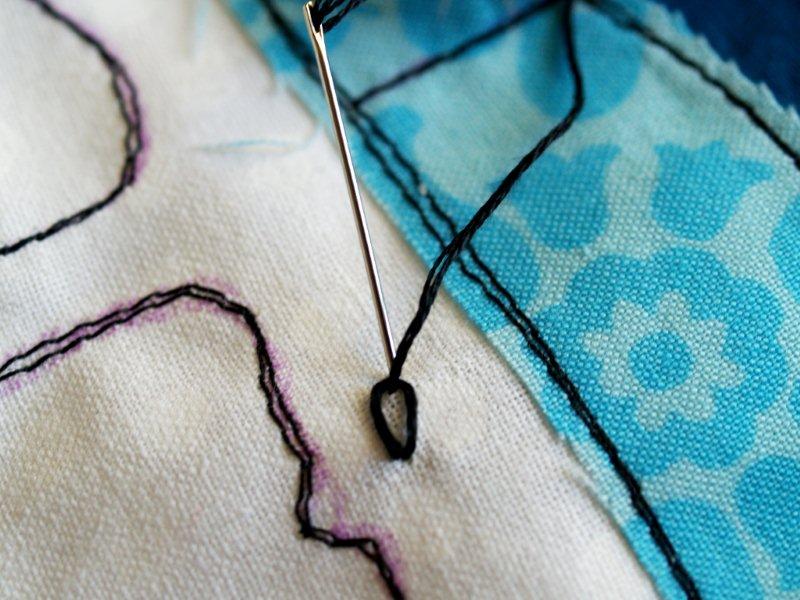
Repeat for the other two loops to make a set of three. Make the center loop a little larger than the side loops.
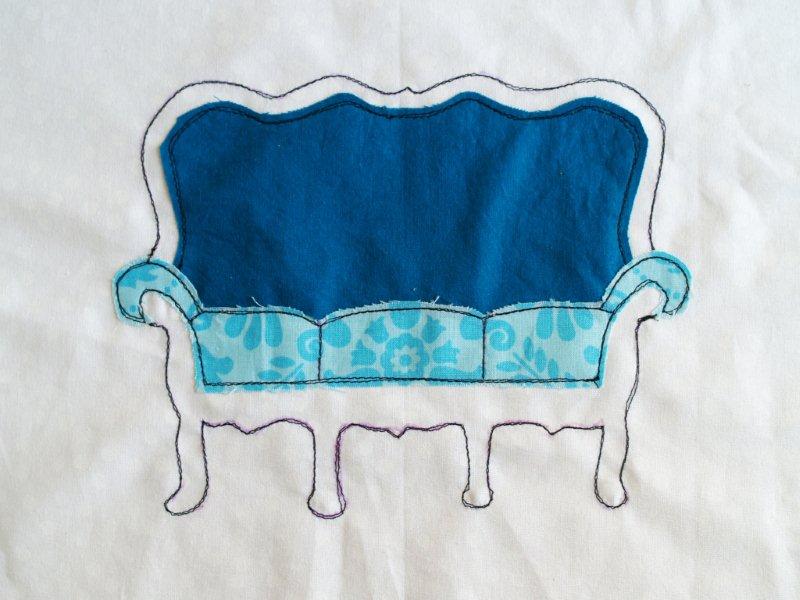
Repeat for all three designs on the sofa – and that finishes off the stitching!

Here are some closeups and details on the other furniture pieces.
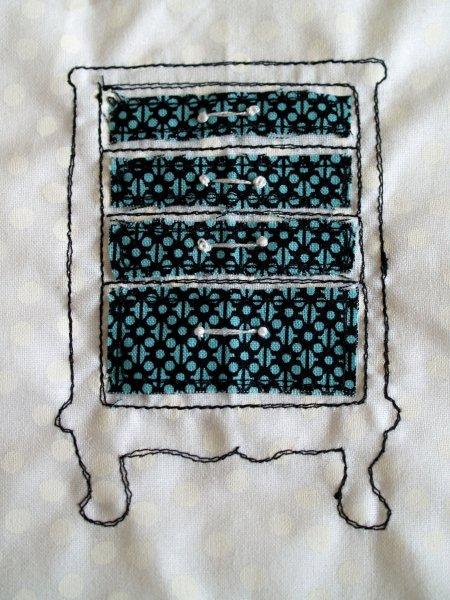
The dresser is pretty easy too! You just sew down the drawers and sew your stitching all around it.
For the pulls, sew two french knots and a straight line of embroidery floss between them.
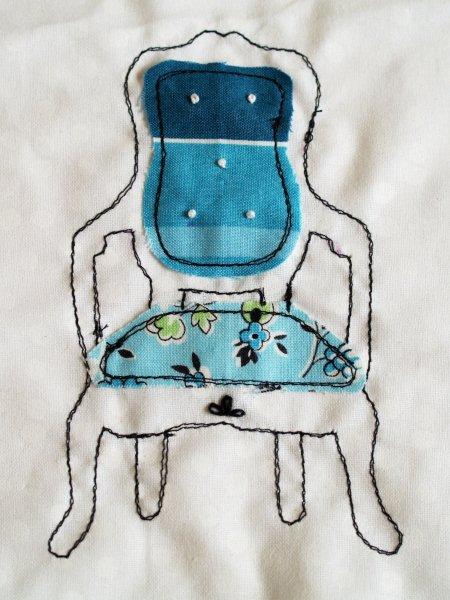
For the chair, do embroidery similar to the sofa, with french knots on the back and a small design below the seat cushion.
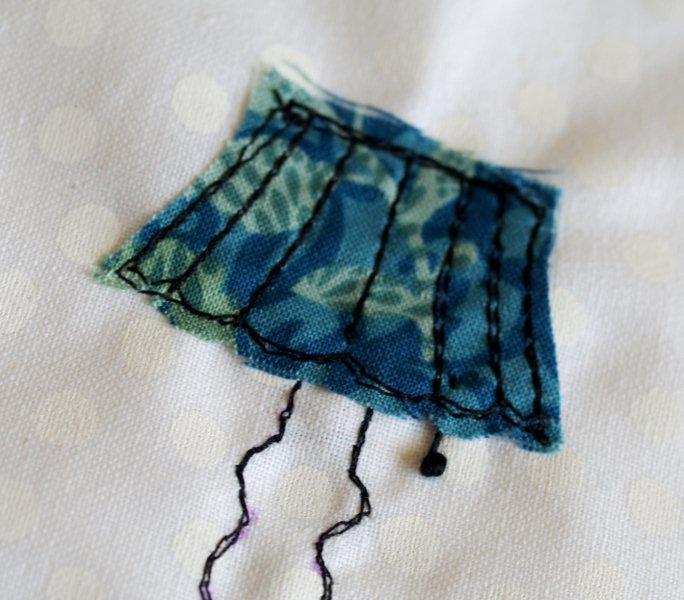
The lamp has stitching down the shade to follow the scallops. To make the lamp pull, sew a french knot below the shade and sew a straight line up from it to the shade.
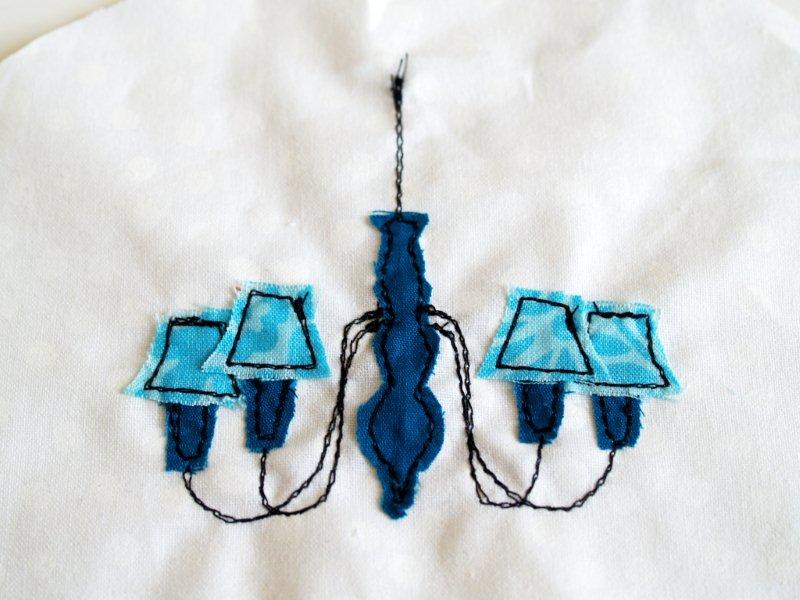
The chandelier doesn’t have any embroidery. Just make sure that you add the solid rectangles under the shades first, then the shades on top so that it looks like the shades are over the bases.
Also, sew on the back two shades first, then the two that overlap them next.
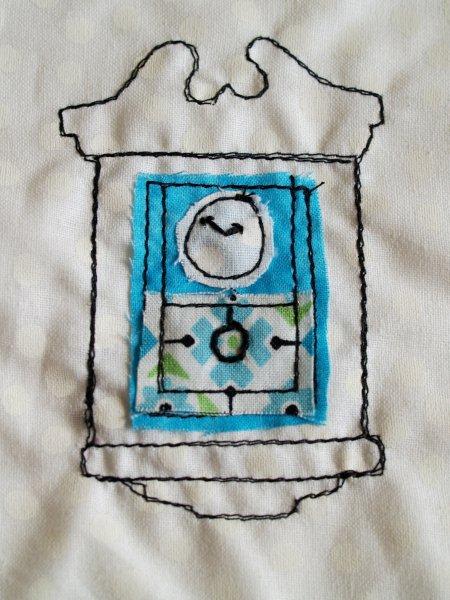
For the clock, after you sew on the center pieces, embroider the clock hands and the pendulum.
Now that all the stitching is finished you can get them ready for framing!
Cut out a piece of cardboard the size of your frame and a piece of fusible fleece a little larger than the cardboard.
Take a minute to explain to your hubby when he goes into the kitchen why there are bags of chips in grocery bags on the counter. :)
Iron the fusible fleece to the back of your fabric.

Center your cardboard over the design on the back and glue the sides down first, then the corners.
My frames were older and they didn’t have backs. So I glued a piece of cardstock over the back so everything looked nice and tidy.
Slide your artwork into the frame and it’s all ready for hanging!
Once they’re all finished you have a fun wall grouping!
I love that you can customize them for any color scheme!
Or if you don’t like sewing – you could do the same thing with fun scrapbook paper and modpodge, then just draw around the outside lines with a Sharpie!
Here’s how I grouped them on my wall:
And here’s a shot of the general area.
Part of my big, grand scheme is to add curtains to this window. I am going to find a fun print that has red and teal and maybe some greens in it too.
So the curtains will take up a little of the wall space too and add more color.
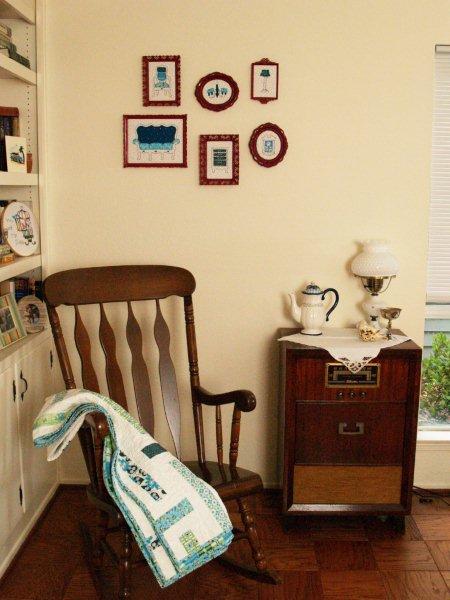
So it’s not too big and grand – but it’s a fun start!!
What do you think?
I’m linking to Sunday Scoop, Today’s Creative Blog, Met Monday, Skip to my Lou, Tutorials & Tips Tuesday, Quilt Story,
and the other fabulous parties on the sidebar – make sure you check them out!


Your decor ideas are always beautiful!
Love the raw edge applique and the gorgeous painted frames! Thank you for sharing your patterns :)
You did an amazing job! I especially love the sofa! If I get a chance, I’ll digitize them (if you don’t mind, and with your permission?) so they can be embroidered in a machine.
You have GOT to be kidding me with these?!?! OMGosh they are SO CUTE! Love the colors and I love each and every one of the pieces of furniture! You are so very talented Bev. Wish I could sew like you :)
Wow these are great and thanks for the tutorial too. x
That is so cute!
What a great idea and the result is fantastic! Very impressive:) Thanks for sharing.
love these! and now i want everything to have a red frame on my house lol!
You are a genius Bev! Love them. Going to tweet about it right now!
love this idea Bev!!! So cute!!! Really genius :)
Love Love Love!!! Maybe I can whip some of these up as a housewarming present to myself :)
this has to be one of the stinkin cutest things I’ve ever seen! Your tutorials for pattern, sewing, stitching and backing the frames were all fabulous! thanks so much for sharing this fun, darling project!
This is a great tutorial! You are so creative and cute!
So stinking cute, I’ll be adding this to my ever growing to do pile.
They look wonderful, I think I’d do it with scrapbook paper and a sharpie!
These are SO cute, I’m in love! <3 You're too clever!
Oh Bev- these are just precious. I love them, not to mention the red. I have that same red on some frames too. Love the wall, well done. winks-jen
Oh Bev!!!! These are the most clever and darling things ever! I absolutely love this idea!
I lOVE this idea. It is so cute. (And the bright red frames are adorable.) I want to make some to hang over my sewing table. Thank you for sharing!
liZ
Oh My Gosh! I love this! I am a sucker for embroidery so I must try it!
Tori
I’m picking my jaw back up here…Wow. That took some time, huh! So neat!
Now how cute is this. I love the color of the frames and the designs are so much fun. You just ooooze with creativitiy. I agree red and teal pattern drapes would look nice.
Very cute! I think I’m not using enough imagination when I’m looking for frames that can be spray painted, I would have never picked those up but they look fabulous painted red!
so cute!
Wow, Bev! These are fantastic! I love your attention to detail when you made these. Perfection! And thanks for the paper alternative idea. You know that’s me!! :)
Holy crap! I can see the love you put into them! Fantastic!!!
Those are so adorable!!! Thanks for the tutorial! And I love the frames you found!
This are totally too cute, Bev!
Great!
Lady… how do you come up with these ideas?! LOVE IT! And those frames are fabulous!
I absolutely love this and must pin it to my Sew Fun board on Pinterest!! Hugs from Conroe, TX!
Wow. These are just amazing! I love the red and teal/blue together… and the stitched details are darling. How long did these take you? I’m not sure I’d have the patience, but I sure like the end result. Beautiful!
These are gorgeous, you’re so clever! Great tutorial too!
I think you are amazing! Great original idea and lovely execution!
These are fantastic! I’m not sure I’m patient enough to do this, but yours completely rock! love your colors! Found you through Today’s Creative blog.
I loved the idea to reuse old frames! So cute! And soooooooo easy (thanks to toturial..)
kisses
LOVE it! What a great idea!
very sweet idea & love that you used second hand frames! good karma! this little stitched collection is so pretty and looks fabulous in your lovely room :)
Those are absolutely adorable!
You are one talented girl! I love those so much!
I am so glad you linked these up to this week’s BFF Open House. They are so so so so wonderful!
Works of art! Very nice:)
Wow, I’m so impressed. This is definitely going to be one of the ‘winter’ crafts I try while holed up for a good storm. And I love the colors you chose too. It’s been forever since we’ve chatted and I hope you’re doing well. (My blog was formerly Beat Until Fluffy) But these furniture things are adorable. And the French Knot photo is just what I needed. I’ve never made one successfully. Thanks for that!
Dawn
These are ah-mazing! I am so in love with the finished product!
I stumbled on this through Tea Rose Home and couldn’t help coming over for a better look because it turned out soooooo cute!! I really love the unexpected colors you used! So cute!
I featured these as part of my Open House Wrap Up! I am on a mission to start a frame collection!
Wow, Bev, everything you do is with such originality, style and attention to detail. I love the color you chose for the frames and all the details that went in to the fabric furniture pieces. I’ve been struggling with my French knots lately (yesterday, in fact), so I am beyond thrilled to have gotten a step-by-step photo tutorial from you. Thank you! I really, really needed that!
These are beautiful! You did such a wonderful job. I love the fabrics that you used for the appliques.
Wow, what a great wall hanging. I love them!
WOW! Bev, this is incredible. And you know what? I saw a thumbnail, and it screamed Bev! You are so talented!
Holy cow…I know everyone else has said this already, but I had to comment. These vignettes are fabulous. Perfectly done.
This is amazing! I love EVERYTHING about it! I am featuring this at somedaycrafts.blogspot.com.
excellent. just perfect i must say.
amazing! love them. you should sell those! i would buy some, love them.
Oh these are lovely!
And the frames are gorgeous.
Great idea!
Thanks so very much for sharing this amazing idea, this project is to DIE for! :-)
I pinned this project months ago because I absolutely love it. Now if I could just find the time to do it. Seriously, one of the cutest things ever!
This is really cute. Thanks for the patterns
amei ,fiquei encantada ;lindo,diferente;voce e realmente uma artista iluminada.Desejo tudo de bom a voce.
Your art is very nice