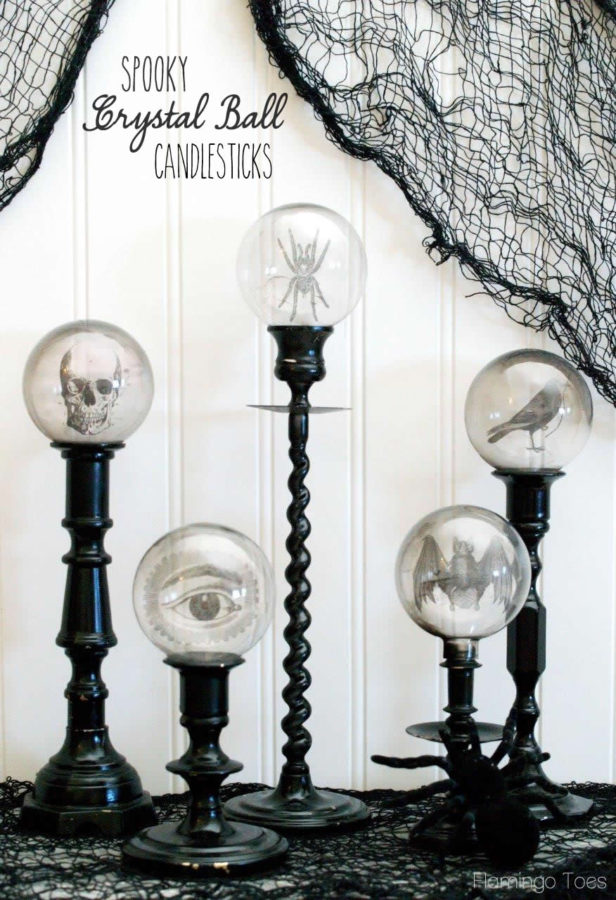
Get ready for Halloween with these DIY Spooky Crystal Ball Halloween Candlesticks! They are so fun and easy to make!
I have always been a huge fan of the Haunted Mansion at Disneyland. It is definitely one of my favorite rides there! I think it has inspired a lot of my Halloween décor too. I just love that spooky Victorian look!
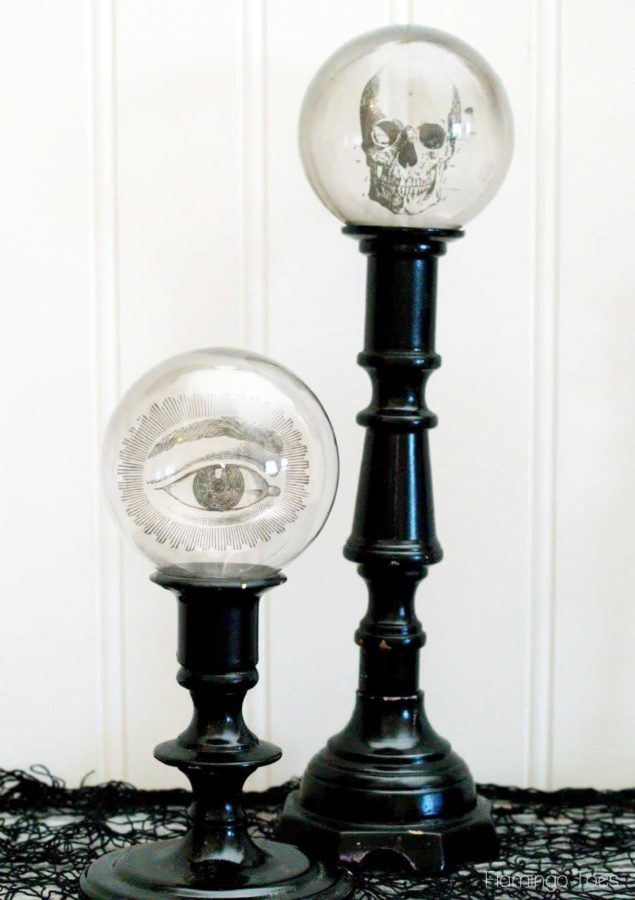
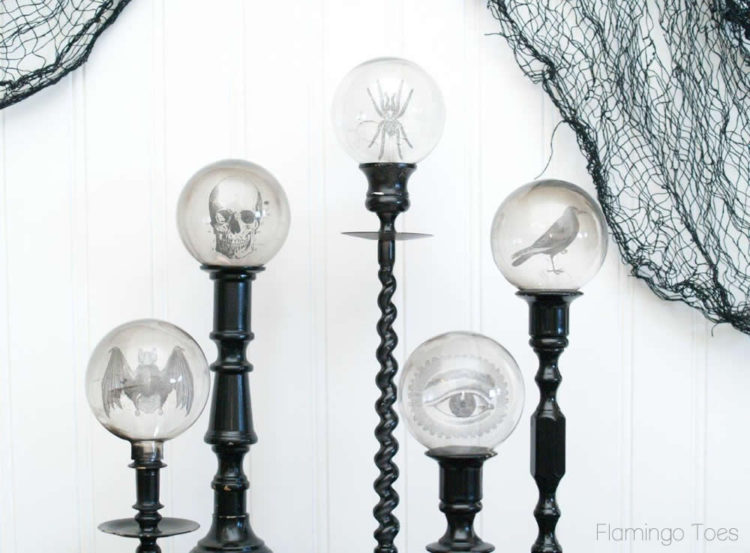
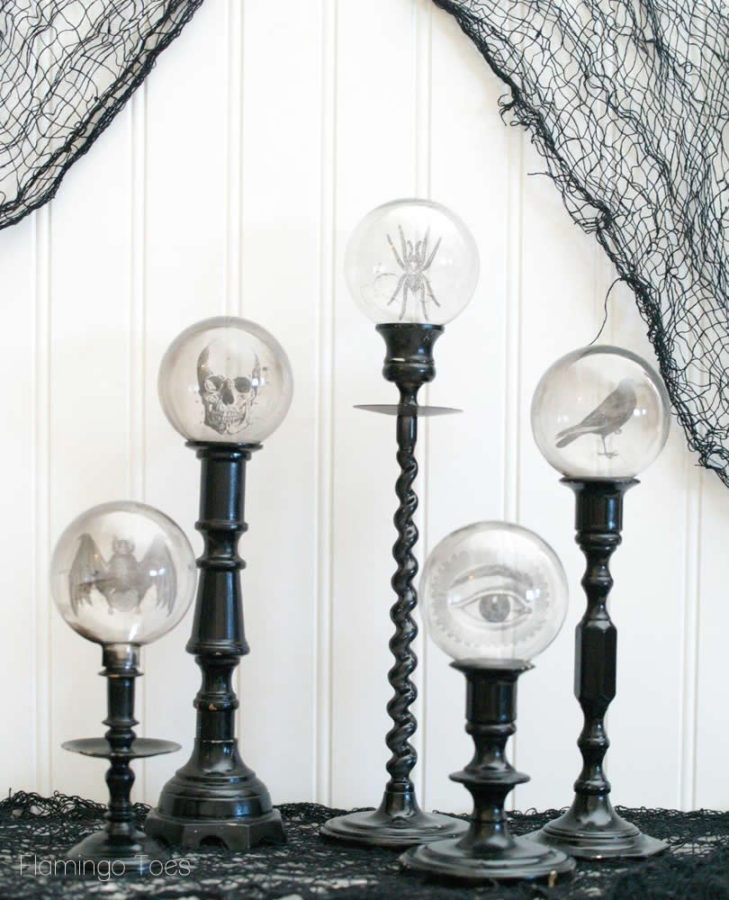
One of my favorite rooms in the Haunted Mansion is the Crystal Ball room and I’ve always wanted to recreate something similar! Well today I am showing off my new Spooky Crystal Ball Halloween Candlesticks!
They are super easy to do too! I love the floating images inside these Halloween candlesticks. So creepy!
All the images I used are from The Graphics Fairy. She has a fabulous resource of creepy old Halloween images!
So are you ready for a fast tutorial?
Spooky Crystal Ball Halloween Candlesticks
Here’s what you’ll need for your Halloween Candlesticks:
(this post contains affiliate links)
- Inkjet Transparency Film (I ordered mine from Amazon, the packs in my local Office Supply stores were pricey.)
- Candlesticks – use an assortment of heights and styles. I found all these at garage sales and painted them black. You can also check here.
- Black Spray Paint
- Clear Glass Christmas Bulbs – I used the 70mm size but anything close will work.
- Hot Glue
- Candle
- Crystal Ball shape pattern
Update #1: The amazing Karen from The Graphics Fairy and I have worked together to bring you the printable for the crystal ball shapes, along with the images in place! You can head over to The Graphics Fairy to download the Printable! Woohoo!
Update #2: Some readers have had trouble using the PDF printable without the images. You can download a .jpeg version of the blank pattern here – if you paste this into Word and then paste your images on top of it, that should work too! Hope that helps!
Start by deciding on your images for the crystal balls. I’ve provided a blank pattern for the shape for you, you’ll need to paste in the images you want to use. As I said earlier, I found mine at The Graphics Fairy – but you can use any image you’d like for a spooky effect.
Once you have your images in place, print them out on the Inkjet Transparency Film.
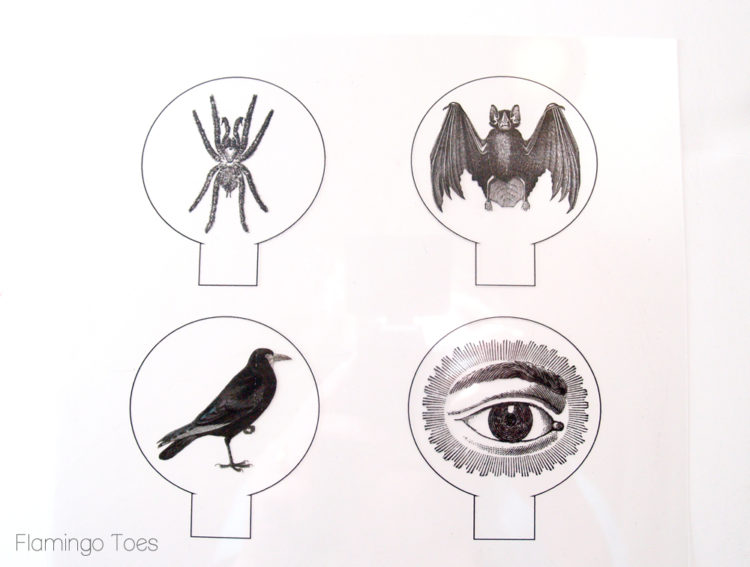
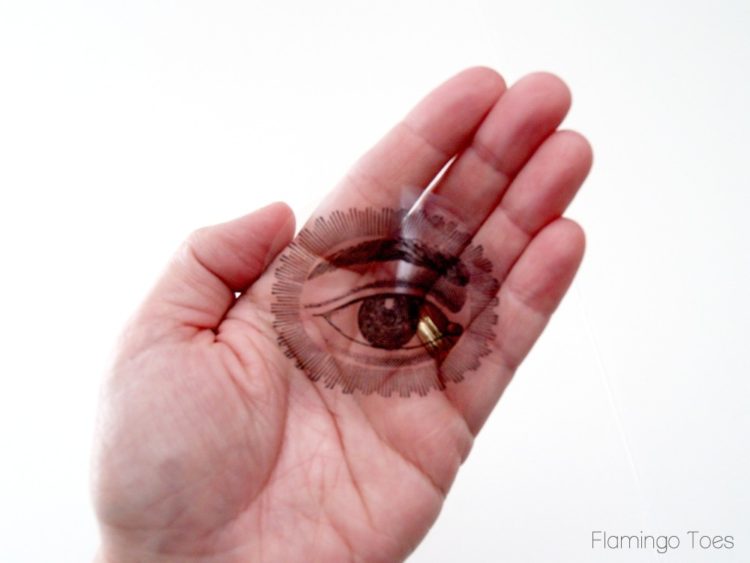
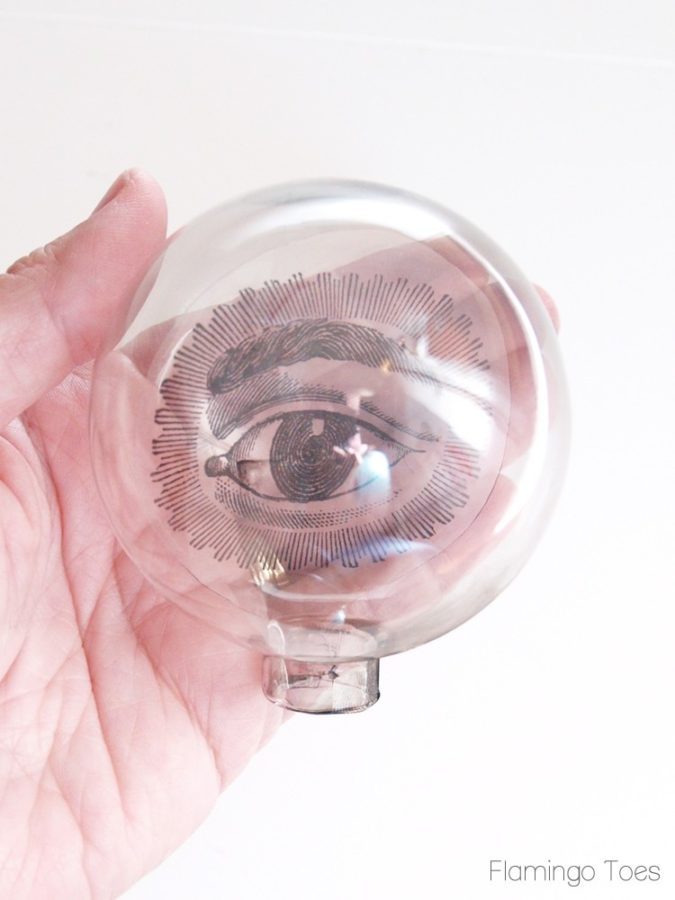
Cut out all the shapes, inside the black line. You will now have a clear image for your crystal ball.
Since crystal ball’s tend to be a bit cloudy, we’re going to add some smoke to ours to make them creepier, and to hide the transparency a bit.
I have some safety tips for you – seeing as you are going to be playing with glass and fire.
DIY Spooky Crystal Ball Halloween Candlesticks
- This is not a kids craft. (fire + glass + kiddos = not awesome)
- Use a candle, not a lighter or other open flame. Candles smoke more and won’t get quite as hot as a lighter.
- Light a candle and hold the opening of the ball just over the top of the flame. You’ll start to see the flame smoke and fill the ball.
- This will get hot. Add a little smoke, take a break and let the ball cool off, then add a little more.
- Don’t touch the bottom edge of the opening to see if it’s hot. Trust me. It is. (not that I would have experience with that or anything.)
- Do not hold me liable for anything that happens to you, your house, or your cats while you are playing with fire. K?
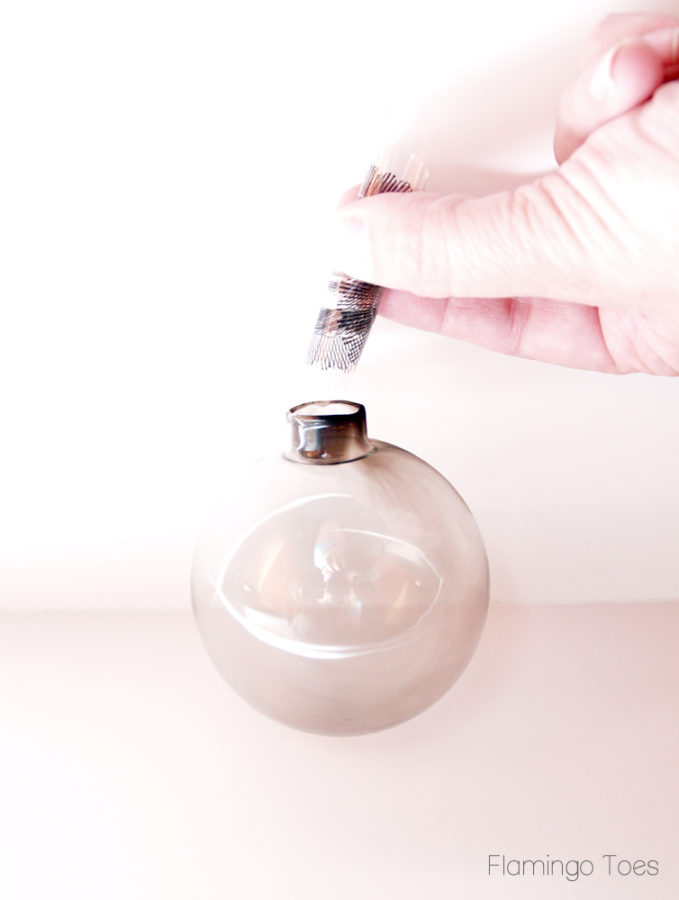
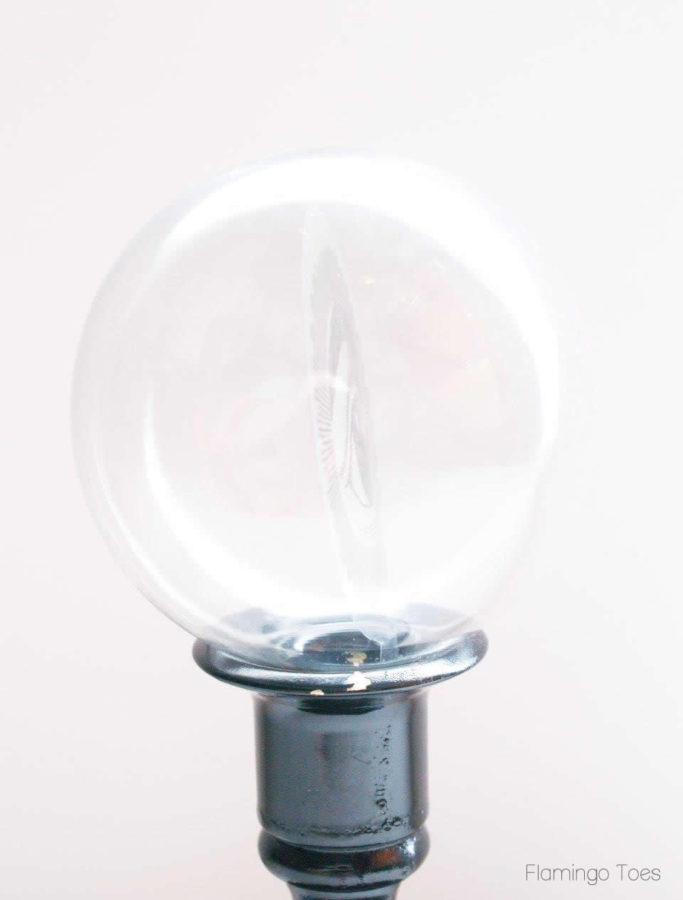
Fill your ball with smoke until it is as dark as you’d like. Here’s a regular ball, and one that I’ve smokified.

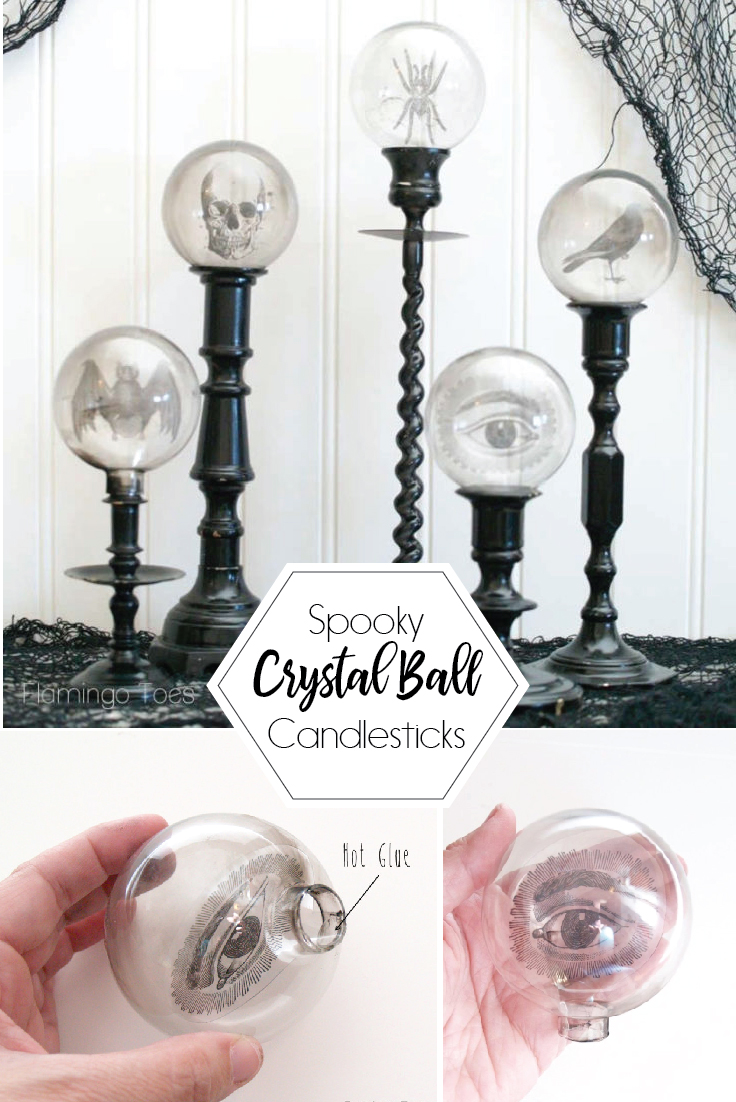
Once your crystal ball is completely cool, roll up your transparency image tight enough to slip inside the ball. Do your best not to touch the inside of the opening, it’s full of black stuff. If it does though, it’s not a tragedy. It will just add to the creepiness of the images.
To get the image to stand up straight and look right, add a tiny bead of hot glue to the inside of the front of the ball opening. Press the tab on the transparency that is in the opening onto the glue bead.
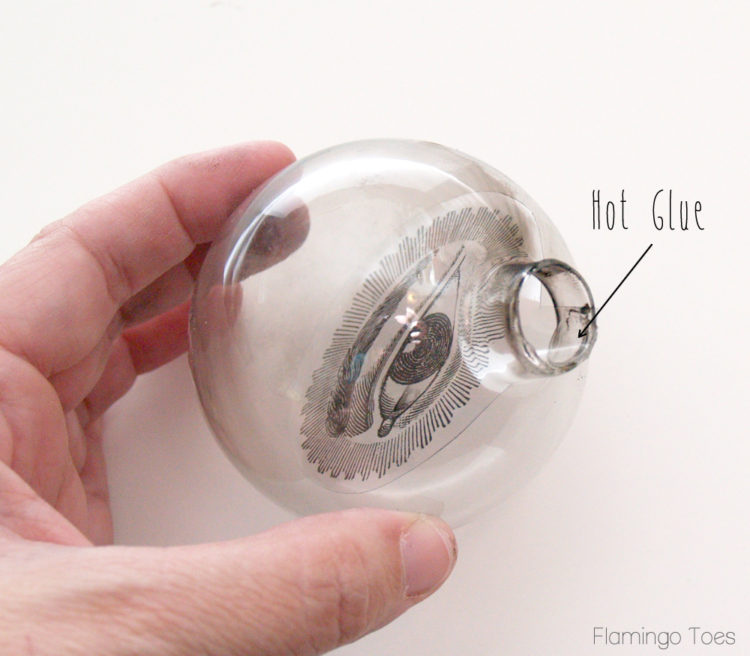
Awesomeness.
Now you can add your crystal balls to your Halloween candlesticks! If you have children, pets or husbands that are likely to bump, pick up or mess with these, I highly recommend gluing them into the candlesticks.
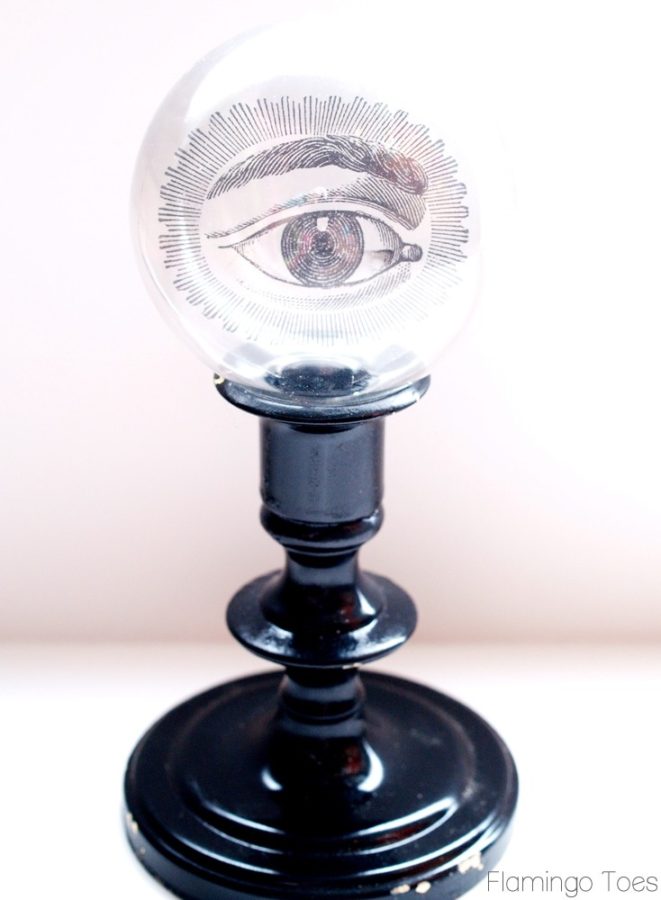
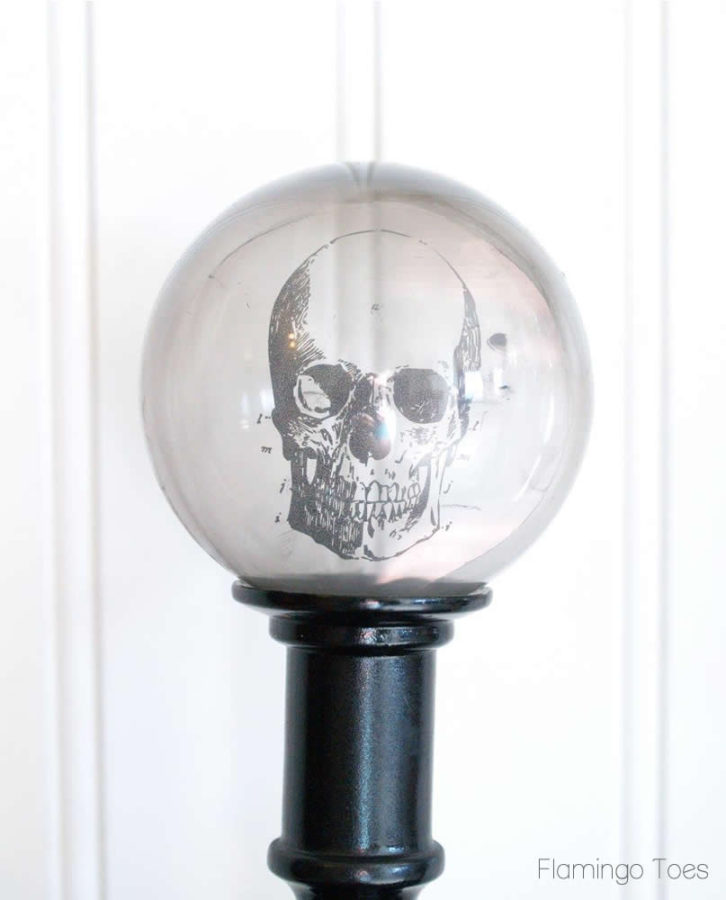
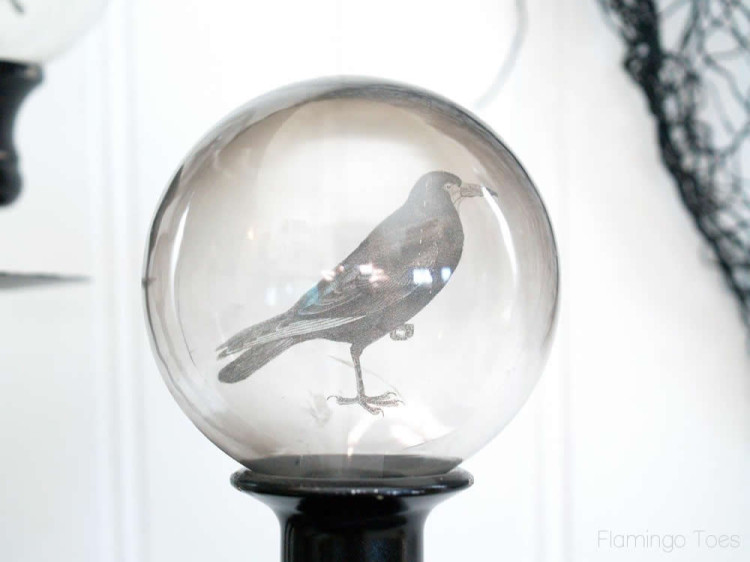
Here’s a side view – you can see that the transparency is hardly noticeable.
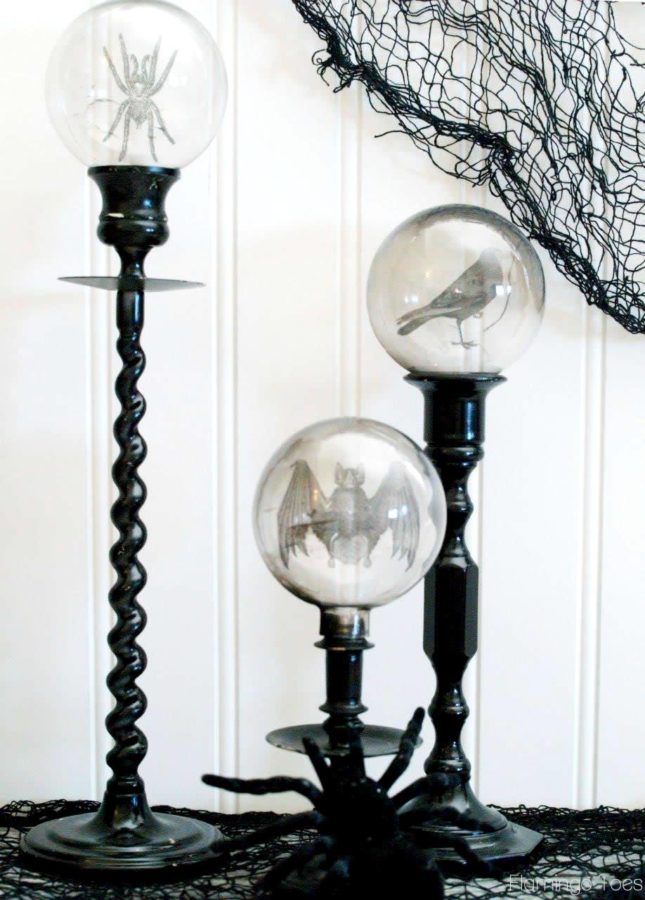
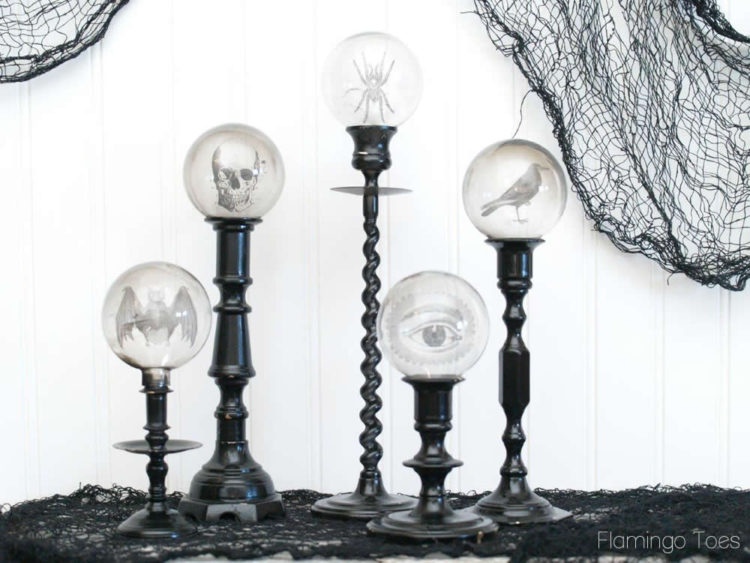
And here’s a front view of our spooky Halloween candlesticks! Now you can make as many as you’d like!
You can check out this skull version in my Poisoned Apple Entryway display!
I think crows are super spooky. All it takes is one viewing of The Birds and you’ll never be the same again.


TOTALLY and utterly AWESOME!!
I love these!
Thanks for sharing this project! Question on the supply list for the spooky Halloween candlesticks- it list a candle… where do you add a candle?
Thanks,
Deverie
You use a candle to get the smoky appearance inside the ornament. :)
This is such a cool project!
Oh my gosh, Bev, these are the coolest Halloween decoration I’ve seen!! I love these, and there are so many possibilities for the images you could use!! Wow, pinning and sharing!
You have killed it! Such an awesome and clever tutorial!!!! You ooze creativity and talent! Thank you so much for sharing!!!!
Has anyone told you lately how brilliant you are? Because it’s totally true. Awesome tutorial, awesome idea. I’m not a Halloween person, but I can completely appreciate this neato project. Very, very cool. *high five*
A- you make me laugh!
B- You Rock!
C- These are amaze balls, I love them!
jen
soooooooooo awesome!!!!!
You can do that same project in color too! I love it!
Simply fabulous! And you really gave great directions.
These are SOOOOOO cool, Bev!! Love them!!!!
This is so awesome! I love it! Thanks for the tutorial. Love the comment about “if you have kids or a husband who are likely to bump or mess with these”. LOL!
These are way cool! hanks so much for sharing with us!
Freaking fantastic!! Seriously. One of the BEST Halloween crafts I’ve seen.
I was so excited when I saw you posted the tutorial for this. AB FAB! These are “wicked smaht”
These are just so creeeeeepy cool!!! Thanks for the great tutorial…
This is a perfect project for halloween. I love the vintage spooky feel.
I LOVE this craft! Definitely putting this on my list of things to do. Goes perfectly with my black and white themed Halloween decor.
These are fantastic! I can’t wait to make some. Thanks for sharing!
These are amazing! I love it!
Bev this is so incredibly creative! Love it ;).
Wow – these are awesome! I have made recycled lightbulb crafts before and I use transparencies for crafts, but what an awesome way to combine the two! Pinning!
These are FABULOUS Bev!!! My fave Halloween project of the year hands down. Love!
Ooooohhhhhhhhh….I love this! And now you gave me another idea for my jewelry. I have a bunch of mini glass vials that I want to use up, I’m thinking I can do something similar to this. Thank you, thank you, thank you Bev!
I have plastic baubles and smoke-free candles, any suggestions??
Bev, these are FANTASTIC!!!! My favorite Halloween craft I’ve seen in a while!!
<3 Christina
I Gotta Create!
I can’t wait to make some of these & share them with my daughter! Thanks so much!
These are absolutely brilliant! i love them!
Bev, I love these!!! You never cease to amaze me! So clever and cute!
Wow, what an amazing craft! I LOVE these! I adore the Haunted Mansion at Disneyland, too, and this project is just amazing! I live in San Diego, too- Laurie from Gallamore West has had such nice things to say about you, I thought I would come check out your blog and say hi :) You have such great ideas!
This is one of the most original projects I have seen! I am a huge Haunted Mansion fan so this is on my “must do” list!
I love this, but I am having trouble pasting images into the crystal ball pattern. I can’t drag them in, either. Am I missing something?
Bev, I am hopping over from Snap to tell you I absolutely love these… They are so cute and my grandkids would think they were so cool… I am pinning this as I may have to try some of my own…. Thanks for sharing this – love it. Cathy
these are the coolest things i have seen in a very long time as far as halloween decor goes. really! i buy up candlesticks when i see them and make cake plate bases out of them but i have extra and would love to try this. my kids are a little older so i might try with them.
thanks so much for the awesome share. found you via google+ through another blogger and am following.
have a great rest of the week. come by and visit sometime. :)
Bev, These are AMAZING!!! This is possibly my most favorite Halloween tutorial EVER! Absolutely love it.
Genius! These are my favorite Halloween craft ideas yet. I must try these!
So love this idea! Something to look forward to for next year!
Wow! Best Halloween Craft of 2014!! Love it. Seems like I’ve seen a lot of the same stuff this year– cute stuff– but still… This, however, is completely unique & genius! New to your site from The Graphics Fairy. Where have you been all my DIY life! =)
PS: Creating the printable & fabulous, detailed tutorial was so generous. Thank you! Sooo pinning this…
Love this idea! One of the things I really like about it are all the different shapes of the candlesticks! Thanks for the tutorial – love the smoke idea, too!
What a great Halloween craft project………love these!
These are the most amazing things ever, you’re a genius!!
Fantastic idea! I can’t wait to try this.
Absolutely brilliant! Love, love, love this idea!
Just a stupid question, but are these plastic or glass ornaments? Thank you and brilliant idea!!!! : )
Not a stupid question at all. These are glass Deb. I didn’t think that plastic would do too well with the heat.
Thanks!
These are AMAZING! Thanks!
This was a genius idea. I love the look. It is very spook and probably looks great from outside looking in. Great tutorial.
How Clever you are!!!! Thanks for sharing!
I love these, you are so creative!!!
very very cool. i am going to try and make these this weekend. thanks for sharing :)
Oh my…………these are the best ever. So creative! Thanks for sharing.
Oh my goodness, Bev. These are fantastic! I went straight to Hobby Lobby, got the glass balls and transparencies and came right home and made them. They are wonderful. Thank you so much for the tutorial and for teaming up with Karen at the Graphics Fairy to provide us with the printable.
I have done the soap bottles with transparencies inside and if you’re only making a few, you can also go to the Office Max or wherever and have them photocopy your images on overhead projector transparency. That way you don’t have to buy a whole package of the inkjet transparencies (because they tend to be pretty pricey).
GREAT project!
Awesome tutorial! Thanks for sharing and motivating me to make my Halloween decor.
Awesome!!! Love It!!!
These have to be one of the most amazing halloween decorations I have seen, and since halloween is really big for my family I have seen tons!!! And so easy, these will definitely be on our list to do this year.
This is brilliant. Thank you! I would love to see this done on a bigger scale using a big glass globe! You know, like the ones you can buy for your yard. That would be epic! It would be just like the Madame’s globe from Haunted Mansion!
Wow! found my Halloween craft for this year- thanks soooo much! these are incredible and relatively inexpensive :)
These are seriously so awesome!! I’m totally going to make these. Thanks for the tutorial!
These look amazing!
These are such a great idea!! Pinned!!
Fantastic project; thank you!
These are legit!
Okay, they are seriously the COOLEST things!!! Ingenious idea and application, Bev. No wonder I’m seeing them all of the web!! ;)
Mind blown. This is master-level crafting right here. SO good!
Very cool! You are so creative!
These are amazing and I appreciate how clear your images AND instructions are…awesome job, thanks for sharing!
Oh these are fabulous!
Love how you used a candle flame to give them that antiquey look!
Best halloween craft this year!
Holy. I freaking LOVE these! Wow. Bev. Well done!
Those have got to be one of the best Halloween ideas I’ve ever seen, so incredible. You did such a great job. If I’ve seen those I don’t remember. Love the black glossy candle sticks also. Great post. Happy week
Awesome! I love this craft! These look amazing and super spooky, pinning!
You could use this as a springboard to other holidays and events….baby showers, weddings, birthdays….all you would have to do is change the items in the ornaments! Thanks for the idea!!!
I HATE Halloween BUT I ADORE THESE!!!! I want to make them so bad! You are incredible Bev!
HOT TIP – My local Officemax charged me $0.80 (that’s right folks, eighty CENTS) to print this out on a transparency for me. I simply called my local store. They gave me the email address for the print shop and I sent over the attachment. They printed it on transparency and had it ready in minutes! They called me and I picked it up!
I can’t promise every store will do the same but definitely easier than ordering transparency and printing it myself.
“Do not hold me liable for anything that happens to you, your house, or your cats while you are playing with fire. K?”
I love you.
(Oh yes, and these are quite possibly THE COOLEST Halloween craft I have EVER seen.)
These are SO awesome, Bev!! Pinned and will re-pin later too. Love these! xo
These are SO cool!!!
Again, you have shown us how creative you can be. This is amazing!
O M G these are fantastic!!!!! Prolly gonna add them to mai drunken Halloween Craft Party!! ty ty ty !
This is so cool! Love it. Thanks for sharing this idea. :)
These are perfectly spooky and would give a great haunted house feel to our Halloween decor. Thanks for sharing such a cool idea!
Like them?…… I LOVE these! Best new Halloween craft I have seen this year. I’m pinning and on the lookout for candle sticks.
Connected from Today’s Creative Blog link party and these are very neat. Feel like I am bringing my Walter White, chemistry teacher geek to mention that the black stuff is carbon.
Love, love love them. Thanks for sharing.
I noticed how Great of a Halloween gift this would be . And would like to purchase a few of them .
If you could sent me information where I can purchase them I would be thankful..
thanks , Bill Scott @ rstbenard1002@ Comcast.net
Que chulo!! La verdad es que está precioso!!!
Confeti en los bolsillos
You are wonderful at doing tutorials. This is the best explanation of putting transparency in a Christmas bulb that I have seen yet. I never could get how people did this until now. Thank you so much! And this idea is unbelievably cool. Thanks so much for sharing it.
Totally Awesome! Great Tutorial! Thank you for sharing.
I love the Disney Haunted Mansion too and this is such a fantastic DIY! Thanks for sharing. Would love for you to stop by sometime too:)
I am making these this weekend LOVE LOVE LOVE them Bev!! BRAVO!!
Seriously fabulous! What a great idea.
Thanks so much for the idea and all your hard work in bringing it to us. I loved the look of them for an empty candelabra that I had yet to find some candles for. This looks so much more Halloween.
I LOVE these! I’m doing a variation for work trophies this evening. Also, I found a great way to get lots of smoke in the bulb. Use the bulb like a candle snuffer and put out the candle with it. Doesn’t get hot and creates tons of smoke in the bulbs (which leaves lots of fogging and carbon behind).
Wow. These are amazing. Love them!! Thanks so much for sharing. Karen.x
this is soooo cool thanks for sharing
Loved this idea, got everything ready but my printer would not print on the transparency paper. I am going to Office Depot tomorrow and have them print it for me. Other then that I am ready to go. Thanks so much for this great idea. I got 2 old and very ornate wooden candle holders and it will look great in my haunted house. Thanks again, Kathleen
You might try using an incent stick for the smoke. It would be less heat and lots of smoke.
SO utterly awesome!!!!!
What would be the easiest way to resize these for a 4 inch ball?
Have you tried doing anything similar to this for Christmas? I was thinking, fill the ball with some glitter snow and a Christmas transparency.
Wondering if you sell them
These are super cool!!! I’m starting to get ideas together for 2014 Halloween crafts and this goes to the top of the list. I have some colored transparency paper that I think I’ll try with these.Thanks for the great tutorial.
where did you get your candle sticks, love the spider one!
You are one smart lady. I love this project!!
This can be used for any holiday. Love it!!!
Love the tute! Very well done & looking forward to more of your creativeness in the future!
Very clever… there’s so many things one could do with this! Aaaand pinned.
Hi just finished this awesome project. mine turned out great! Wanted to share something I learned. When rolling up and inserting one of the transperancies, I messed up the smoke inside. I poured a little salt in placed my finger over the hole and shook it. It removed most of the smoke and I was able to re-smoke it. (Like it never happened!!) :) thanks for the super great project! Love them
ran across this post on pinterest, and can not WAIT to try it out! Awesome Idea :)
Could you do this for Christmas with Santa, snowman, elf, reindeer, etc. faces? Somehow snowify the globe instead of smokify? I have no idea how; I’m asking you to figure it out. :-))Use gold, silver, red, or green candlesticks. Think it’s awesome & could look elegant as well as spooky.
These are amazing (and so are you!). I just love these!
I see great projects like this and wonder: why didn’t I think of that?
I can’t seem to print the size I need..the spider is huge even though I resized a thousand times…cool craft but not for dummies like me
Can someone please link me to a inkjet transparency? Thank you :)
Hi Bev, I love this project and have bought all the materials to do so, however as I try to smoke it, it will not turn black! It’s almost as if all the candles I have emit a white, instead of black smoke. Any suggestions? How long should I hold it over a candle before noticing a difference? Thanks, I’m excited for my new decor, I love Halloween!
Shoot Natalie – sorry it’s not working out! The only think I can think of is that the candles I used were pretty cheap – I think they were from the dollar store. So maybe that’s why they burned darker? I hope that helps!
Oooh – I thought of something else – I also let them burn a bit so the wicks were really black. That might have helped them smoke darker. :)
Thanks for the ideas. I don’t know if it’s the ornaments I bought, but the candles alone were not working. So I went outside and experimented:). I read that rubber bands let off black smoke… DON’T try it!!! I about set myself and my deck on fire! I found that as the candle was blown by a light breeze it gave off a black smoke, and for when it wasn’t blowing, a dry stick held at the top of the flame works wonders! Thanks again!
I bet you are trying with a soy based candle! Soy based candles are known to burn clean with out soot!
HELP! After printing the transparencies, do you use a fixative. The ink will not dry on mine. Do you need a special ink? I so hope you have a solution, because I love, love this project.
Hi Linda, So sorry you’re having trouble! Are you using regular transparencies? You have to use transparencies specifically for printing on. They make them for ink jet printers and laser printers – I picked mine up from Amazon. I hope that helps!
And you have to use the correct side of the transparency. I was a teacher and there was many a times I ruined the transparency by putting it in the wrong way. You could try going over the print out with a permanent marker if you don’t want waste the transparency.
seriously awesome and spooky as all get out..how many times did you burn yourself so i know how many bandaids to have on hand ha ha love this xx
I will be using this idea for our Halloween Party this year!! These are so cool! Easy too, Thank you, everyone will be so impressed!
Absolutely awesome! Have some clear ornaments left over from Christmas craft with the kids way back when so using them up this way is perfect! Thanks for a great tutorial!!
So bummed! I got everything ready and when I tried to roll the image all the ink came off my transparency! I read through the comments and found out my transparencies are for copiers (they are really, really old) not printers!
I’ll have to run out tomorrow and get the right kind.
Thank you so much, this is an awesome project!
Totally cool!!!!! Creepy and classy. Love just the eyeball in the hand picture! I remember from working in offices that you have to match inkjet transparencies with inkjet printers, and laser transparencies with laser printers. And for goodness sakes don’t put an inkjet trans into a laser printer because it will melt. Great idea to pair transparencies with glass balls. I think you could do this for different holidays, if you paired holiday images (thank you Graphics Fairy) with other colors of candlesticks, or glass ones. Thanks for the tutorial and pdf.
OMG, this is fabulous!!! I love the effect! Thanks so much for sharing this idea with us. Hugs, Kristina
i made these last night and they turned out so cool! A simply brilliant idea! The bulbs I found were bigger than the ones you used so I will probably try to figure out how to make the images larger next year…but, they are still way fun. Thank you so much for sharing this!
instead of a flaming candle, you could also light an incense stick, ensure it’s straight and let the smoke from that fill the glass, bit safer and works faster. Hope it helps.
Great idea Kayla!
OMG… BEYOND awesomeness!!!! Cool!!!
Thanks!
Made these tonight and they turned out great! Tip, make sure your bulbs will fit in your candlesticks. I wanted to use the larger size bulbs and enlarged the pictures only to discover the opening for my bulbs was too big. Luckily I had the smaller size on hand and was able to redo them.
Yes, I nearly had the same problem, luckily, my husband bored out the candlesticks enough to fit the larger globes he bought me…I just wish I had put 2 and 2 together while doing the images. D’uh, bigger globes, bigger holes, bigger images? Hello! LOL!
I did everything tonight! I painted the candle sticks in purple, used Cracking compound over them to make the vintage looking cracks and then pushed black into them, they looked good but…then I found some webbing spray in silver I had and sprayed it over the stick and now they are awesome!
I smoked my glass globes my hubby picked up for me.
I fought my printer to print the images and not just spit out the blank transparencies.
I got them cut out and….the balls he bought were 4″ not 2.5″ so the transparencies are very small.
Back to Photoshop to make them bigger!
Thanks for the tutorial, I know I will love these when I get them right.
This is so creative – I made a few for my Halloween mantle this year and have gotten a million compliments. Thank you for the tutorial – I linked back to it/you on my blog :)
I found this after Halloween, but I need to remember it! I think it would be cute to get images of snowmen, snowflakes, stuff like that, and add to green and red candlesticks for Christmas decoration also!
I got a bulb, but I can’t seem to get the bottom part off. Ideas??
Anyone try with plastic bulbs?
how wide does the top of the candle stick have to be
My transparency also just slid thru my printer and I finally taped a blank sheet to the back and it finally printed on it. I left it for a day to make sure it was dry, I wore latex gloves so I would not get finger prints on it when I rolled it up but all the ink smeared off anyway. Do you have any suggestions. It,s making me crazy! Please help if anyone can. Thannks
Are you using Transparency specifically designed for ink jet printers? There are two sides to those transparency sheets – one is rougher than the other and that is the side that needs to be facing up when printed. Here’s a link to the kind I mean: http://goo.gl/Dp1vnw/. Regular transparency sheets won’t work.
I believe you could also take the file into a copy store and have them run it on their transparency paper – most copy stores carry something like that.
Hope that helps!
This is so cool! I’m definitely doing this for Halloween 2015. What paint did you use on the candlesticks? Thank you!!
Thanks Sonja! I just used a regular glossy spray paint on them. Super easy. :)
If you have old colored round glass Christmas ornaments and a funnel, you can remove the metal cap from the ornament, pour in a small amount of bleach and slosh around. Viola! clear glass balls! Rinse out and let dry. You are ready to make your Halloween globes.
I’ve wondered how these spooky crystal balls were made. Thank you so much for the fantastic tutorial! I think my mantle needs a few of these this Halloween! Pinned to share and to refer back to when I decide to make them ☺
Hi again, I’m featuring your fabulous Spooky Crystal Ball Candlesticks this weekend at the DIY Sunday Showcase Party!
What a brilliant idea…these are amazing! Thank you so much for sharing at Share The Wealth Sunday!
xoxo
Lisa
I love this! so cool!
These are fabulous! They will be awesome at my family’s annual Halloween party and just great to decorate the house with! Love it!
So cool! What an awesome idea. I really want to make these now.
These are great!! I love them!!!
Thanks for sharing this great idea!
Hi Bev! I chose this as my fav link up from last week’s Teach Me Tuesday party. It will be featured at this week’s party starting Monday 7pm CST.
Thanks so much for linking up with us!!!
Have an awesome week ;)
This is so COOL!!! and easy too. I need that. Thanks for sharing on the #HomeMattersParty . I hope you will join us again next week.
Bev, these are so cool! I love black candlesticks, I already have a few, I’m wanting the tall spindly one, it is so gorgeous! I am so impressed with your creativity, this is the perfect Halloween decoration! Love them.
Has anyone done these with using just regular white printer paper? Im sure it doesn’t look quite as spooky…. but does it look terrible? I really want to make these but im trying to budget all my crafty ideas! Thanks.
Wow. Just wow.
Very cool. I’ve yet to see any Halloween crafts like this. I love how you can customize them with the images!
Bev, these are really cool! I need to find some bulbs… Pinned! I would like to invite you to share at the party http://sweethings.net/oh-my-heartsie-girls-wordless-wednesday/
Hugs,
Pili
Hey, Bev! Just wanted to let you know that we loved your Spooky Crystal Ball Halloween Candlesticks so much when you shared it at the #HomeMattersParty last week, we’ve FEATURED it THIS WEEK! Hope you can check it out when you get a sec! Happy Friday!!! http://lifewithlorelai.com/2015/10/08/home-matters-linky-party-58/
~Lorelai
Life With Lorelai / Home Matters Linky Party
Those candlesticks are so cool!
Those are amazing!!!! I love how it looks so difficult, but your breakdown makes it seem easy. Cannot wait to try!! #HomeMattersParty
I found your tutorial on Pinterest; this is absolutely fantastic! Thank you so much for sharing such a wonderful Halloween project! Your instructions and photos were perfect, and I made the spooky crystal balls and found some candlesticks at Michael’s and Hobby Lobby that were on sale. Everything came out great, and I have received several compliments on these. The only thing I had some trouble with was when I put a small bead of hot glue on the opening of one of the glass balls, the neck broke–I found that my transparencies stayed put on their own, so that problem was solved. Thank you again for a great tutorial!
My wife and I made these and everyone thought they were cool.We are holiday freaks anyway so this was right up out alley so to speak. THANKS !!!
I think I love you. You just made my Halloween party 20 times cooler and I am going to use these for Divination class at my Harry Potter party. Thank you!
Ok so I’m like the millionth comment but you are a genius!
I too love the haunted mansion at Disney!
Thanks for an awesome idea!
Michelle
Bev great shared just pinned thanks for sharing with us over at Turn it Up :)
These look like something you’d see in Pottery Barn, very cool!
These are spooktacular~! and really awesome looking.
Paulette
Wow, these are SO cool, I love them!! Thanks for linking up at Craft Frenzy Friday!
Tania
These are great! So spooky and fun. Thank you for linking up to The Creative Exchange. We are featuring your project this week.
xo,
Laura
Wow, I’ve learned so many things! Transparency film, crystal balls, and best of all the smoke effect- SO cool!! Thanks for sharing, #HomeMattersParty
This is a great project – thanks so much!!!
I got plastic bulbs and candle holders at Dollar Tree and whipped out 4 for $8. For another $4 I got some silver glitter bulbs in the xmas section and made these displays
http://www.flickr.com/gp/hippiechickbakery/1890W5
http://www.flickr.com/gp/hippiechickbakery/uJVsUm
http://www.flickr.com/gp/hippiechickbakery/DQ27i2
My bulbs were larger than yours and I didn’t have time to resize the pics, but I think they look OK even with the smaller pics. I will probably change them out next year for bigger ones
Those turned out great! It was super smart to use items from the Dollar Store!
I love those, Bev! Brilliant idea!
Thank You for sharing I am making these for our wedding reception on Halloween. They are perfect!
I gave these a shot but used regular glue because I couldn’t find my hot glue gun. Big mistake, after a week, the glue fumes has made all of the ink slide off the transparencies and into the base of the bulb! WHOOPS! That’s what I get for not following directions. They looked great until then!
These candlesticks are awesome!!
Hi!
I love this craft! Am currently in the process of making it! But, quick question!
Because the ink jet printer ink doesn’t really dry on the transparency film, how do you roll the film without the image getting completely smudged and rubbing off while putting it in the ball?
I hope there is a trick I am missing!
Can’t wait for the finished product!! :)
Hi Molly,
I’m sorry you’re having trouble! Are you using Ink Jet transparency? It’s made specifically so the ink will dry on it. I think that might be it? I didn’t have any trouble with the ink smudging. Hope that helps!
Do you think you could use the plastic ornament balls from Dollar Tree instead of the glass?
Hi Natalie,
I wouldn’t recommend that if you want to do the smoky effect with the candle, the plastic would melt. If you skip that part you could definitely use the plastic ornaments! :)
This is great! I am going to try it and Pin it.
I absolutely love these! I would love for you to come over and link up to the Hauntingly Beautiful Decor Halloween Link Party at http://www.followtheyellowbrickhome.com. You can link up all through October, old or new posts. I really enjoyed this tutorial!
Love, love, love these candlesticks. What a great project.
Thanks for sharing at Over The moon party.
Hugs,
Bev
Hi!
LOVE this project. Can you give me a bit more info on the smoke? I understand HOW you get it into the glass, but does it stay in the “globe” or just “stain” it smoky? If the actual smoke stays in the globe, how long does it last….do you know?
Thanks!!
Christy
Hi Christy!
The smoke just stains the glass, kind of like it would on a window or a if there was something too close to a candle. So it’s permanent! You don’t have to worry about it fading unless you accidently wipe it off when you put the transparency in.
Hope that helps!
Bev
Perfect! Just what I wanted to know :)
This is so clever. I have no idea how you came up with this idea but it’s amazing. Thanks for sharing!
No mention of how to fit the bulbs
These are fantastically spooky and so creative! Thanks for linking up with Merry Monday; I’ll be featuring this project at our upcoming party. Hope you’ll stop by and link up again!
This is such a great idea and I love how you created these! I love how creepy they look. Pinning for future reference.
These are absolutely brilliant, no, make that BRILLIANT! I must pin this. And I don’t even like Halloween. This is just maybe enough to convert me, lol.
Rita C at Panoply
FANTABULOUS! Quick question. Do you think these will show up outside on a table barely lit or will I need to keep this in a well lit area so they’ll show up? Love this idea!
I love the IDEA of this, but I tried it and my Christmas ornament (the same one shown in this tutorial) melted rather than smoked.
These came out fabulous! Thanks so much for sharing the idea!
What a fun project! Neat placing the images inside.
Hi Bev. What a fabulous idea for Halloween! The candlesticks look sensational. Thanks for sharing. I’ve included your tutorial in our Top 10 in Halloween Crafts roundup. https://craftylikegranny.com/halloween-crafts/ Our readers will love it! Cheers Jodie :)
Great Halloween craft idea I love black and white as Halloween decorations.
These are awesome! I just love them!! Thanks for sharing with SYC.
hugs,
Jann
Thank you for such awesome directions and links… so tired of DIY’S that leave so much guesswork in the to-doing! FANTASTIC!
Hi, I wanted to feature these at SYC tomorrow, but I’m not seeing a link back to the party. Sorry, but that is a requirement to be featured.
hugs,
Jann
These are about the cutest scary things I’ve seen and your are so creative! I’m inspired!!! Thanks for sharing at What’d You Do This Weekend?
Wishes for tasty dishes,
Linda
Thank you so much for the tutorial! I love it and made my own. My sister is also making some for her mantle.
Do you have to use glass christmas bulbs or can you use plastic?
omg. so happy i stumbled upon this project. My son is having a halloween themed wedding in Salem, MA this October and we are making 18 of these for table decor. I have had the best time finding the images and collecting the candlesticks (although harder than i thought out here in California. My daughter had much better luck in Chicago). Everything has worked like a charm except for two things. I ended up using my paint program (Windows 10) to overlay the images on the ornament template as my Word won’t save as a jpeg so i wasn’t able to adjust the ornament size on the template in word or overlay the images. (needed to use some 80mm and 100mm ornaments as the 70mm were to puny for some of my candlesticks) Also, you need to find good old fashioned candles that smoke! The dripless ones do not. I had a few “incidents” before i realized my candles wouldn’t work. Like others on this comment thread i ended up using matches and it was a cinch. Wish i could share a picture of our creations!
These are so awesome!! You did such an amazing job of making this a fun and easy craft. Thanks so much!!
where can i buy the crystal balls
You can find them here on Amazon: https://amzn.to/3l0qsaO
Bev, OMG these are fantastic! I have to make these so pinned! Love Graphics Fairy as I have used bee and peacock images to create theme party invitations. Thank you for the detailed tutorial too — love how you added the smoke. Found you this morning after Rita of Panoply featured the candlestick balls for our Halloween tablescape blog hop.
OHH wow these are fantastic its looking so cool am really like it , its full of fun thank you so much for sharing these content and amazing ideas with us . You made our party full of fun
I just stumbled upon your blog (saw this project on the Graphics Fairy site) and I am soooo excited to make these! THEY ARE THE COOLEST! And, haha, you mentioned you like the Disneyland Haunted Mansion – That is precisely my vision for my own Halloween decor! No wonder this project caught my eye. (around these parts, I’m known as the “Halloween Queen” – or Halloween Crazy Woman, Hmmm….) Thank you so much for sharing your creativity & talents with the world!
Well this is too cool! I can’t wait to try it. I think I’ll try using Palo Santo or incense to add smoke without a flame. Thanks for the amazing idea!
I love it, very creative.
This is just what I have been looking for, something a bit different but also stylish. Fantastic idea and clear description of what is needed and what to do. I’m happy to have these on display always, not just at Halloween because, like you, I like the creepy Victorian styling. I hope mine work out as good.