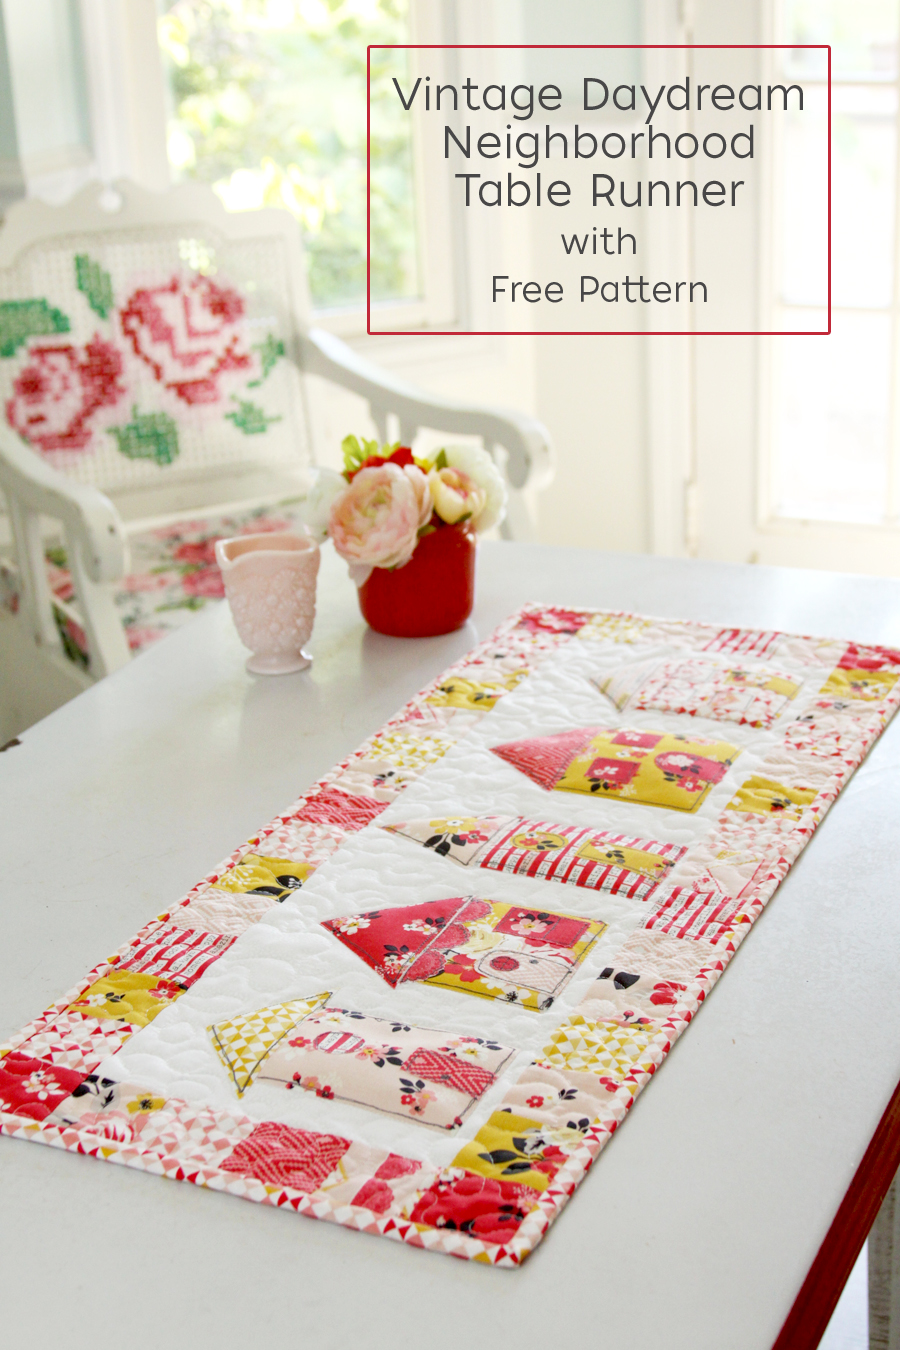
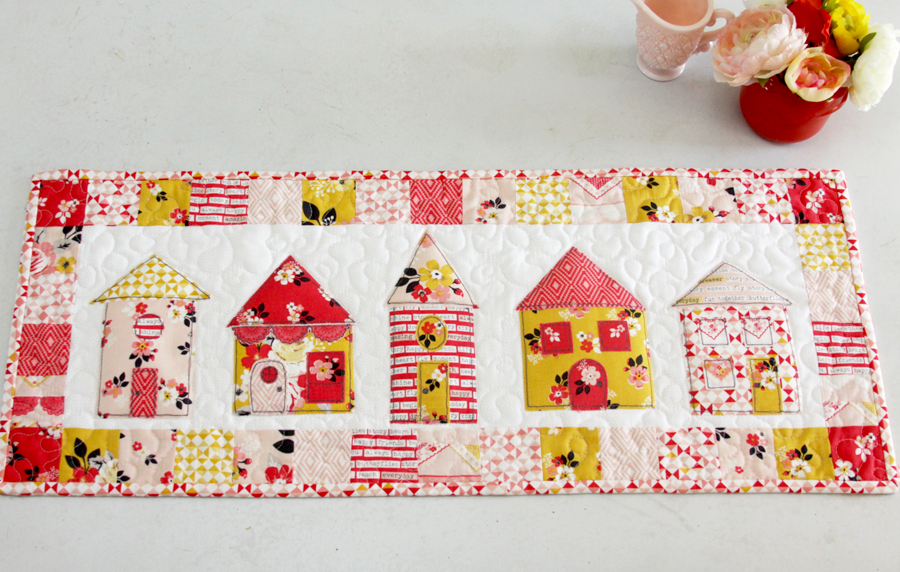
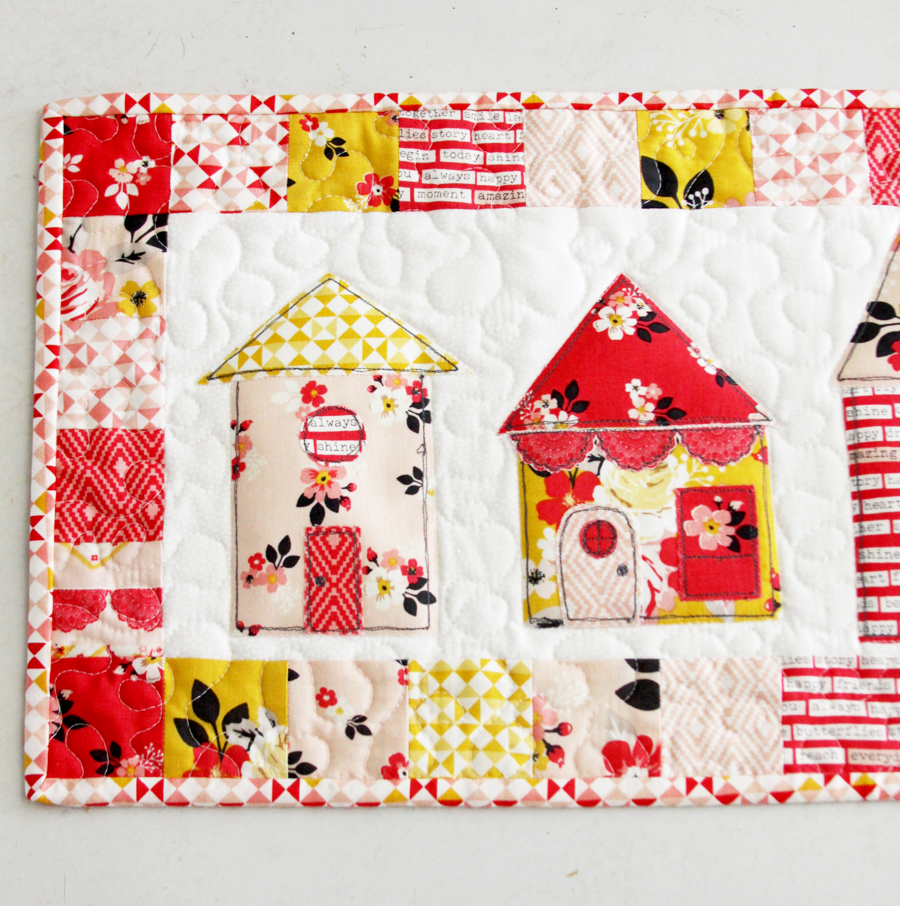
I have been on a roll lately making things for my cute little enamel table in my kitchen – so many in fact that I need to put them on rotation so I can use them all. Totally a good problem to have. I’m super in love with my latest project – this sweet Vintage Daydream Neighborhood Table Runner!

I used the Vintage Daydream fabric line from Riley Blake and I realllllly love the colors in this! There’s something so pretty and vintagey about pinks and mustard yellow. Add in florals, pretty buntings and little phrases and you have a super cute vintage style fabric!
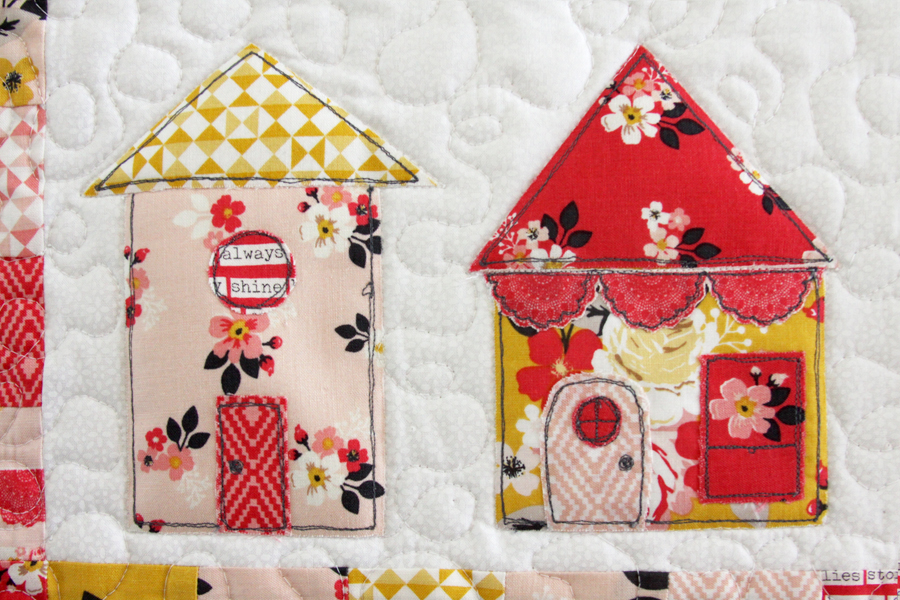
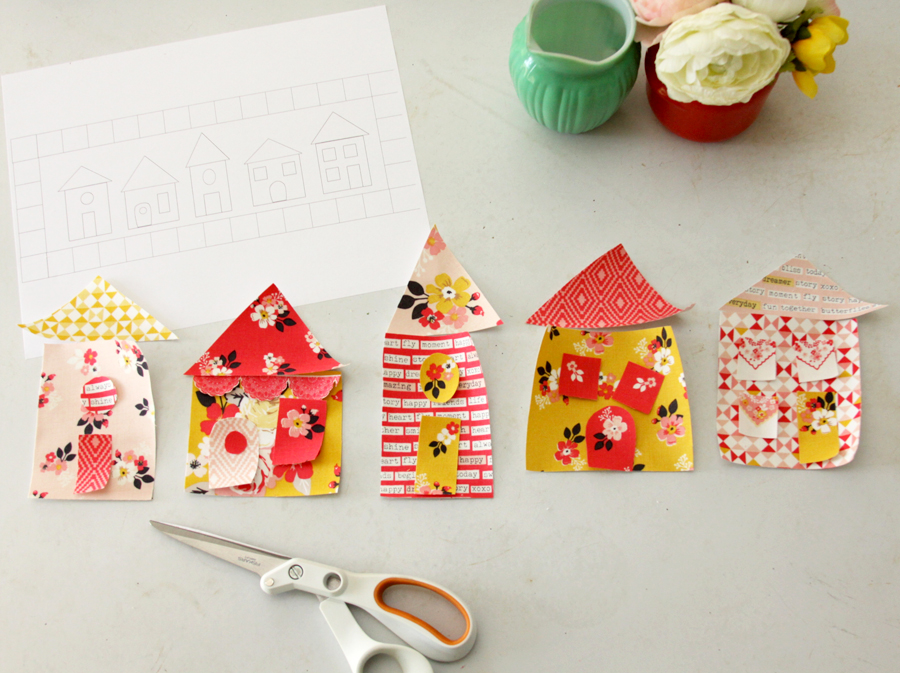
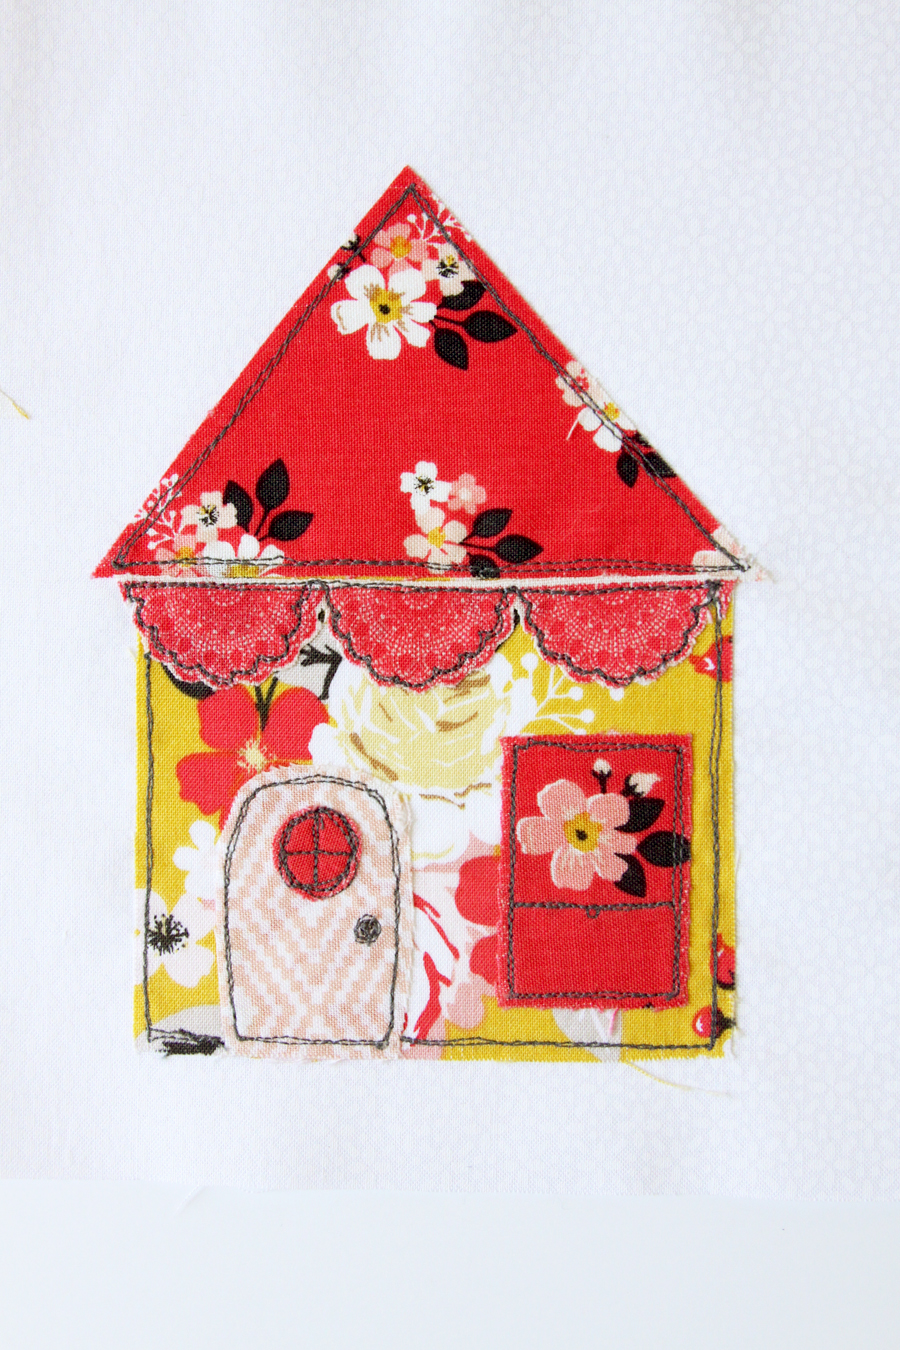
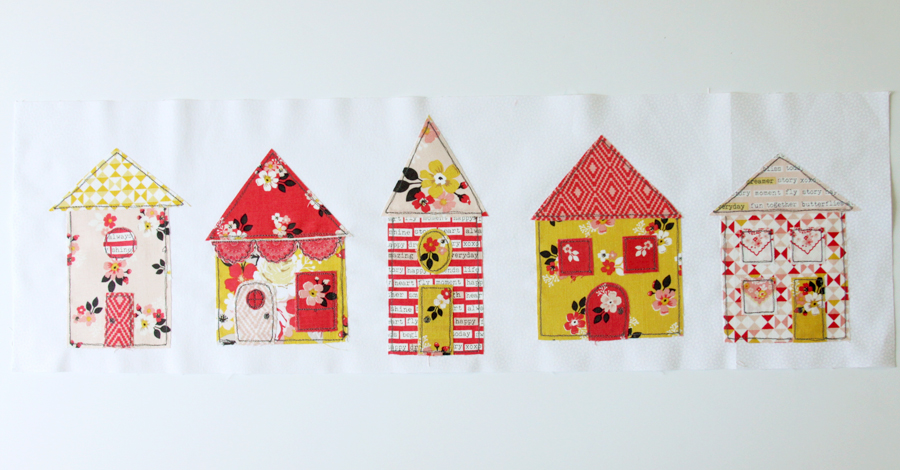
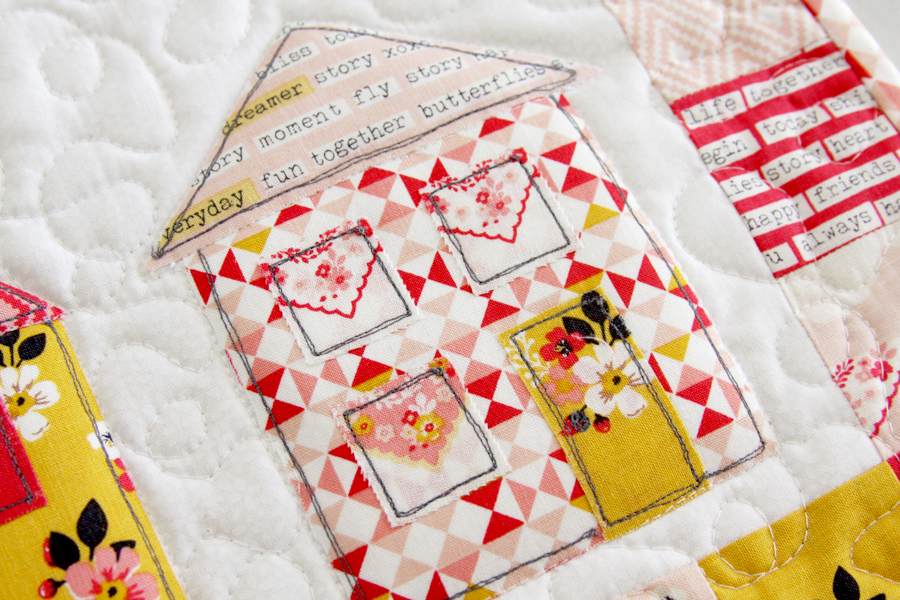
I made the little houses with applique so you don’t have to worry about piecing them and they all have fun little details for the doors and windows. There are so many cute elements in the fabrics that I had a blast fussy cutting them all out!
So let’s get started! Here’s what you’ll need:
These are affiliate links (that just means that if you make any purchases from these links that I’ll receive a small amount – but it doesn’t cost you anything extra!)
- Vintage Daydream 5″ Stacker
- Vintage Daydream Geometric in Pink – 1/4 yard for binding
- Riley Blake White on White – 1/4 yard for background
- Vintage Daydream Aztec Gold – 1/2 yard for backing
- Heat-n-Bond Lite Adhesive – 1 yard
- Batting
- White and Gray Thread
- Table Runner Layout and Patterns
Finished Runner Size: 11 1/2″ x 28″
For your fabric pieces cut out:
- From the white background fabric – one piece 8 1/2″ x 26 1/2″
- From the stackers – 38 pieces that are 2 1/2″ x 2 1/2″ square
- From the backing fabric – one piece 18″ x 36″
- From the batting- one piece 18″ x 36″
- From the binding fabric – 3 strips 2 1/2″ x width of the fabric (wof)
The beauty of the 5″ stacker is that you get lots of different fabrics for the houses, roofs and windows! To start off decide what you’d like for each house. Cut a section of fabric a little larger than your pattern and iron the fusible webbing to the wrong side of the fabric. Cut out the houses, roofs, windows and doors.
Remove the paper backing from the houses and iron the houses and roofs to the white background fabric. Make sure you space the houses evenly and about 1″ away from each short side. Remove the backing from the doors and windows and fuse these in place on the houses.
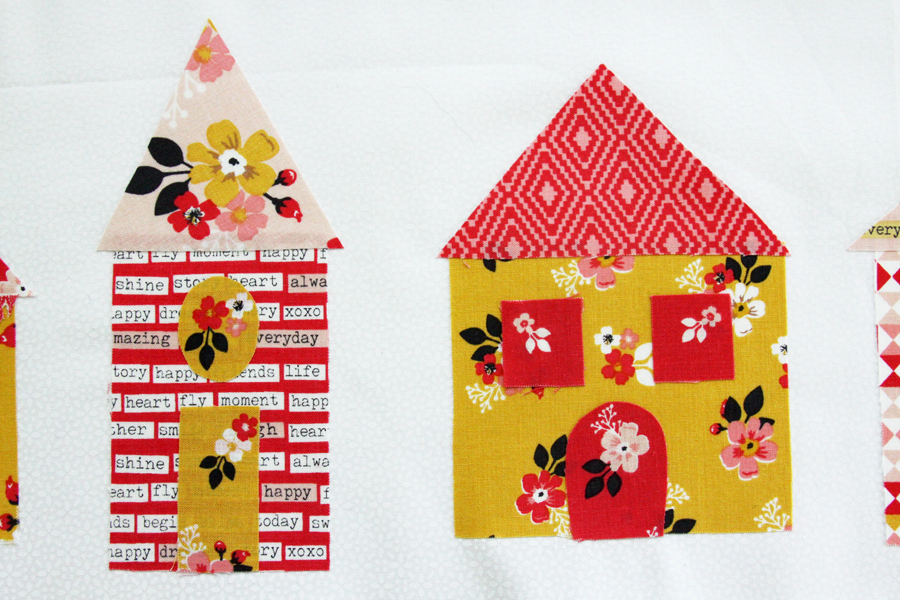
Using a contrasting thread, stitch around all the fabric pieces. This will be a little easier if you use a free motion foot, but you don’t have to if you don’t want to. :) Sew around each of the elements a couple of times to give the stitching a “sketched” look.
Repeat for all the houses on the runner.
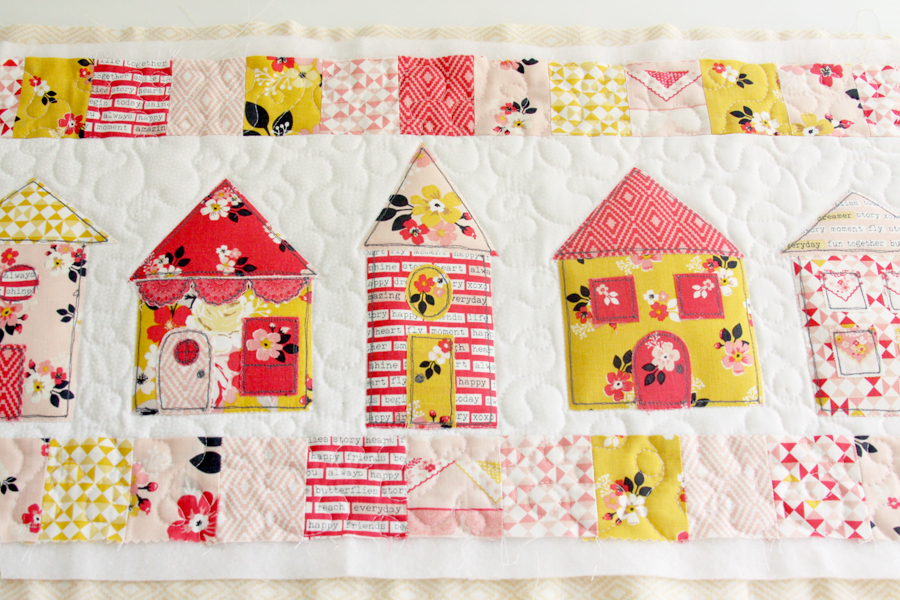
Sew the borders next using a 1/4″ seam allowance for all the little blocks. To make these, sew two strips of 15 squares and two strips of four squares. Sew the strips of four blocks to each short side of the runner. Sew the two 15 square rows to the top and bottom of the runner, lining up the end blocks with the blocks on the sides. Press all the rows away from the center section.

Layer this together with the runner top, batting and backing fabric and pin together. Quilt your runner as you want – I used a small meandering pattern everywhere except for the houses. I outlined the houses as well. I think this runner would look super cute with hand quilting around the houses too!
Trim the runner to 12″ x 30″ and bind the quilt using your favorite method.
Now you can show off your cute new runner!
I think this would be a sweet little mini quilt or a gift for a friend too!


Pretty adorable!! Thanks for sharing.
I love the runner. Is there a house pattern?
I love it! You give me so much inspiration to get busy on cute projects for my home. Thank you for sharing your creativity!
So cute-I would definitely enjoy making this! Thank you for sharing, Susan
I love this so much Bev! I so look forward to your emails each week!
Just love your runner. Hope to make one for a friend who had a lot of house damage in cyclone Debbie (Australia). Has a new kitchen installed so this would be a lovely celebration addition. Thankyou so much for sharing your lovely pattern.
love this Bev:) want to set my sights much lower for a beginner as holiday gifts but this is a great example for the future. Really love your ideas!
Hi Bev,
Thank you so much for this pattern, I have a girlfriend who is going to love this. She doesn’t sew, but maybe this will put that bug in her ear. lol
Love house blocks. This one is adorable.
Thanks a million for sharing with us. My daughter is expecting at the end of January and I’m sure I’ll manage to convert this to a size that will fit into a crib. (The theme for the baby’s room is houses)
Lynn
I have a friend who will be moving into their first home in a month, so this would be the perfect house-warming gift! Thank you!
Wonderful idea (perfect gift if you ask me)…love the vintage style so much.
This is gorgeous. I love the motif and beautiful colour combinations you chose. Pinning.
Bev this is a great tutorial and the runner came out perfect, I love the color combination!
Thank you for sharing on #OMHGWW this past week!! Ive pinned to share!
Hope you will enjoy the rest of the long weekend!
Just love your runner. Hope to make one for a friend who had a lot of house damage in cyclone Debbie (Australia). Has a new kitchen installed so this would be a lovely celebration addition. Thankyou so much for sharing your lovely pattern.
Hi, thank you for sharing. Just finished making it today, and it super cute. love it. I’ve done my in fall colors.
I love this adorable little table runner! I think I’ll just have to make one for myself.
Thank you for sharing. Might try this in Christmas prints as well. Santa’s Village. Love house blocks.
Great tutorial, thank you so much. I love house projects and your’s invites “playing” with the details on the houses. That is something I really find fun.
Just finished a “terra cotta” village runner, it’s 43 inches long and 5 inches tall, I sewed it on the bottom of curtains. Fused and fused and fused! Oh, fused some more! Inktense pencils rescued me ! Had a whole bunch of fun and now I do NOT want to think of houses but I will save this for future. My project took forever, but this one looks a tad less intense.
Thank you for the inspiration.
Maggie
Es sencillamente adorable, amo todo trabajo en patchwork qe lleve motivos de casitas…. estoy trabajando en este patron espero bonitos resultados… muchas gracias es una labor gratificante. Un abrazo desde mi linda Colombia.
Hola, hace 17 año que hice mi trabajo , lo que iba hacer un cojín, al final fue una colcha y después siguieron algunas más,todos mis nietos tiene una.
Yo no tengo maquina y todo lo hago manual, que fue como me enseñaron.
Me encanta sus trabajo, estoy subscrita hace mucho tiempo. Gracias
Un saludo.
Exactamente hace 10 meses hice est hermoso corredor de mesa. Lo hice baastante grande, Ahora volvere hacerlo exactamente del tamaño del patron y con telas diferentes, muchas gracias desde Colombia.
Can Zi ask where the template for the houses is, as I am interested in making this!
I really love this little table runner, thanks so much for the pattern!
Your table runner is adorable! I can’t wait to make it. Thanks for post telling all about it.