Are you into your holiday baking yet? I am going to be starting mine this week! I’m so excited!
Do you have a special treat that you make every year? We have a couple that are favorites – but we like to change it up every year and try new ones. I think something with chocolate and peppermint is a must this year. :)
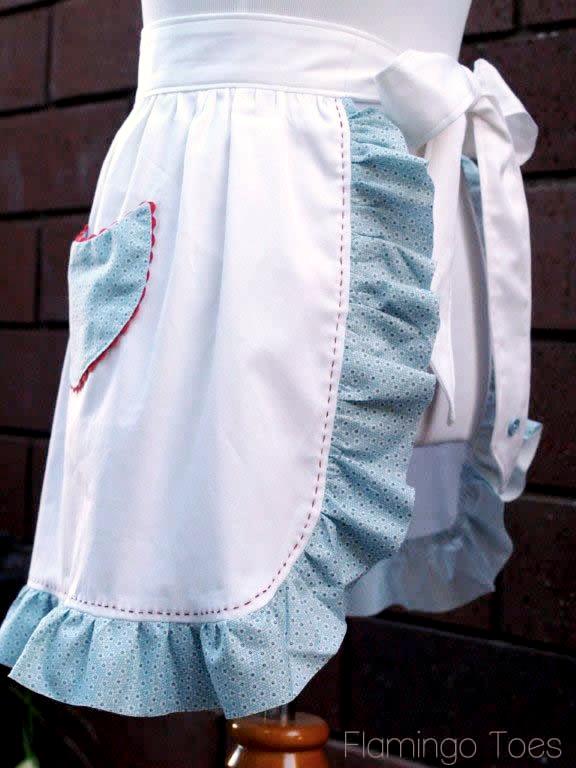
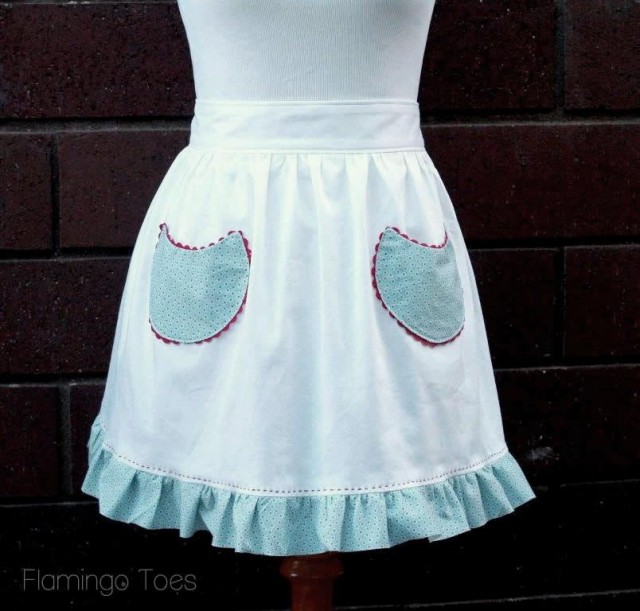
To get you in the mood for you holiday baking, I have a sweet little apron for you today! It would be great to wear while you’re whipping up some treats for the neighbors – or to give as a hostess gift at a Christmas party!

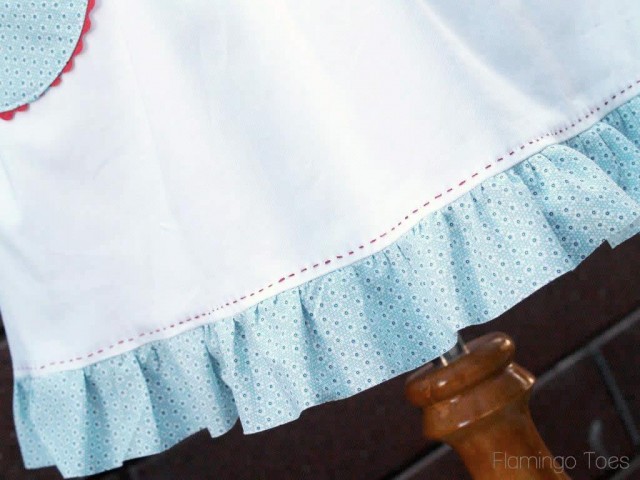
It has cute circle pockets edged in rick rack (which if you know me is no surprise – I’m kind of addicted) and it’s finished with a little bias ruffle and embroidery thread.
Here’s what you’ll need to make your own:
• Main Fabric • Cut 1 piece 13″ x 32″ • Cut 2 pieces 3″ x 20″ • Cut 4 pieces 3″ x 28″ • Accent Fabric • Cut on bias – 2 1/2″ 80″ (or piece together enough for length) • Cut out 7″ circles for pockets • Contrasting Rick Rack – 1 yard • Embroidery Thread • 4 Coordinating buttons
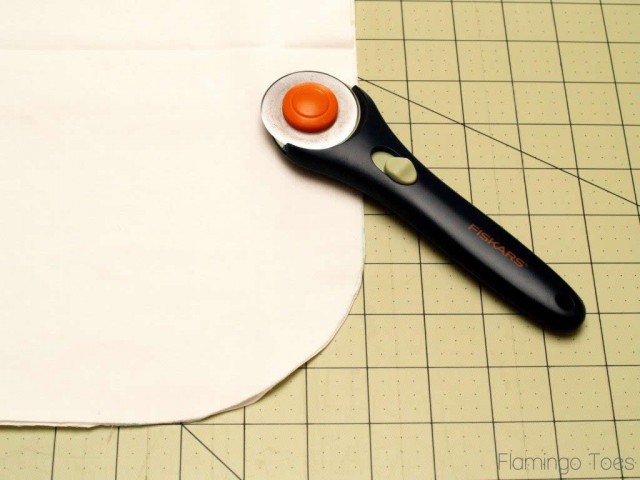
Begin by cutting out all your fabric pieces. For the main portion of the apron, cut the two bottom corners into curves. You can use a little bowl as a guide for the shape.
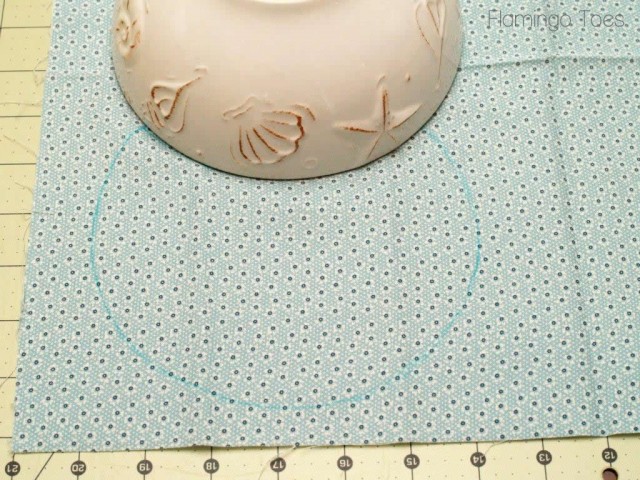
To cut out your pockets, use a circle shape (or a handle bowl) that is about a 7″ circle. Trace the bowl, then move it up about 5″ and trace the bottom curve again to make the top, curved section of the pocket. Cut out 4 of these.
Baste rick rack on to two of the pocket pieces, about 1/4″ from the edge of the pocket. Overlap the rick rack at the bottom.
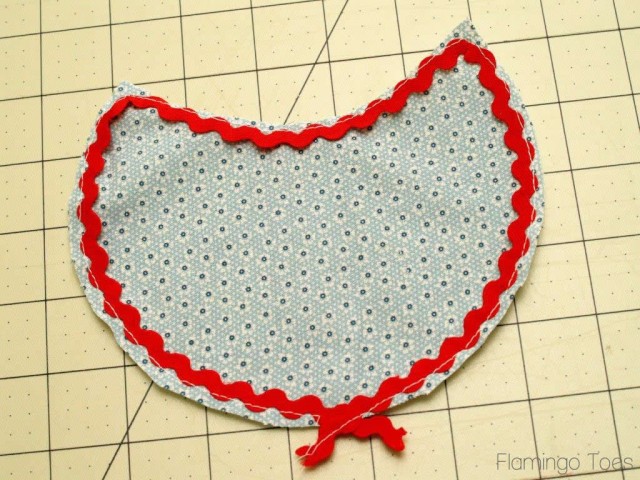
Lay the pocket piece that doesn’t have rick rack over this, right sides together, matching up the curves and points. Sew the pocket pieces together with a 3/8″ seam so the basting stitch doesn’t show. Leave a 1 1/2″ opening for turning. Clip the corners and curves and turn right side out. Press.

Do any piecing of your little bias ruffle now, then sew a gathering stitch along the top.
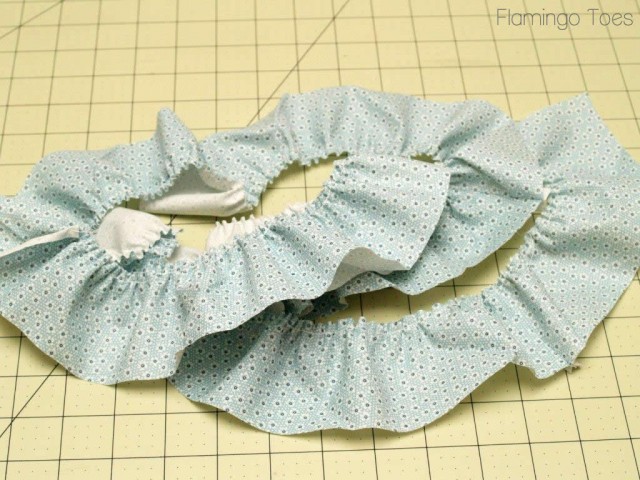
Pin, then sew the ruffle to the sides and bottom of the main apron piece, right sides together. Press the ruffle down, then top stitch 1/4″ from the seam on the apron body.

Take the 3″ x 20″ piece and sew a 3″ x 28″ tie piece on each end. Repeat for the other waistband and tie pieces. Sew a gathering stitch along the top of the apron body. Pin, then sew the apron body to the bottom of a waistband piece, right sides together. Tuck the ruffle tops in towards the back and make sure you don’t sew onto the tie pieces. Press the seam up towards the waistband.
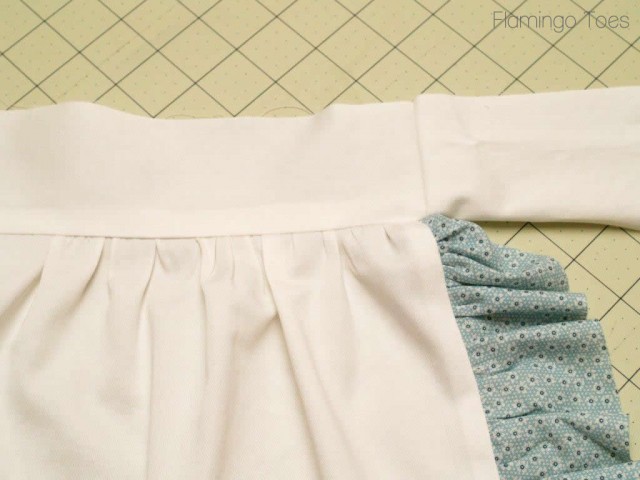
Pin the pockets in place – 6″ in from each side (from the seam, not the ruffle) and 3″ down from the waistband seam. Sew the pockets on just inside the edge of the sides and bottom. Leave the top open. (It’s so much easier to put things in them that way. :)

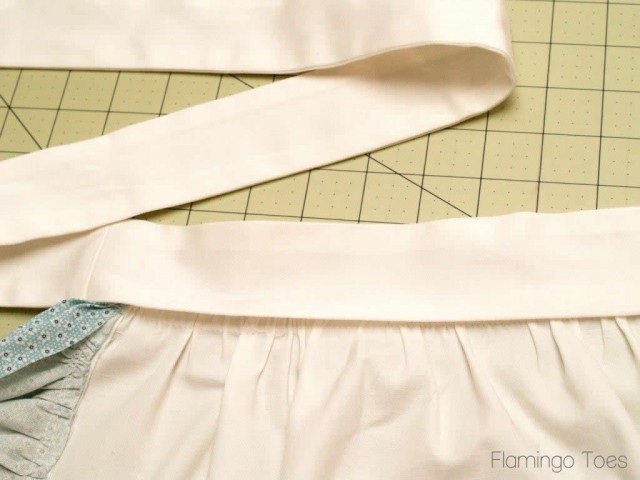
Place the waistband and tie lining pieces right sides together with the waistband and tie pieces sewn to the apron. Match up the seams and ends. Starting and one bottom side next to the apron body, sew along the bottom of one tie, across the end (angling the end if you want), along the top of the ties and waistband, and across the bottom of the other tie. Leave open the bottom of the waistband.

Turn the ties right side out and press. Press the bottom of the waistband lining piece under 1/2″.
Top stitch around the waistband and ties, 1/4″ from the edges.
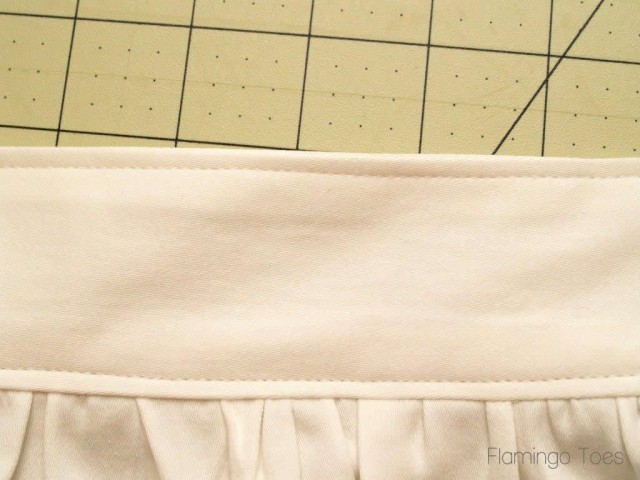
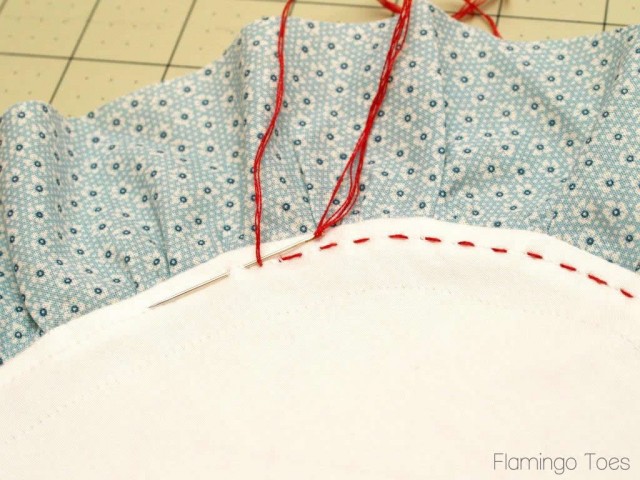
You’re almost finished! We’re going to put on the final touches. Thread a needle with three strands of embroidery floss and sew a running stitch (just in and out) along the top stitching just above the ruffle.
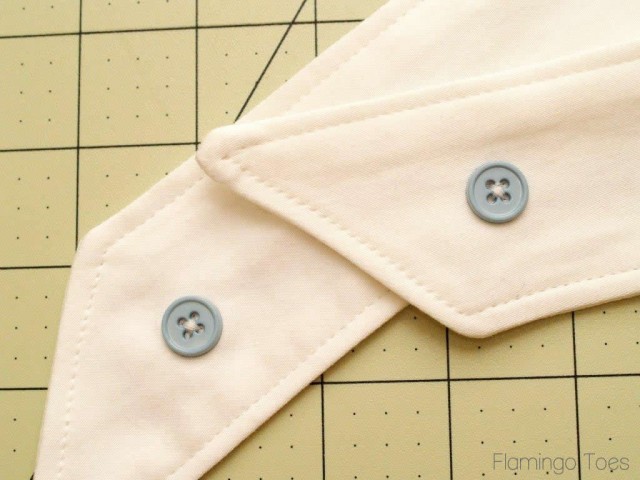
Sew the buttons onto the bottom of your apron ties, so that there is a button in each side of the tie. If you line up the holes you can sew them on at the same time.
And that’s it! You now have a cute little Christmas apron for all your holiday baking and parties!

What do you think? I’d love to know!
Linking up at Sunday Scoop, Today’s Creative Blog, Met Monday, Tutorials & Tips Tuesday, Quilt Story, Shabby Creek Cottage, My Repurposed Life, 504 Main, Positively Splendid, and the other fabulous parties on the party page – make sure you check them out!


Seriously, this is the cutest apron, ever!!!
Oh Bev, ruffles and rick rack? These are so perfect together!! I’ve been avoiding sewing lately (yap, I’m still not good at it!) but I think I’ve found a perfect first ever apron project :)
This is soo cute. I’m not one to comment on sites but I love your blog. BRILLIANT and classy :)
Darling apron–Great instructions!
Its just adorable, Bev!! I love the pockets and the extra red stitching. Too cute!!!
oh man, I totally wish I had the time to make one of these this month. I am going to try to squeeze it in b/c i love it so!!!
I’m a sucker for blue and red – gorgeous!
So Cute!!
ohmyword! i love this. the color combo & that ric rac. totally in love. so pretty!
I LOVE this! I want to make one!
I love the ric rac edges on the pockets! I’m pinning the way you did that!
So cute!
What a beautiful apron, Bev! I love ric rac. :) This reminds me of my grandma’s apron. (that I accidentally caught on fire, but that’s a story for another day) ;)
I LOVE this apron. I have sort of an obsession with aprons. Your tutorial is so helpful. This is definitely going on my to do list. :)
I love aprons! I never wear them, don’t even own one, but I so love them! Your apron is absolutely adorable! I love how it turned out! You are so talented! :)
So classic and pretty! Love this, Bev!
I love having a pretty apron to wear for the holidays – I so want to make this!
This is so darn adorable!!!
What a cute, saucy and pretty apron, Bev!
This is a darling apron. I haven’t sewn a thing in years (my machine doesn’t work). I am going to try my hand at this cute apron!! Thanks for posting the instructions.
Lady Tupperware
This is a darling apron. I haven’t sewn a thing in years (my machine doesn’t work). I am going to try my hand at this cute apron!! Thanks for posting the instructions.
Lady Tupperware
My daughter and granddaughter both want aprons made for Christmas. Since I am on a limited budget and have lots of material, I am going to do this one for Christmas. Love the pattern and it brought back memories from my first project in high school home economics. First thing I ever made there. Course my mom taught me to sew when I was five so this was easy. I’m 68 now and still sewing. Relaxes me and I love your patterns. So easy to understand. Thanks.
Thank you so much for the sweet comment Julene! I would love to see your version of the apron, I’m sure it will turn out beautiful! :)
This is a great little apron! So cute!
One hiccup is that in the material sizes to cut you have 4″x28″ when it states later on down the page 3″x 28″ which I believe is the right size. :)
Hi
Just what I was looking for, re enforced my ideas that have been floating in my head. I was given a delightful retro print that my daughter (29) loved and suited a 1950’s apron. Feeling ready now to make it.
Thanks for the inspiration and motivation.
That’s so great Sue!! Thanks so much for letting me know!
I love this pattern. I’ve been looking for apron patterns and this one seems just what I was looking for. I’m getting ready to try it this morning.
Love this pattern! Thank you! I had never seen those same instructions for the waistband and ties. So easy, so nicely finished.
Love this tutorial! So cute! I have a question, are the buttons on the ties of the apron decorative or do they serve a purpose? Sorry if that’s a silly question! Thanks!
It’s not a silly question at all Kaitlyn! But yes, they are just decorative. A little something cute and easy for the tie, I tend to put them on all my aprons. But they don’t need to be there. :)
Thanks!
The ruffle appears to be unfinished. Is this true? Cut at 2 1/2″, it will be only 1″ wide when applied to apron (since doubling it is the only viable way to “hem” a bias ruffle).
Hi Bobbye,
I just left the ruffle unfinished so it would have a slight frayed edge – I like that look sometimes. But you could definitely double the width and fold it in half, or cut it out not on the bias, add a 1/2″ and then hem the bottom edge.
Thanks!
What is the total primary fabric yardage for the apron, please?
Hi Beverly – This pattern is adorable and the instructions are fantastic. My young daughter and I can’t wait to get started on these for Mother’s Day presents for the Grandmothers! We have all the fabric cut and I just noticed, “Take the 3″ x 20″ piece and sew a 3″ x 28″ tie piece on each end.” I originally cut 4″ x 28″ and assume I should re-trim or press down to 3″ size? Thanks for letting me know if you have a moment and THANK YOU FOR SHARING this wonderful pattern. It will be a big hit!
Thank you Beverly, great instructions. Can’t wait to make this one for Christmas gifts.
Me encanta este tutorial voy a hacerlo hoy mismo. Gracias por compartirlo es muy claro y sencillo.