I’ve shared that I’m not so good with paper crafts. Especially ones that I have to cut out myself.
For some reason anything I cut out of paper ends up looking like I’ve got a severe vision impairment paired with palsy of the hands.
Not pretty.
While I’m fully aware of my inadequacies, I still have been dying to make some Specimen Artwork.
There are so many fabulous examples of it, I especially love Jen from Tatertots and Jello’s Creepy Halloween Version. So fun.
So what is a paper craft-impaired girl to do when she wants to make Specimen Art?
Make it out of fabric!
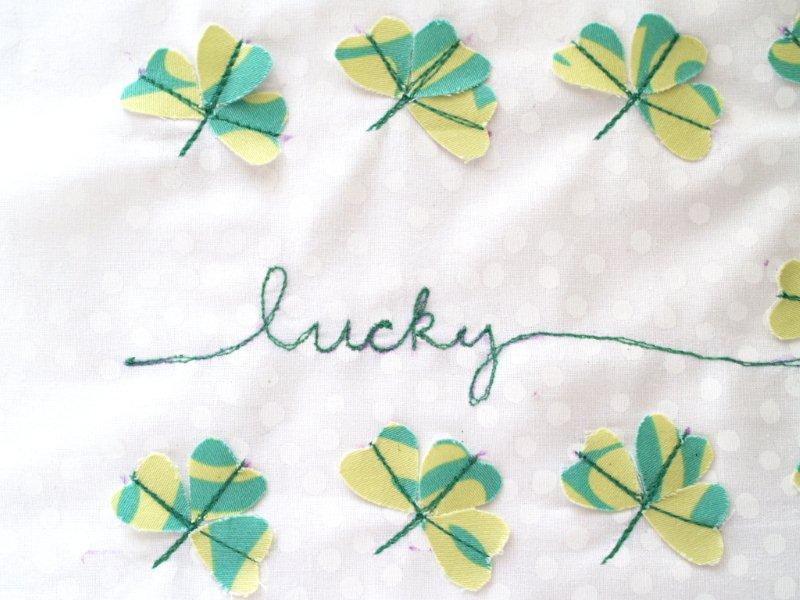
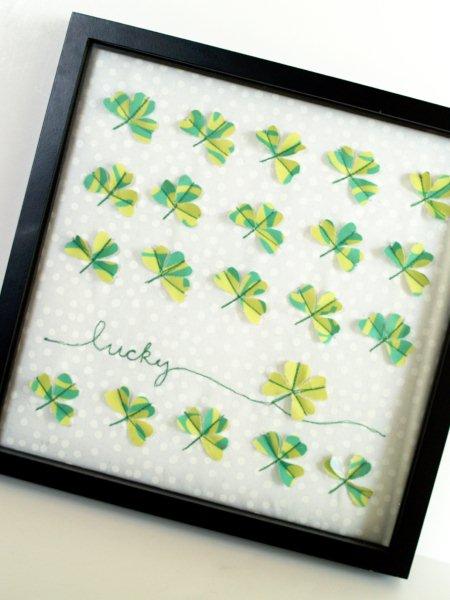
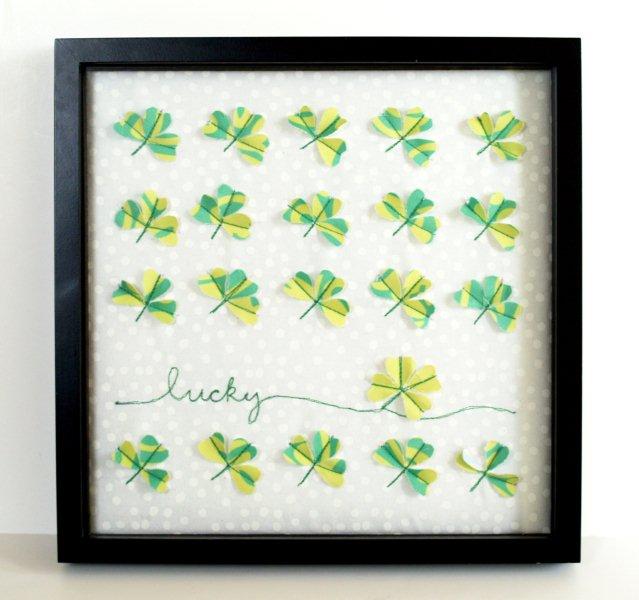
Here’s my St. Paddy’s version!


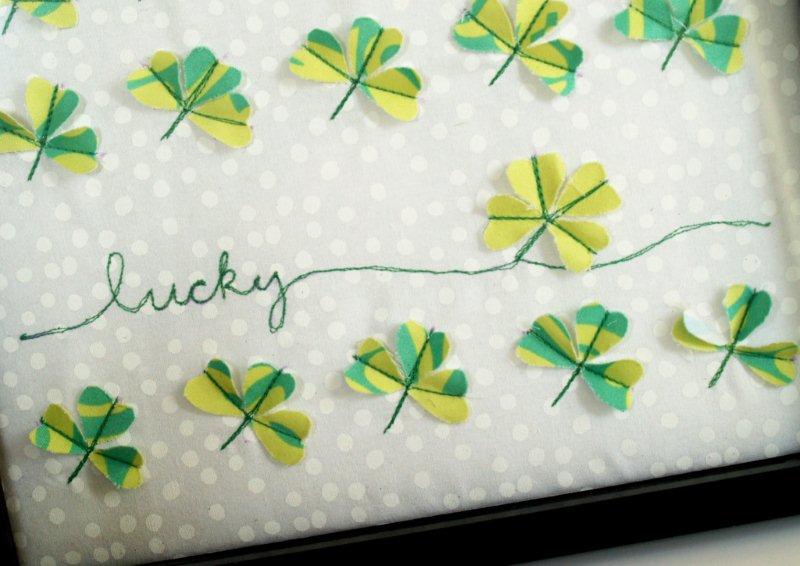
Isn’t it so cute?? I love the little shamrocks. ;)
Here’s a tutorial in case you are paper craft-impaired too! ;)
You’ll need:
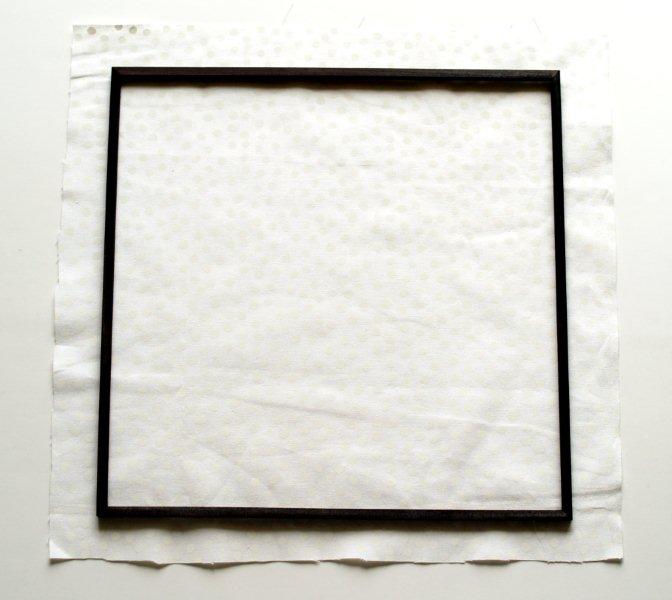
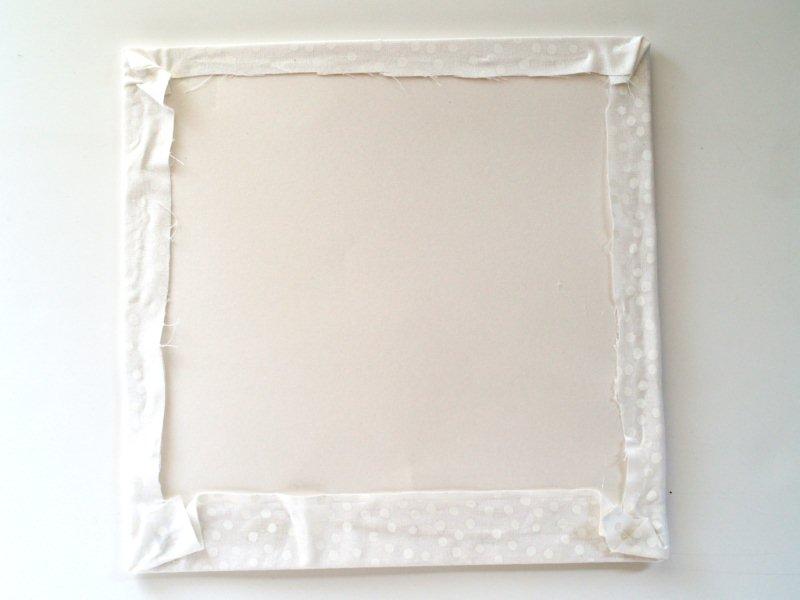
1 Frame – I used a 12 x 12 Shadowbox
Fabric for background – about 14 x 14
Fabric for Shamrocks – you don’t need much)
Contrasting Thread
12 x 12 piece of batting
12 x 12 piece of posterboard or chipboard
Start by cutting out your background fabric.
Cut it just a little wider than your frame size.
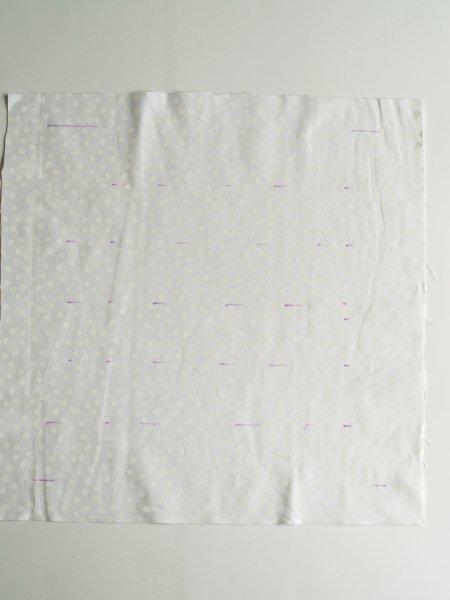
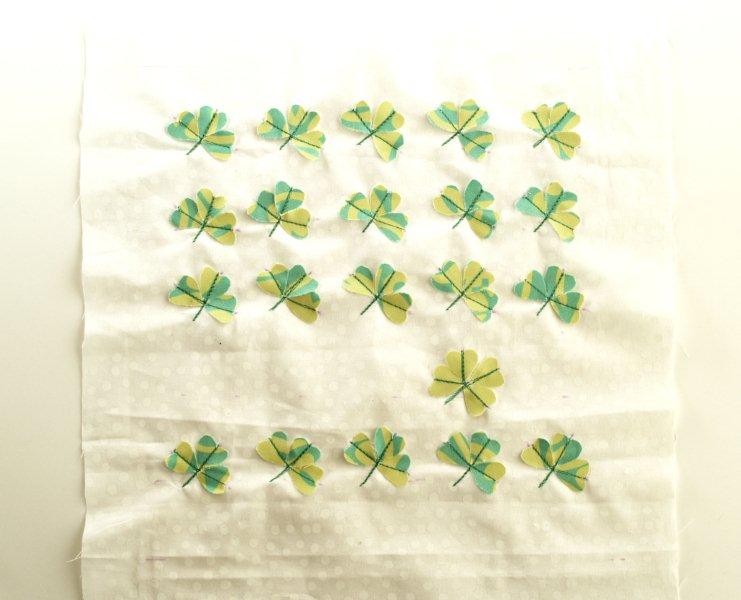
Decide how many rows of shamrocks (or whatever design you’re doing) you would like. I wanted 5 rows across and 5 down.
Mark out your rows with a disappearing fabric marker.
Now cut out your shamrock pieces. I used small hearts for the petals. The heart measures about 7/8″ from top to point.
I did 4 rows of regular 3 leaf shamrocks (so 60 hearts) and 1 row with 1 4 leaf clover.
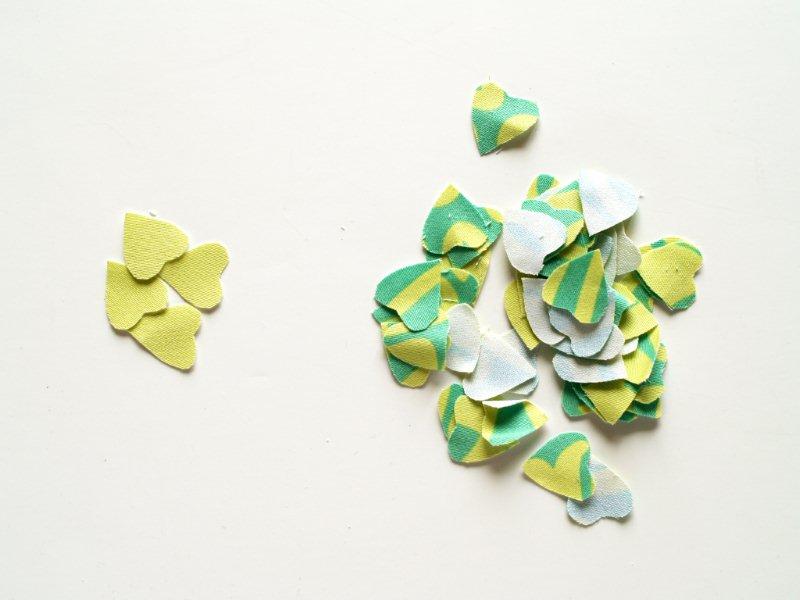
(This fabric is from Amy Butler’s line.)
Lay out the center row of shamrocks, with the center of the bottom right heart lining up with the marked line.
Then place the two remaining hearts to the left of that, so that the clover is a little angled.

Lay out the two end rows next, lining them up the same way.
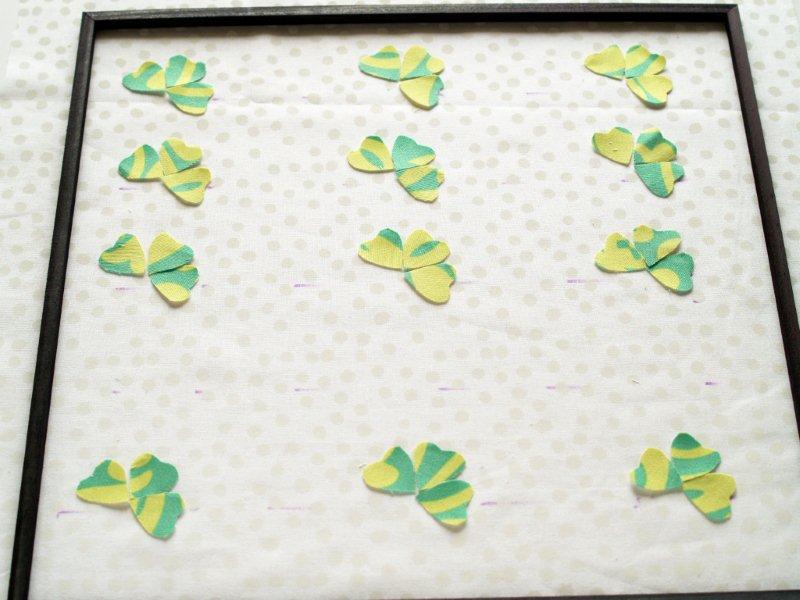
Layout the inside two rows next.
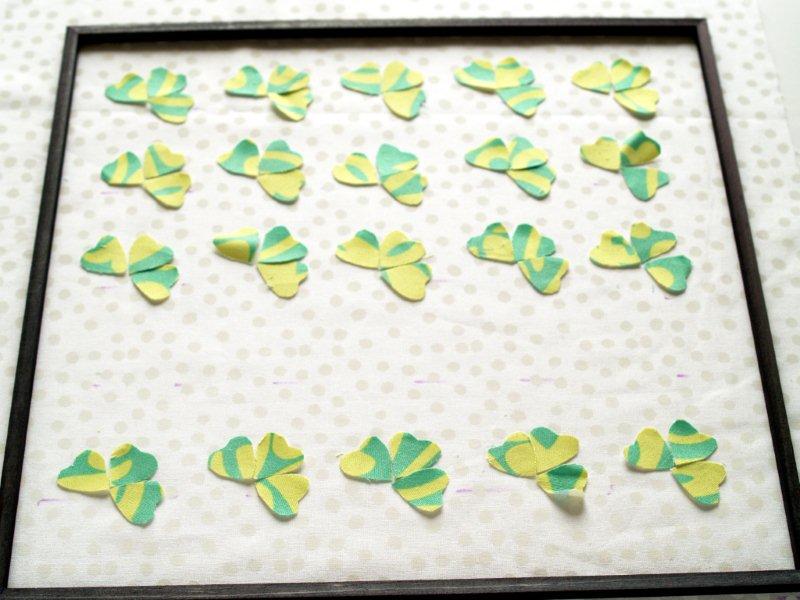
Last, lay out the four leaf clover in the empty row. It should line up with the 4th column of clovers.
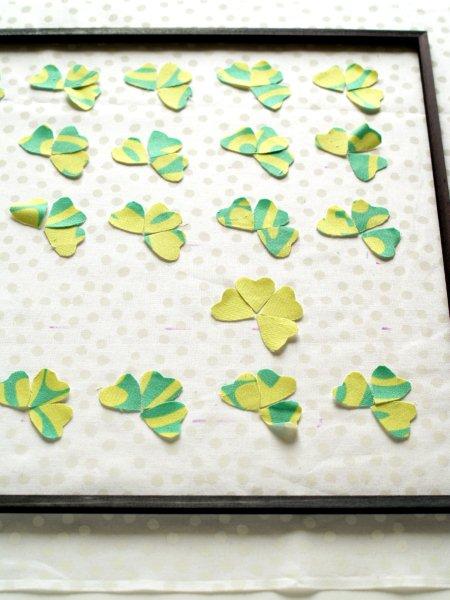
I figured out partway through the sewing process that pins were not the best way to keep track of where the hearts go.
Just mark the “V” of the heart with the marking pen, then you can line them up as you sew.
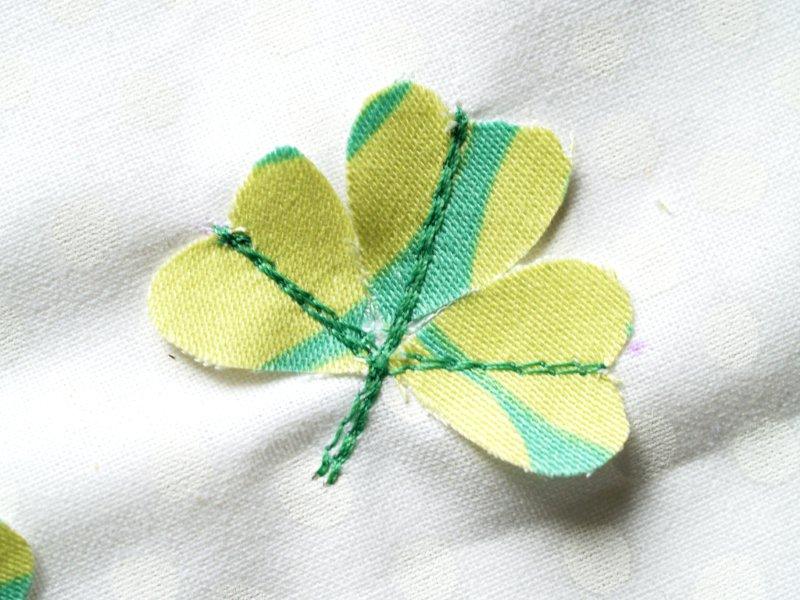
Here are the sewing instructions for each clover:
Start with the far left heart. Sew down the center and then sew up the center of the far right heart.
Turn the fabric 360 degrees and go back over this stitching line.
Sew back to the center point. Turn the fabric and sew up the center of the middle heart.
Turn the fabric 360 degrees and sew back down the center and continue down 4 or 5 stitches to make the stem.
Sew up the stem and center heart one more time in each direction.
Sew back up to the center from the bottom of the stem. Finish it off with a locking stitch.
(You don’t have to do it exactly like this – just do it the way it works best for you)
Here’s a closeup.
Start with the top row and sew all the clovers down the same way. You don’t have to cut the threads after each clover, you can clip them all at the end of the row.
It doesn’t have to be perfect. If you look closely at mine (or maybe not even closely) you’ll see that they’re not all exactly the same. That’s ok. ;)
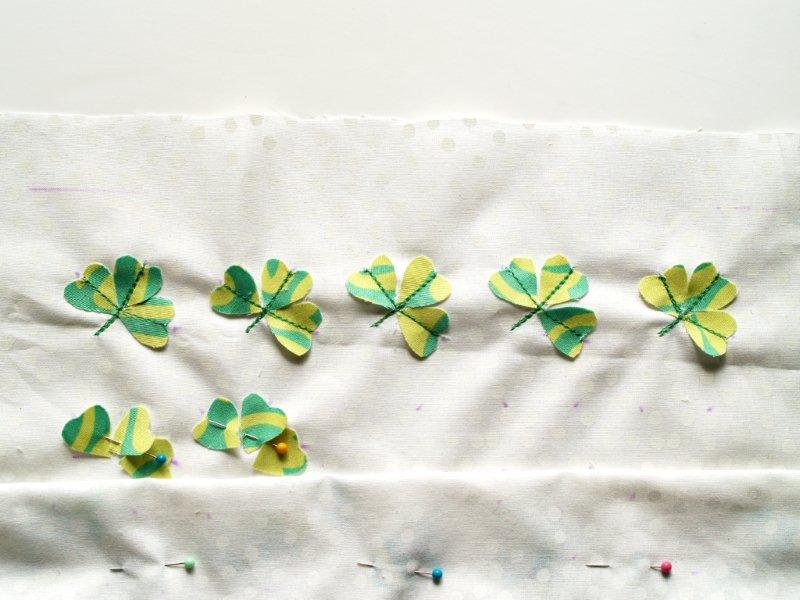
Continue sewing on the clovers down all the rows.
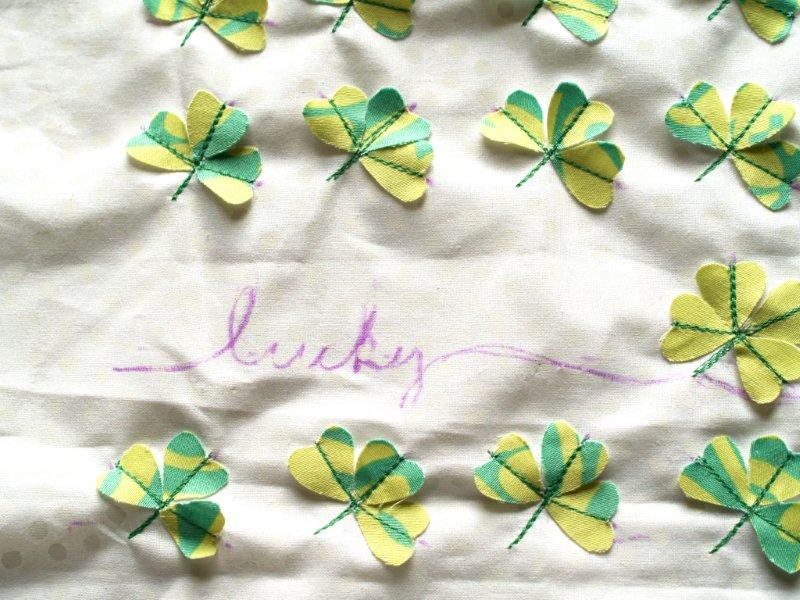
Now that your clovers are all sewn on, write out the word “lucky” in the space by the 4 leave clover with your marking pen.
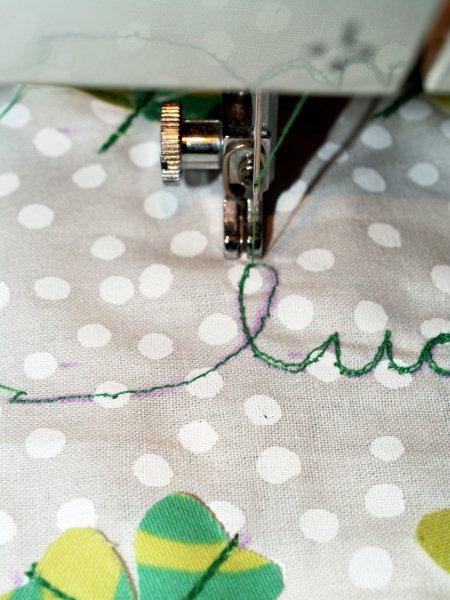
Take the pressure foot off your machine. We’re going to follow the marked line with machine stitching, just like the Hoop Art last month.
Start with your needle at the left side of the fabric and pull your fabric through as you sew.
(Since the pressure foot is off, the feed dogs won’t be feeding your fabric through. You will.)
The faster you pull, the longer your stitches will be.
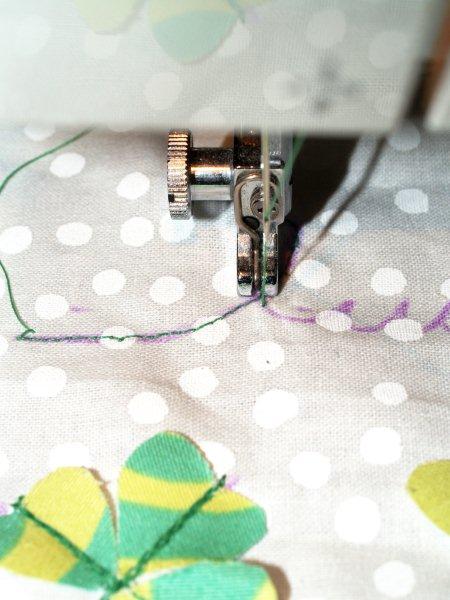
Don’t worry too much if you’re a little off the marked line, you can fix it on your second pass.
Continue all the way to the right side of the fabric, then go back over your stitching all the way to the beginning.
Remove your marked lines and dots and press your fabric.
If you like the finished look to be a little padded like mine, place your fabric face down, then place a piece of batting on that, then top it with your posterboard or chipboard.
Hot glue your edges around the posterboard, pulling the fabric tight so that there aren’t any puckers in the front.
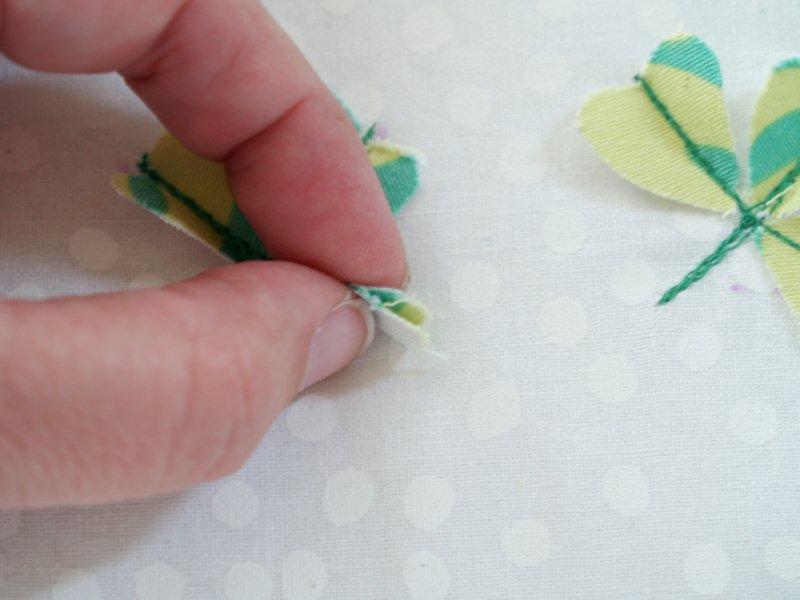
Flip the fabric back over. Finger press the clovers up a little so that they stand off the fabric. You can do this by pinching the heart around the stitching.
Pop the finished artwork in your frame and you’re done!
What do you think?
I think it might bring me some luck.


I love it Bev! So cute. I haven’t jumped on the Silhouette band wagon yet either! Soooo expensive. Maybe we could win one, huh? Thanks for sharing! I always look forward to looking at your blog:)
Super cute, Bev! Love it! And guess I hadn’t noticed until you said it about your aversion to paper. How funny! But the things you do with fabric are just dreamy!
this is really something…clever and adorable. i am wishing i had sewing skills right about now!
super, super cute! I just might have to knock off this idea- absolutely lovely!
xoxo,
Amy
This is adorable! So clever and unique! :) I stumbled this!
Love how you stitched these shamrocks on !!! great project.
I love it! the work lucky really makes it have that wow factor! great job!
tweeting it!
gail
*word*
OOHWEE, I love it!
I am not even a huge fan of specimen art – because I don’t really get it:) But having all the 3 leaf clovers with 1 4 leaf clover!! I love it! So clever:)
Oh my goodness Bev, that’s too cute for words! I love the little shamrocks too :)
So cute! And what a great step by step tutorial! You should link up at DIY Thrifty Thursday @ http://www.thrifty101.blogspot.com
so beautiful!!
I love it!
This is adorable! You have talent, there is no way I could sew the word lucky!!
SO cute, I love the fabric! The stitching ROCKS!
Carlee
SO cute!! I have the opposite problem-I could not do this with fabric!! But, paper, no prob.
I’m speechless. I don’t think you give yourself enough credit for your paper crafts because i’m sure they are awesome because your sewing skills are amazing! And how did you cut out such perfect little hearts? My favorite specimen art EVER.
I’m REALLY loving the specimin art that I’ve been seeing around blogland…but THIS?!? I ADORE everything about it! The word “lucky” connecting w/ the only 4 leaf clover…NICE TOUCH!
Your tutorial too…you make it all look so easy!!! You may have just inspired me to get my sewing machine warmed up…. *wink*
All the Best & Good Luck @ CSI!
…M… @ RequireLife
this is amazing – you are very very good at this! Reminds me of your PS I Love You that I saw everywhere – love the way you incorporated fabric as your clovers…so very unique. Awesome job!
adorable!!
WOW! I love this! such a great twist on specimen art. I love the look of slightly messy machine stitching on lettering. I feel like mine would be too messy to work, but maybe I’ll try it anyway. I really love it!
So cute!
This is seriously FANTASTIC! Great great job!!!!
this idea is ridiculously cute. I LOVE LOVE LOVE it. It might be my favorite tutorial yet. which is also ridiculous because I think I say that almost every time!!!
PS. in between all your amazing projects, would you mind giving this one a consideration?
http://acommunityartproject.blogspot.com/2011/02/project.html
Love it! And a great tutorial, too!
Lovely!! I wish I could sew. Paper is no problem for me, but once the sewing machine comes out something always goes horribly wrong.
Genious lady! I would have never thought to use fabric….I am a paper crafter….sewing machines scare me!
Adorable Beverly!!!
I shared it on my TT&J facebook page and linked to you!!
xox
Jen
As always a spot on tutorial – this is adorable. My son would love it because it is called Specimen art!
I love it! I might have missed it, but did you use anything to cut out your hearts or just do them by hand? They all look so perfect like you used a punch or something. I know I could never cut that many so perfectly!
Very, very clever! I like…
Oh this is fabulous! I would love if you linked up to TOO Cute Tuesday!
http://funkypolkadotgiraffe.blogspot.com/2011/03/too-cute-tuesday-linky-par-tay-20.html
I love it! If I had the green fabric, the shadow box, and the patience to do it, I definitely would! Maybe I’ll try one of these for Christmas… I think I need all the time I can get! So cute!
I really like this, Bev. I love that you used fabric. It gives it an entirely different look. Really nice!
I don’t sew at all ~ but I absolutely LOOOOOOOOOVE THIS!!!!!!!!!!!
How cute!! I love it!
SUPER cute… what a great idea!!
This is SOOO cute! I can’t believe you had the patience to make it, but I’m crazy impressed!
What a cute project! Adorable piece of crafty art, love it.
I am following you from the blog hop. Plese return the follow at http://www.reneeahand.com
http://thecryptocapersseries.blogspot.com
Thanks!
Renee
I love this project. I came via the CSI blog.
I love this project so, SO much!
I like this better than the paper versions! It is more texture and I prefer sewing any day. Hmmm, I might have to try something similar. Thank you for the how-to.
This is darling!! I love the stitched ‘lucky’… it is a perfect touch.
This is so charming. I love the stitching!
This is a darling project! Just lovely!!
This is so sweet! I’m not usually one to decorate during St. Patrick’s day but this cute craft changed my tune!! :) Love it!
http://bluerobincottage.blogspot.com
Beautiful work you put into the coverlets
Stopped by to follow your blog from the 504 Main blog hop… do comment/follow me back :-)
Have an abundant 2011! :-)
Best,
Elizabeth
Positive Kismet Blog</a
this is so cool! i’m specimen art obsessed! i’m on the paper end of the spectrum so could never pull this off.. but such a cool alternative.. really sorta jealous over here! :)
Love. It! Saw this at tatortots and jello. I actually made your cute witchy towel last fall too.
I love it!!!! What a fu idea!
You are seriously amazing! I didn’t even realize that you sewed the stems and “lucky” at first… that is SUCH a cute idea!
Love this! So adorable! I can’t imagine sewing all that individually! Wow!
these are so delicate and pretty!
megan
craftycpa.blogspot.com
OMG! Mad skillz woman! I am SUPER impressed! I love this!
I am going to feature this in a Special St. Patrick’s Day Features this week!
Thanks for linking up to Making It With Allie! I can’t wait to see what you have for next week!
AllieMakes.Blogspot.com
Oh my! This is darlin’!!
-Many Smiles!
This is super cute, but A LOT of work…my goodness! Love it!!
good golly! i love this so much! How long did it take you? :)gina
Ooooh I love this! Now if only I wasn’t sewing impared lol…
aubrie @ http://amamab.blogspot.com/
Very cute!
I love how you sewed it together!! It looks awesome! If you have a chance come link up to Handmade Tuesdays @ Ladybug Blessings.. http://www.ladybug-blessings.com
I had a problem with my linky party code. I thought it was set up as a thumbnail party but it wasn’t. It’s all fixed now but can you add your link again? I”m so sorry for the inconvenience. :( xoxo
So clever and fun!
That’s totally adorable. I love it!
Cute! Love it :)
Love this! And great tutorial!
I absolutely LOVE this, I will be featuring it on my “Idea List” tomorrow.
This is a great project! I love the stitching and it looks great in the black frame! I’m not a ‘Silhouettester’ either!! :)
Very creative idea and thanks for the tutorial … it makes me understand more clearly… lovel job
Hope you will enjoy your visit if you can spare a little bit to see some napkin folds at
http://craftaworld.blogspot.com/
Love
Farah
Wow, I think you have more talent with a machine than I do, but I am so inspired by this!
For a “paper-crafting-challenged” person you sure did a great job with fabric. The sewing looks difficult but you did a fantastic job.
This is awesome!! What a great idea!
This turned out so adorable! Love all of the precious detail!
I’m really lovin this project…what a creative idea!
That is incredibly sweet. I am in the no-silhouette club as well. *Pout* I would love one too!! :-) I would love it if you would link this up to my Marvelous Mess party….each party I feature one project on my sidebar for a week!! Here is the link: http://marvelouslymessy.blogspot.com/2011/03/marvelous-mess-3.html
Just lovely!
I have to let you know it was a bit of inspiration for this card I made:
http://craftingintherain.blogspot.com/2011/03/lucky-card.html
Thanks for linking up to Take-A-Look Tuesday with Sugar Bee Craft Edition – I featured you today! – Mandy, http://www.craftedition.blogspot.com
So pretty! What a fun project and a great work around for those of who don’t have those snazzy machines :)
I love this idea! I also love your polka dot fabric! I found your blog at Between Naps on the Front Porch. You have such great ideas and I’m your newest follower! I’d love it if you’d follow me back: http://stillwaterstory.blogspot.com/
Again, you did a fantastic job with this!! :-)
This is so great! I totally love it! Thanks for linking to Quiltstory!
Absolutely DARLING! Thanks for the tutorial :)
yet another wonderful project! Thanks for linking up yet again! I’m featuring this (of course) tonight on Topsy Turvy Tuesdays!
I featured you today! :) Hooray! I’d love if you stopped by!
Amanda
http://www.todaystoptwenty.blogspot.com
I love this piece! It was an inspiration for my Easter specimen art. I linked back to you. If you get a chance, stop by and check it out- http://stayathomemeagan.blogspot.com/2011/03/old-rugged-cross.html
You did a great job on this project. I love specimen art too and think this is a wonderful adaptation. I’ve pinned it on Pinterest. Hope that’s okay with you.
Such a lovely project! I love your attention to detail. I have pinned! Kari