This post is a partnership with Plaid. All opinions are my own. ;)

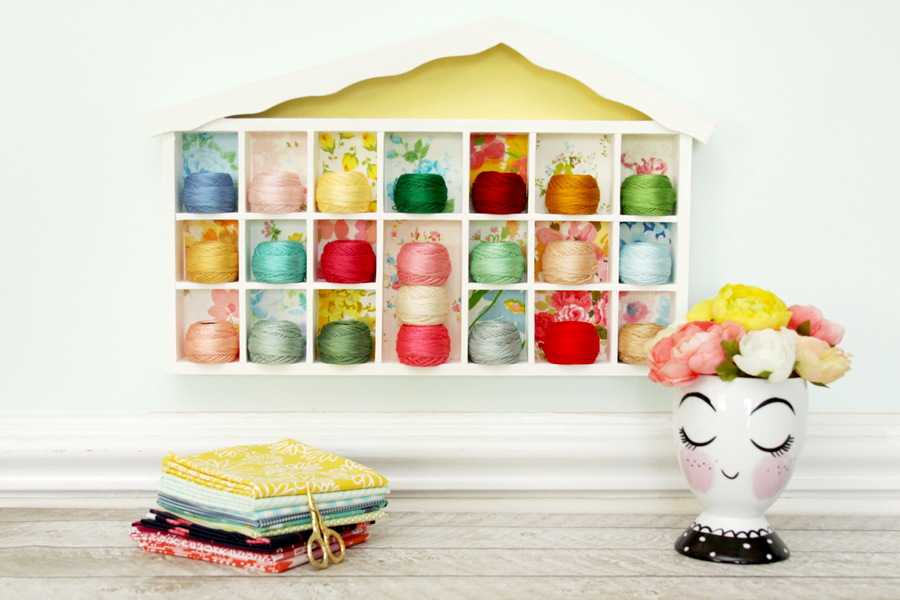
I’ve been working on storage in my craft room (an ongoing always sort of project) and I’m super excited to show off this new Colorful Embroidery Floss Shadowbox Storage I created to hold my little DMC pearl cotton threads!

It’s been way too long since I did a vintage sheet project and this little shadowbox worked out perfectly! I have all these cute little colors of floss and I wanted a way to easily see what I had. Plus I’m always up for cute storage – it’s so much more fun to be tidy that way!

This little box was the perfect project to use the FolkArt® Home Decor Chalk Paint on – I didn’t have to prime or sand anything and it covered up all the little bumps and dings in a 70’s ish wood piece. Plus I knew the ultra matte white would really look fabulous in all these little windows with the fabric on it!
As another idea, the FolkArt paint comes in 41 colors so you could do a different color in every window – that would look super sweet too! The paints now come in 2 oz, 8 oz, 16 oz and 32 oz sizes so for this project you could pick up a few of the little bottles or if you’re doing a giant project like a kitchen renovation, you could get the big bottles.

Colorful Embroidery Floss Shadowbox Storage Tutorial
Materials:
- Shadowbox *check thrift stores, garage sales or Etsy!
- FolkArt Chalk Paint – White Adirondack and Summer Porch (yellow)
- FolkArt Chalk Paint Brush
- 1/4″ Stencil Brush
- Mod Podge Matte
- Mod Podge Brush
- Vintage Sheets
- Sharp Scissors, Ruler
Here’s a look at the shadowbox before – pretty much your typical 70’s shadowbox! :)

Start by painting all the corners and edges of the little window frames. I recommend using a small stencil brush for this – the bristles are nice and stiff for the paint but it’s small enough to fill in the corners of all those windows.

Continue painting with the small brush and the regular chalk paint brush until you have the entire box covered. This took me about 4 coats for a nice bright white but the paint dries so quickly that you can get through those coats nice and fast.
As a tip – you can keep your brushes in a ziploc baggie or wrapped in plastic wrap between coats so you don’t have to wash them after every step. Just make sure all the air is out of the baggie and your brushes won’t dry out. Then when you’re all done painting you can wash them out with soap and water – the paint is water based and non-toxic so clean up is super easy!

Once your paint is dry you can start cutting the fabric for the windows. I found that I needed to measure pretty much every window so I used a small clear quilting ruler, then cut out the fabric with my rotary cutter. It went super fast!

Cut fabric for all the windows and make sure you like the layout and color choices. Once the fabric was cut I decided I wanted the top section to be painted as well so I painted one coat of Summer Porch paint. I love how the yellow looks in contrast with the fabrics!

Begin Mod Podging your fabric down by brushing a coat of the Mod Podge on the back wall of the frame. Press the fabric in place and make sure all the edges are glued down.

I found I didn’t need to do a top coat – everything was holding really well. You can always add another coat of Mod Podge on top of the fabric if you want to seal it down really well.
So cute and colorful right?

Now you can fill it up with all the cute things! I used these sweet little DMC Pearl Cottons but I think it would be fun with little vintage things too. Oooh – or little sewing notions? So many ideas!


You can find more Chalk Paint inspiration on the Plaid social media channels – Facebook, Instagram and Pinterest.


What a lovely idea! Love how all the lovely colors are showcased in the shadowbox.
Absolute transformation! Now a thing of beauty!
It’s SO pretty! I love the bright colors and floral designs!
Lovely idea. So bright and cheerful. What size thread are you using?
Love that. Such a great upgrade. The fabric is just perfect. Pinning.
I’d love if you’d share with us at the To Grandma’s House We Go Link Party. It opens at 11pm EST on Tuesdays. We pin all posts and pick a few feature projects every week. AbbottsAtHome.com
This is charming! The embroidery floss storage becomes an artistic wall hanging itself!
I love this, the vintage sheets are beautiful. Functional decor is great for a craft room. Thanks for linking up to #HomeMattersParty
It’s 2017 and I think you should resurrect this project! I LOVE IT!!!! :)