Do you ever have one of those projects that sits in your head for a while and sticks and you can’t get it out?

Fester fester fester rot rot rot.
(2 points if you get the reference)
This is one of those projects for me. When I saw the little Spool Side Table at Ballard several months ago I fell in love.

I pointed it out to Mr. F.T. and said, “I want to make That!”
(You have to love a guy that doesn’t blink an eye when you point out a table wrapped in rope but instead just rolls with it and helps you figure it out.)
Well for months (on and off – not continuously) we have been toying with rope and wood options and cost. Then one day while we were thrift store shopping (Yes. Mr. F.T. gets points for that too) we spotted this rope basket . . .
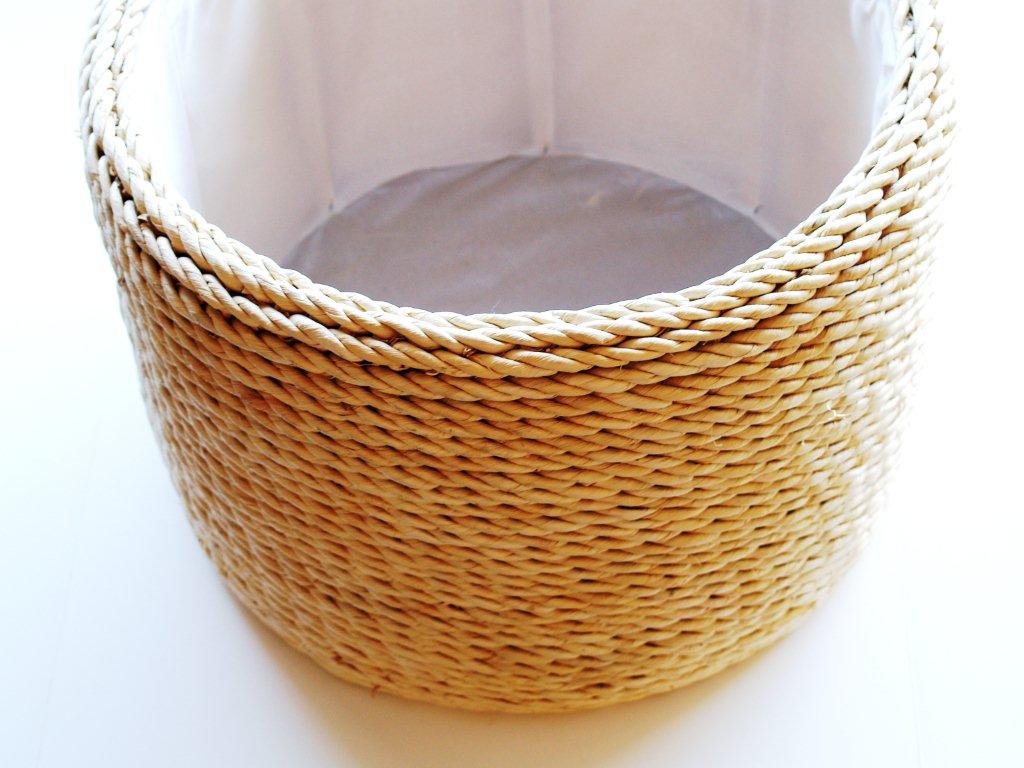
(Aaaaaaaaaa – those are the angels singing and a little spotlight shining down from heaven)
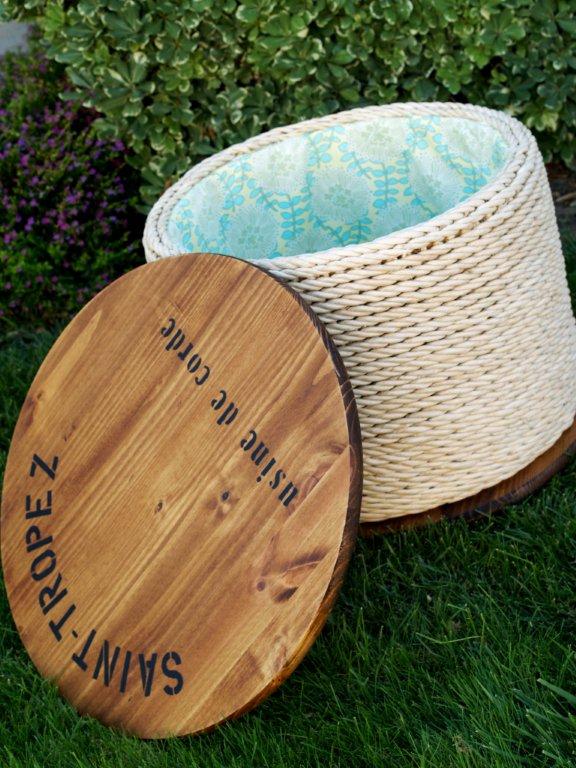
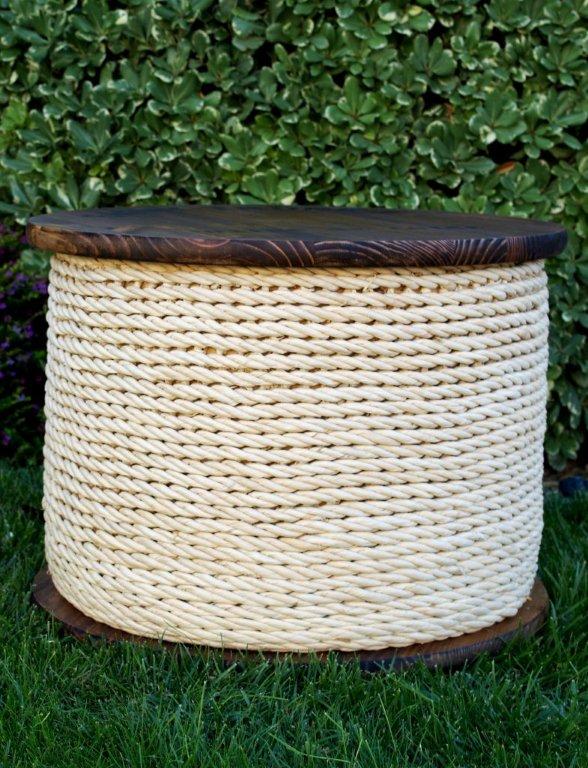
We snatched it right up and were ready to rock and roll. Let me introduce you to my new little spool side table.
Complete with removable lid for storage . . .
I even have a nifty tutorial for you in case you are also in love with this little rope table and you find/own a little basket too. :)
You’ll need:
- A basket (or something similar with rope wrapped around it)
- 2 Round wood pieces (mine are 24″ circles from Home Depot)
- 1 dowel
- stencils for top
- Stain (I used Minwax satin all in one)
- Paint for lettering (black craft paint)
- Brushes
- glue
- screws
- fabric for lining (optional)
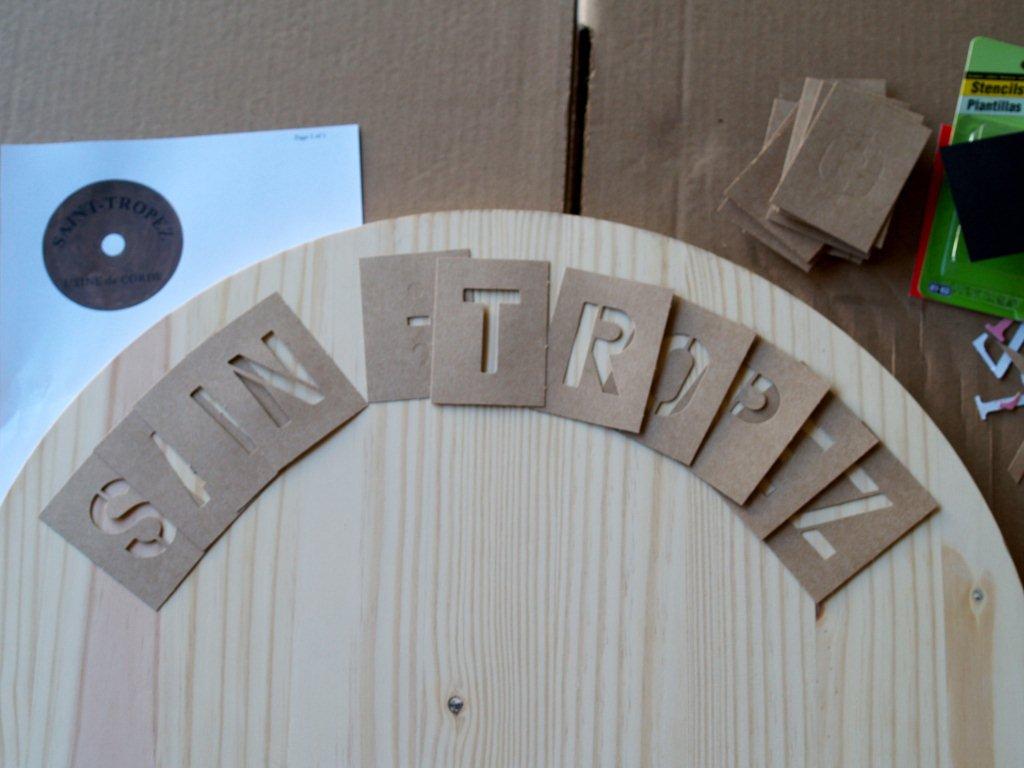
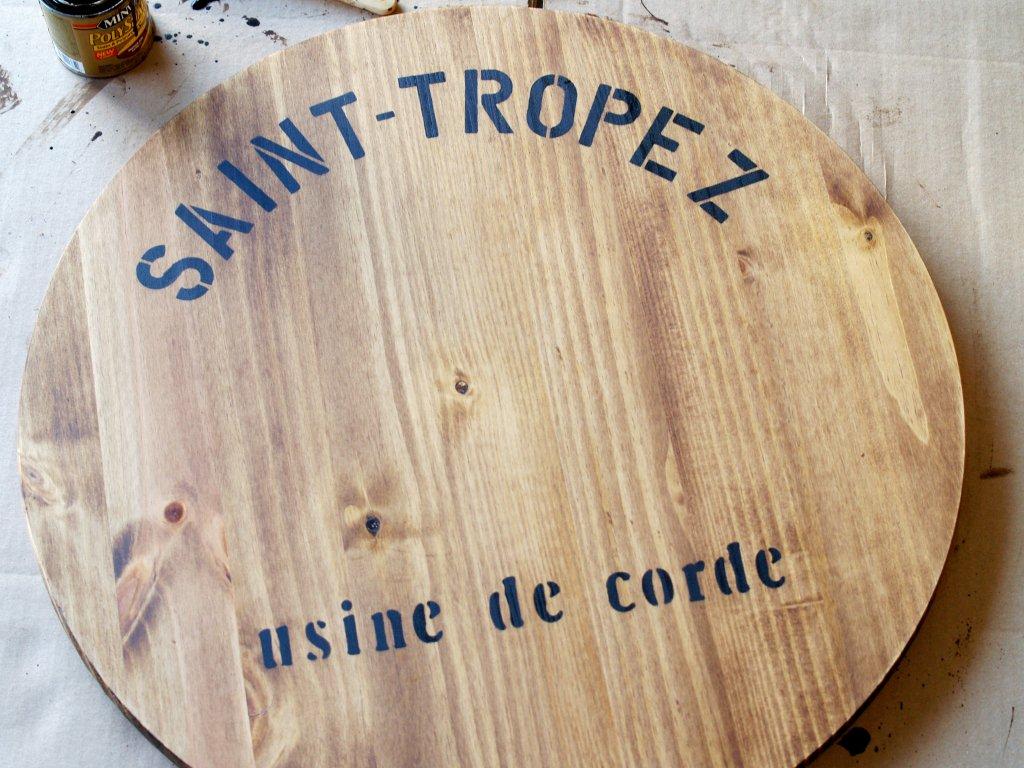
Start with tracing a curve for the top line of stenciling. I used a large bowl – that is apparently peeling on the bottom. Huh.

Get your stencils ready and lay them out on the arch to make sure the spacing is right.
Run back out to the store because the stinkin’ stencil pack you bought is missing letters E – L. Peachy.
Lay out the new letters.
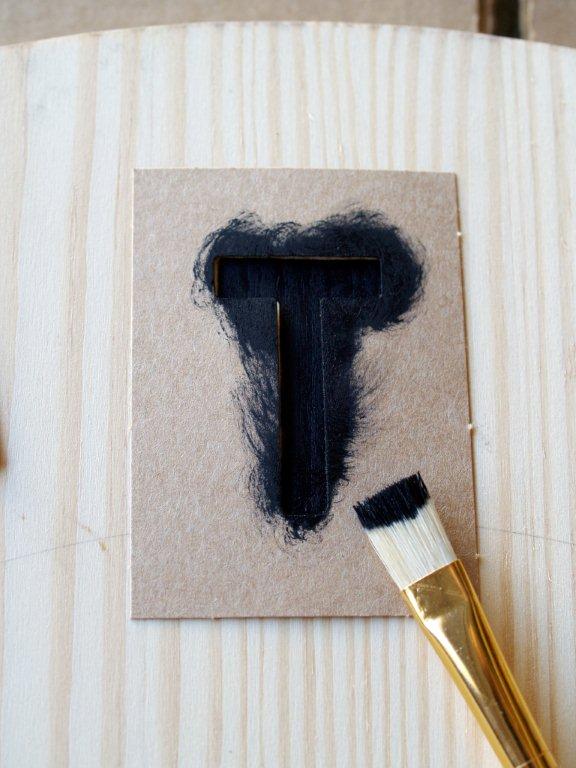
Start with the middle letter on the top and stencil it on. Put a little black paint on your brush and using a circular motion on a paper plate or paper towel, work the paint in to the bristles so that it’s not super wet.
Move the brush in a circular motion over the stencil, covering the open section well.
Work down the right side of the arch, then the left, stenciling on the other letters. Make sure the spacing in between letters is even.
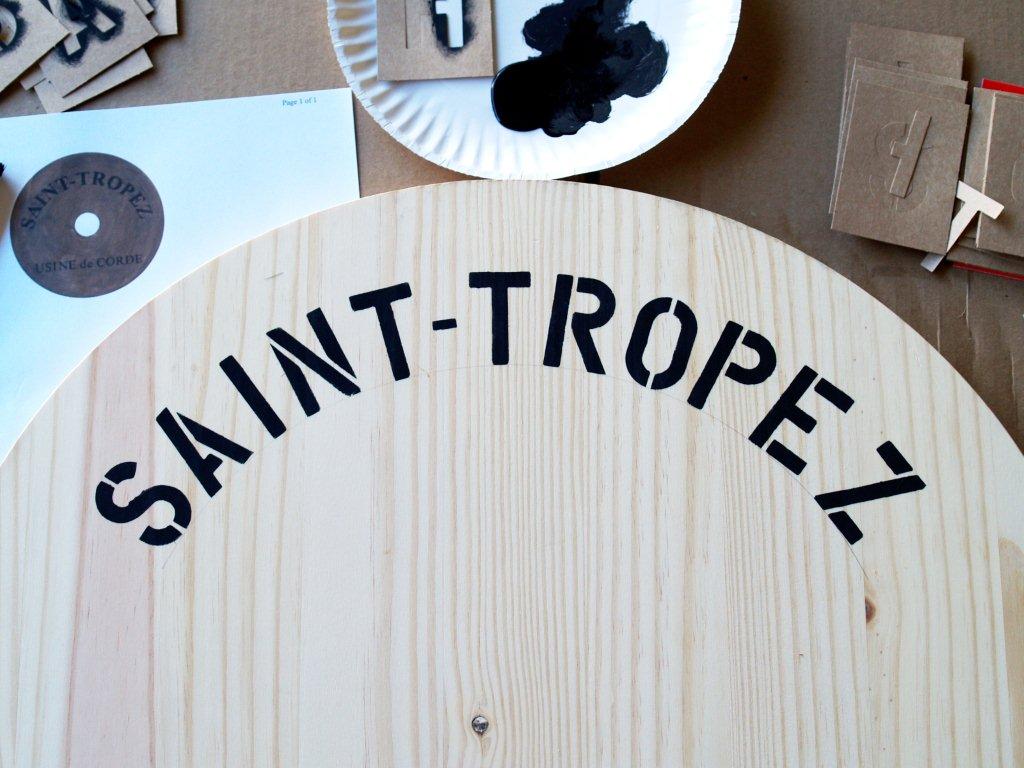
Repeat for the smaller letters at the bottom. I kept these in a straight line like Ballard’s. I also looked up usine de corde before I stencilled it on. I wanted to make sure it was something I’d actually want stencilled on a piece of furniture. It means “Rope Plant.” Ok then.
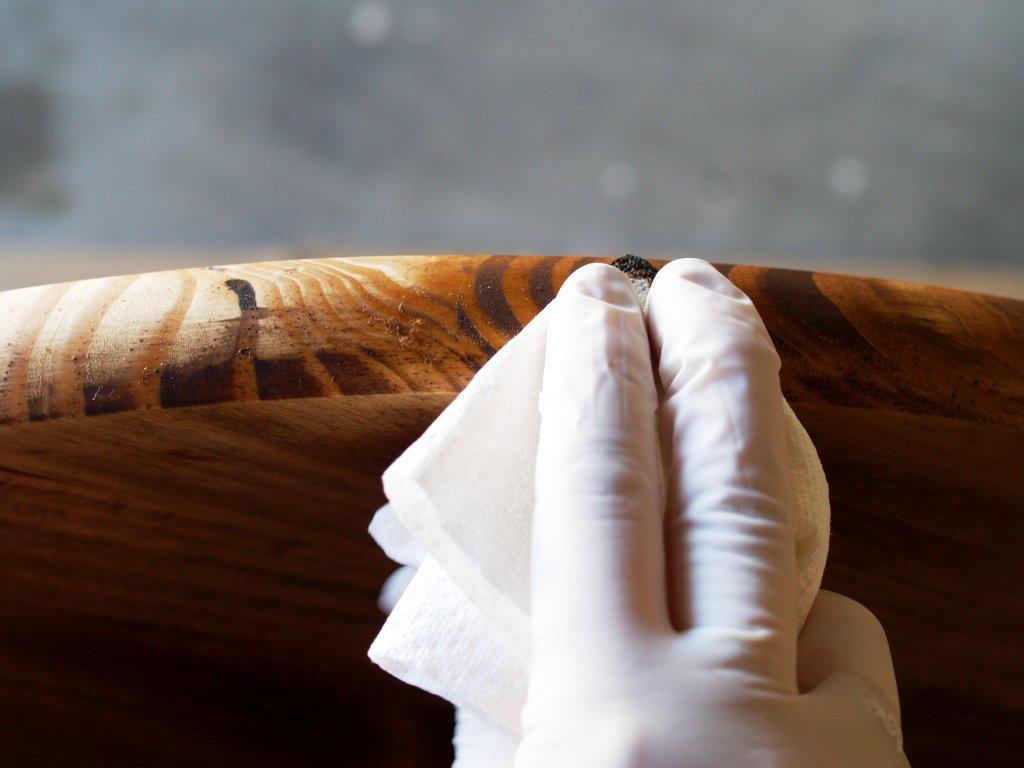
Begin staining your wood pieces. For the sides you can apply the stain with a paper towel. Just rub it on and then rub off any excess.
For the top flat parts, you can use a brush to apply the stain . . .
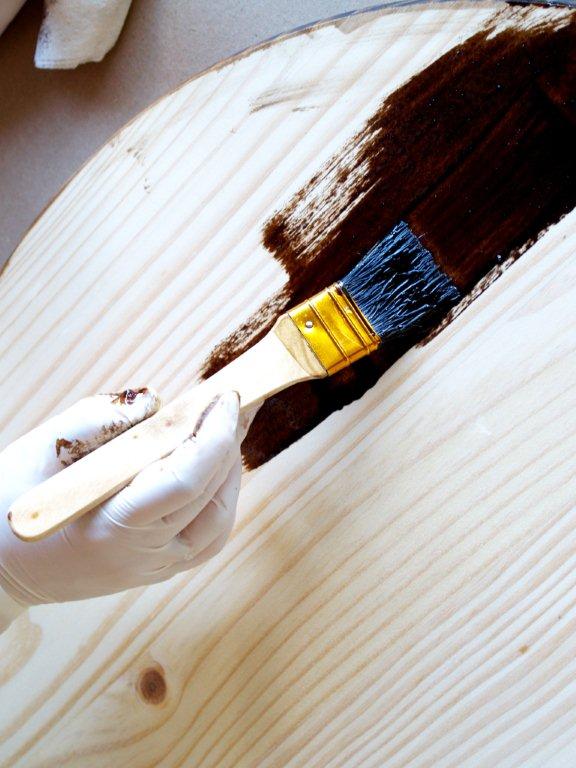
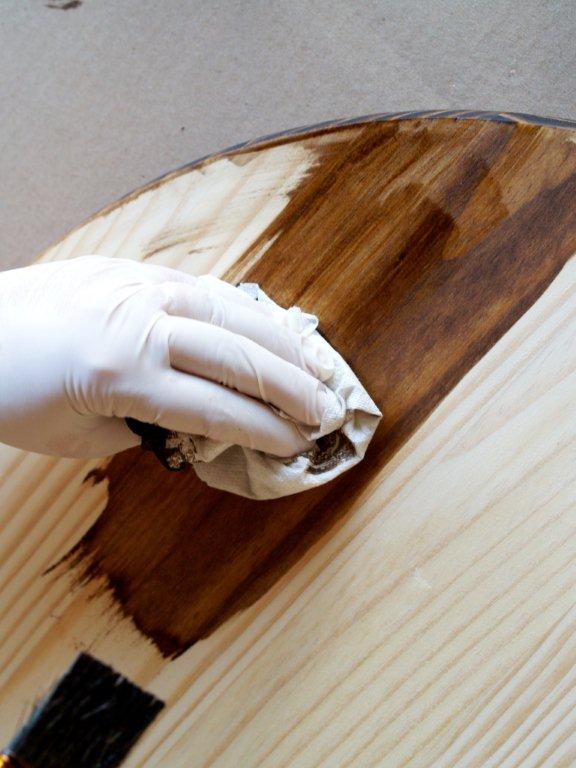
Then wipe off with a paper towel. The longer you leave the stain on, the darker it will be.
(Look. Gloves. Don’t ever say I don’t occasionally learn from my mistakes.)
Stain all the round wood pieces.
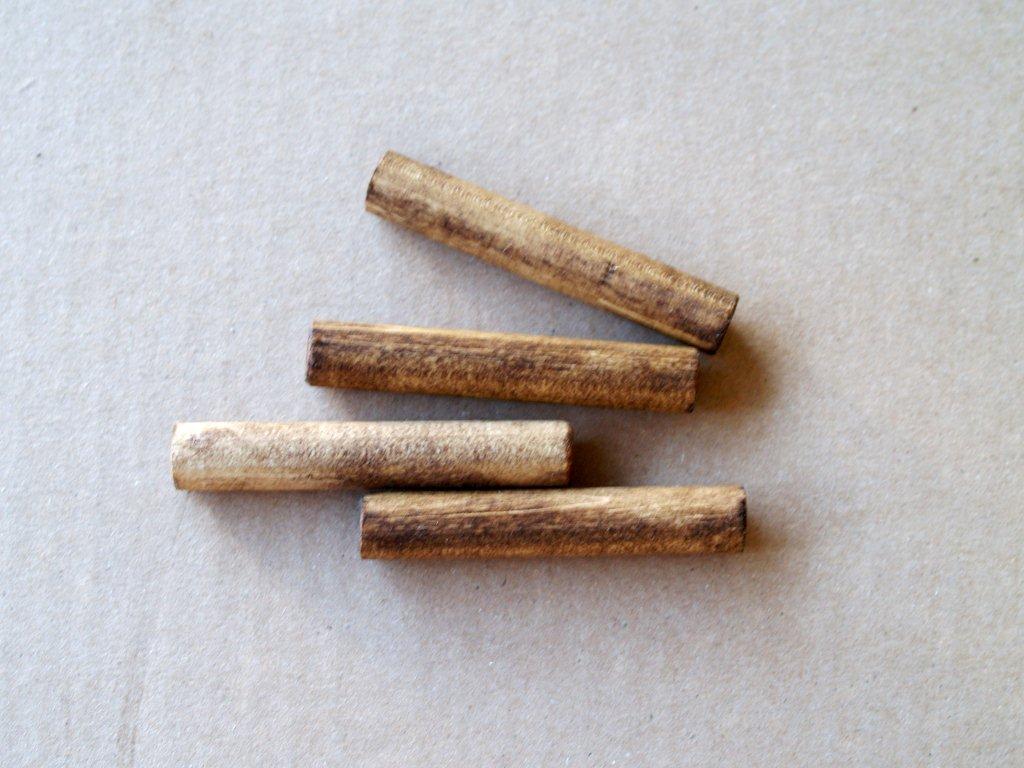
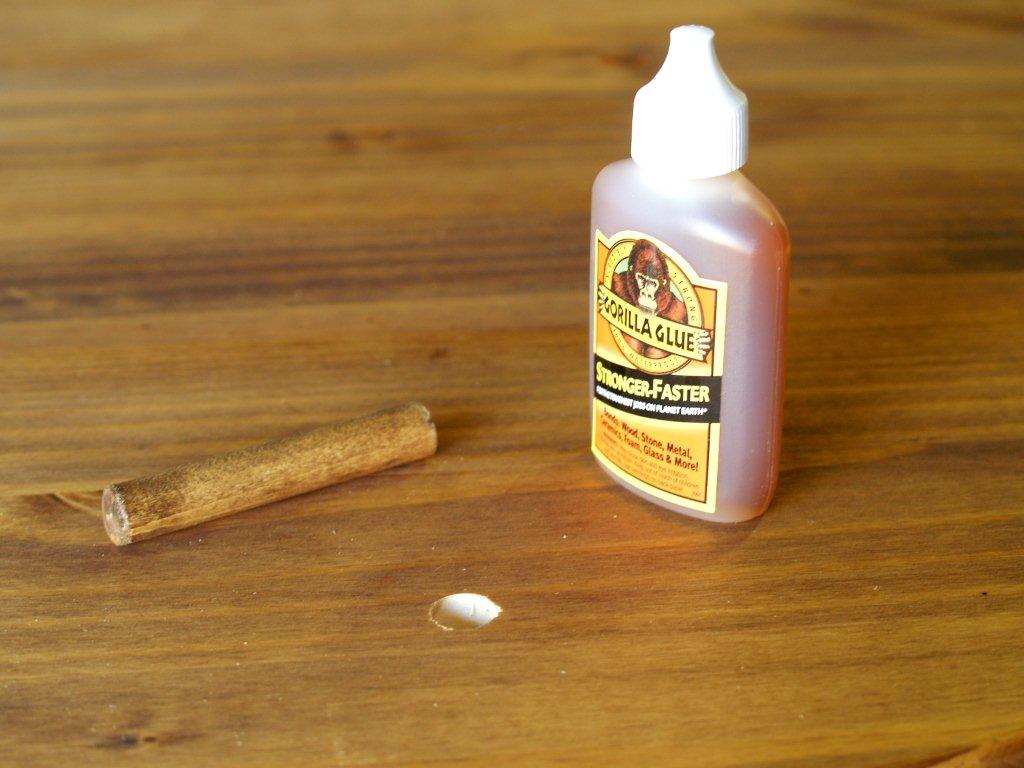
Cut the dowel into 4 inch pieces. These will be glued into the top to hold the top in place. Stain them also.
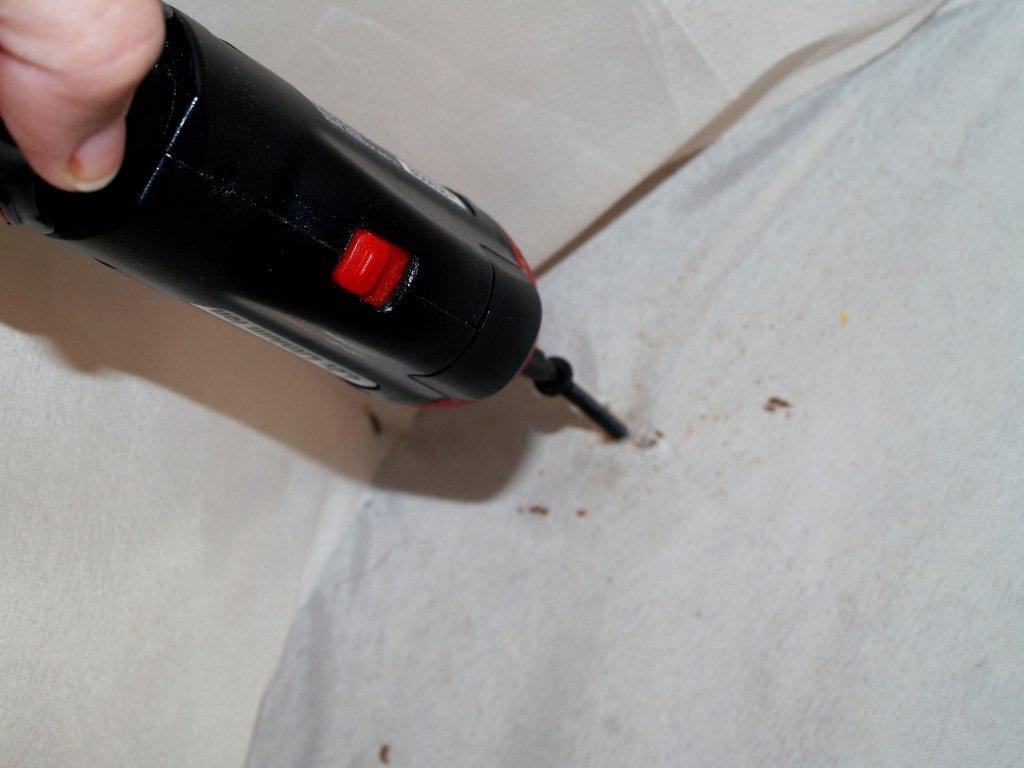
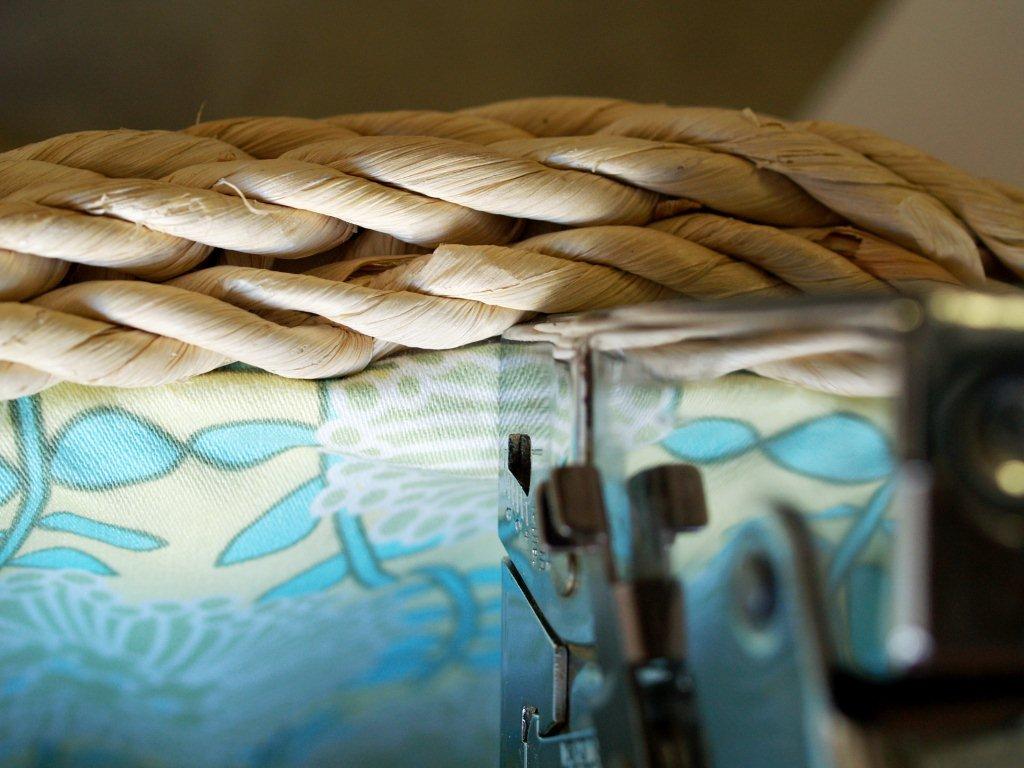
To determine the right size screw to hold the basket to the base, I drilled a hole through the base of the basket. I pushed a nail through to see how deep the base was.
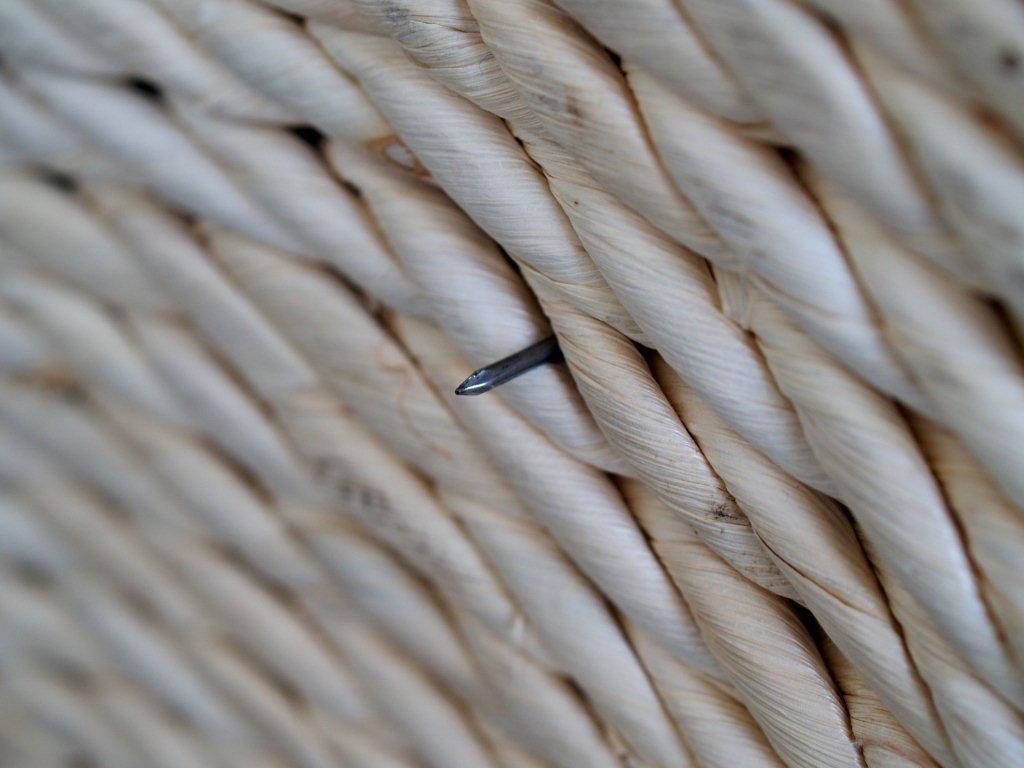
Then I could measure the nail and determine how far into the base I wanted the screw to go.
Drill through the base of the basket in four places.
Center the basket on the base. Screw the basket to the base.
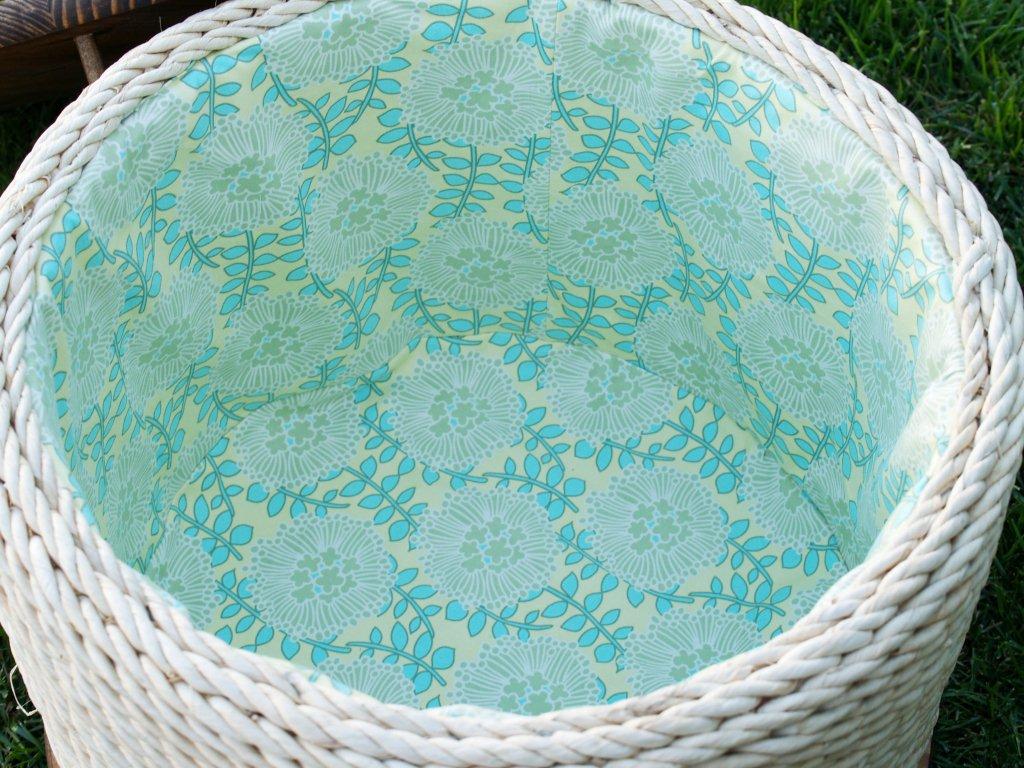
At this point I decided I wanted to cover up the thin nylon lining that came with the basket. I measured the existing lining and made a cuter one out of some Amy Butler fabric I had on hand.
I stapled in the new lining along the top edge under the rope.
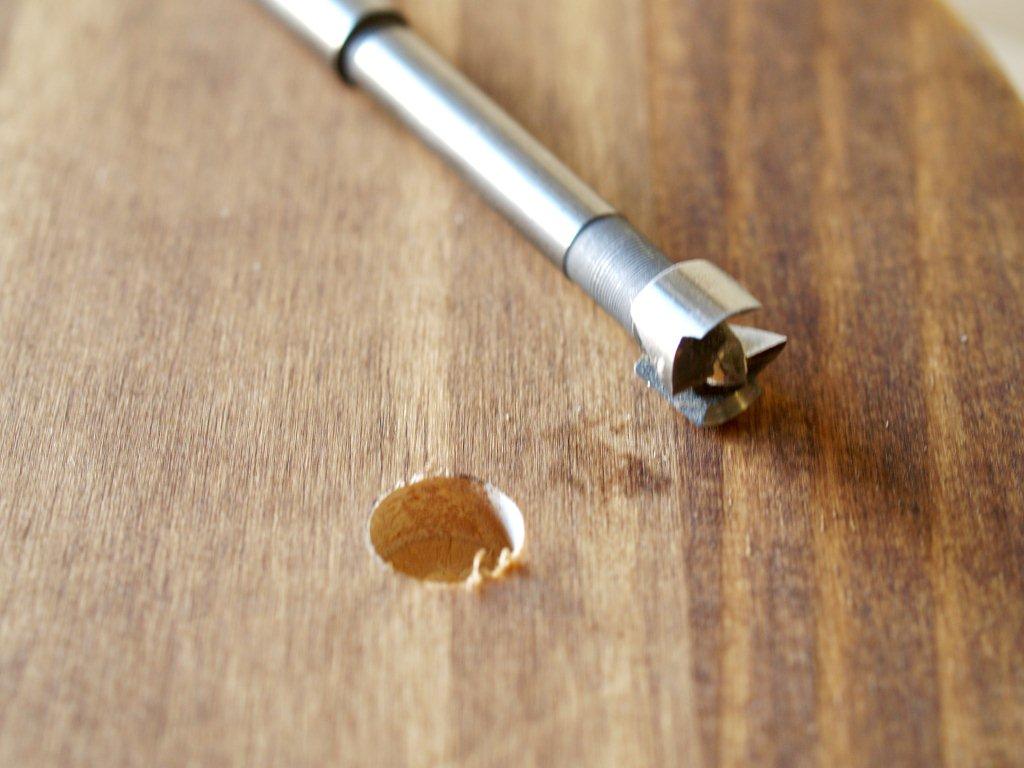
To add in the pegs for the top, I made a template on a scrap piece of wood.
Trace the hole onto the underside of the top. To drill the holes I used a bit called a Forstner bit. It made a nice circle, but if you don’t have one, you can use a regular bit.
Glue in the dowel pieces with Gorilla Glue. I used their all purpose glue.
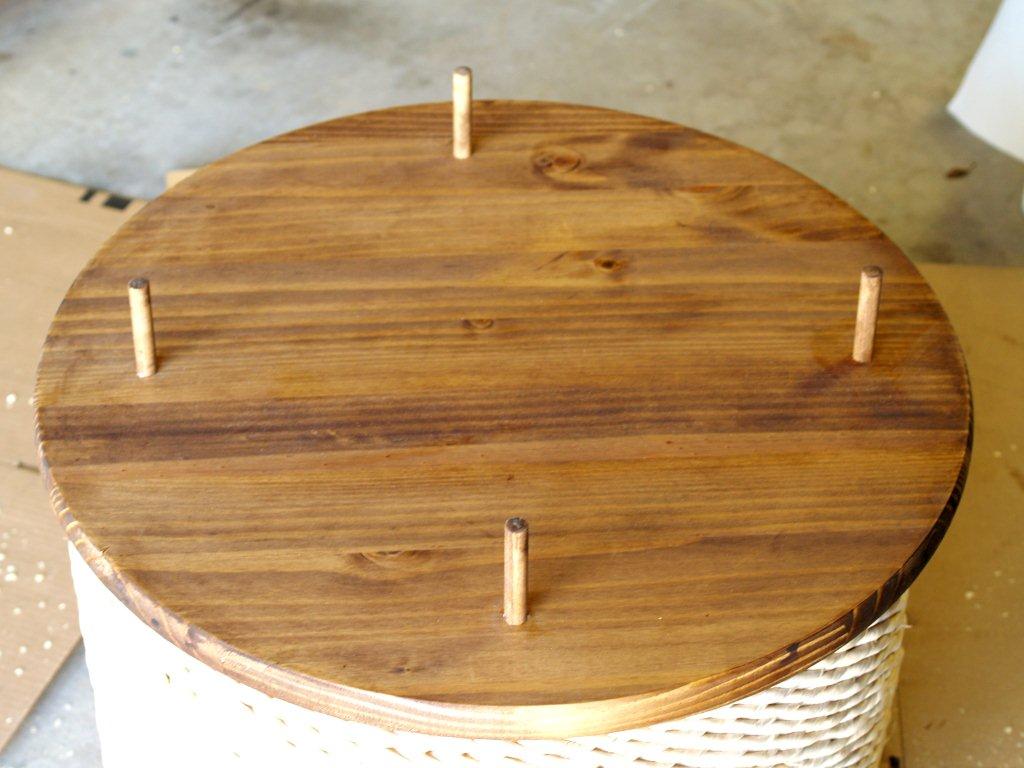
Glue all the pegs in the top. Tap them in with a mallet to make sure they’re in tight. Wipe off any excess glue with a damp rag.
All done!
I must say that while I did all the work on this table – I had significant technical advice from Mr. F.T. Thanks baby.
I’m seriously in love with this table. As is obvious from the bunch of pictures I’m going to make you scroll through. ;)


Did I mention I’m in love??


LOVE LOVE LOVE LOOOOOOVE THIS BEV!!!!
I love this end table and was wondering how hard it would be to replicate. Thank you so much for the inspiration! :)
LOVE!!! You are one lucky duck with a find like that! The makeover is absolutely fantastic.
Absolutely brilliant! And adorable!
Genius! What a great find and transformation. I love it when you have ‘something in mind’ and you find the perfect solution.
wow! this is BEAUTIFUL!!! what a great find at the thrift store! dont you just love that!!! so beautiful! great job!
Wow Bev Thanks for linking this up! I absolutely love love love this table! you did an amazing job on it!
no way did you just do that!! ima be on the lookout for a rope basket now!!
Kimra
http://crafty-cove.blogspot.com
LOVE! Would love if you link up to my party on Monday! http://dthatssewme.blogspot.com/2010/10/party-time.html
SEW inspired!
signed under wrong blog before …right link thoug!
Ok, I think?? the fester/rot comment is from Meg Ryan in French Kiss.
This is such a cute idea from Ballards and you did an amazing job with the knockoff! In fact, I like your’s better because it looks bigger. Thanks for showing us how! I’m visiting from Cheri’s.
This little table is perfection! If only my husband knew the amount of things that roll around and around in my brain. We constantly have this discussion, “Honey! Let’s get that!” He says, “It’s too impulsive,” to which I reply, “It’s NOT impulsive! I’ve been thinking about getting one of those for years!” He has no idea. It would scare him if I made a list. LOL! Lisa~
Wow! Bev, this is fabulous!! That fabric lining is too gorgeous! I am so impressed!!
That is so cool!!!
Looks great!
This would be SO FUN is a sewing room!! Love the table!
I just saw this on Made by You Mondays and wanted to tell you how awesome this looks. You did a beautiful job, and your tutorial is so informative, amazing job.
I can see why you fell for this side table. It really is cute. Great job on duplicating it.
Came out very Kewl!
These are ADORABLE! Very creative!
taidye original
So beautiful – you have a wonderful husband too!
Super love this!
I also saw this in the Ballard Magazine and have been wondering how I could recreate it! You did a really great job! Now… where can I find a rope basket??
That is one fantastic piece of furniture. I LOVE IT! GREAT job!!!
Party with you tonight.
This is my first time to your site. Coming to you from Met Monday. This is AWESOME!! I’ve been looking for ideas for a side table for my husbands office that I’m about to begin working on. Nice job!!
WOW, that is amazing! Don’t you love it when you can get an expensive piece for much, much less, plus you’ll always feel a little bit of pride everytime you see your gorgeous table.
Following you from Anything Related Tuesdays. Check out my blog at http://daffodilmama.blogspot.com
Kim
Oh my gosh! No way! I was just looking @ this table today in the Ballard’s catalog and wondering how it could be recreated!! AWESOME! You did a fabulous job! I’m visiting from It’s So Very Cheri by the way. :)
OMG…I see Ballard and I see knock-off and I just had to come on over and check it out. I have a round Ballard table with their burlap table skirt and it was a real treat to get it a couple of years ago. I just love their style and your table is georgous and the extra storage is fantastic. Have a wonderful week, fondly, Roberta
LOVE, LOVE, LOVE…I am not sure I can say it enough. This is to die for. Your tutorial is awesome…and I remember seeing that table. FABULOUS! Can you tell I like it?
It’s AWESOME. Great job!!!
I can’t even pretend to wrap my mind around how you did this. You’re a baller, Bev. A straight baller.
Wow! This is super creative and cool! Nice work… visiting from It’s so very Cheri.
AWESOME! Thanks for linking up with Anything Related! ~Bridgette
Love what you have done here. Looks great and kinda easy too, which is a huge bonus. Love me some Ballard designs! visiting from It’s so Cheri. liz
I just wanted to stop by and let you know that I linked to this post today from the Home & Garden channel at Craft Gossip. :)
Your feature will appear in the main Craft Gossip RSS feed, on the main home page and can be found directly here
http://homeandgarden.craftgossip.com/ballard-knockoff-spool-side-table/
If you would like a “featured by” button, you can grab one here!
http://homeandgarden.craftgossip.com/grab-a-craft-gossip-button/
That is absolutely brilliant.
Hi Beverly, another fantastic job! This turned out great, I love your stenciling and the peg legs, it’s all fab.
Totally amazing, Bev! Stunning job!
Your creativity continues to amaze and inspire me. I love and want this table.
I’m in love with anything from Ballards … and I’m amazed that you did this! Kudos!!! Watch out, they may hire you to mass produce these bad boys! Jules
That looks fabulous. Love how you made that side table. Thanks so much for sharing your tutorial!
Brittany
http://www.prettyhandygirl.com
You did a great job. This is great but also practical with the extra storage.
Thanks for linking up.
Cheri
GREAT tutorial!! Thanks for linking up another FAB idea to Thrilling Thursdays @ Paisley Passions.
This is a beautiful “knock off”…I think I like yours better than the original!
So happy to see you at A Crafty Soiree! That is beyond fabulous, I love that you were able to make your own version that is just as cool at the original. The fabric you lined it with is cute too. Thanks for sharing and looking forward to seeing you next time too:)
Wow it looks awesome! You did a great job. I think I like your better than the original.
wow, so clever!! I guess I need to do more shopping to find my DIY inspiration!
Such a great eye to pick out that item and see the potential in it! Great project!! Thanks for linking up the the DIY Project Party monthly contest!
Amy
Beautiful and so creative!!! {Love} this.
Oh my goodness! What luck! Great job spotting that basket and then figuring out how to make your little table from there. Visiting from Frugal Friday!
This is amazing!
I’m featuring this on my blog today!
Hope you don’t mind!
“Love it”… This is a fabulous idea and I THANK YOU SO MUCH!!!
Have a wonderful Friday and weekend!
Donna
this is amazing!!!! i want one! i will def have my eyes peeled for rope baskets from now on!
I have been trying to figure out how to copy this too! I want to make mine double as a kitty scratching post too! I love how you did the top!
That is SO creative! I love it! where did you get the fabric on the inside that is adorable as well.
French Kiss- love that flick!
That is freaking amazing. great find and amazing knock off. I love a good Ballard’s copy. This is beautiful! You should be so proud.
Gorgeous, amazing, beautiful, well done, clever, lovely, unique….most excellent and wonderful!!
Wow! I really love this table, you are one creative person!
This is so cool! Love the texture and rustic nature of the finished product. And check out that storage space!
Brilliant!
Donna
Beverly! Love love love! Fantastic piece and great tutorial. Another creation of yours I really need =) Thanks so much for linking up! Hope you have a wonderful week! Stephanie Lynn
I can honestly say that I like yours better than the Ballard one. Yours is more subtle- a nod to a spool. Yours has nicer rope. Plus with the storage its so practical. The lining is beautiful too. Great job!
You did such a beautiful job. It’s gorgeous! Great tutorial too! Thanks so much for sharing! ;)
Have a great week!
I have a thing for spools of all kinds so I LOVE this! It’s a fantastic project and totally deserving of the paparazzi given to it!
wow! wow! wow! that’s all i can say (-:
What an amazing find! That rope basket! GREAT job. Thanks for linking up to Topsy Turvy Tuesday’s. I’ll be featuring this on my blog today.
Absolutely brilliant.
Oh, I have been waiting for someone to do this. You did such a lovely job! I was thinking it could be done with the round tubes they sell at the hardware store for pouring cement pillars. I would have never thought to look for a rope basket.
Really great job! I’m in love with it and am thinking a basket I have might just be perfect to do the same thing to! Thanks for the inspiration.
Wow, thanks for your tutorial. Very cool knockoff. I have to say I actually like yours tons better than the Ballard one.
This looks great and give you so much storage. Congrats on making Top 10!
Ummm…yes, still want one =) I featured this today Beverly. Thanks so much for linking to The Sunday Showcase. I greatly appreciate it. Hope you enjoy your week! ~ Stephanie Lynn
What a fantastic knockoff! Great job!
Thanks for stopping by my blog too! :-)
What a FANTASTIC project!! LOVE it!! (=
We love this party link and I wanted to let you know that we are planning on featuring it on our craft blog. We hope that you get a bunch of new visitors.
http://www.remodelaholic.com
Cute cute cute!!! Great job!
Fabulous!!!!! I LOVE LOVE LOVE IT!!!!!
WELL??…where is the next batch of say…250 more so we can PURCHASE them from you?? I’d be game for that.
Instead of paying $200 to Ballard Designs.
I too have been in love with those side tables for years now.
Kudos!
Where did you find the basket used for this project.? Am not having any luck finding one!
Help!
Spotted any baskets somewhere since the thrift store?
LOL I saw the French Kiss reference and chuckled! I keep picturing Meg Ryan’s face now when she says it :)
I am IN LOVE with it, too!!! I’ve actually been on a hunt for a wire cord spool (The big ones you see at Lowes/Home Depot)… and thought about transforming it into a little book shelf (Saw it on pinterest) Hmm.. this is nifty though! Plus it works as a storage! Extra points for that ! ;) -Mika
You know, you don’t need a rope basket. Just get a construction tube–likely 12″ or 14″ in diameter at one of the hardware stores/home improvement stores, asking very nicely for it to be cut to whatever height you’d like. You can find cords, ropes, etc. at military surplus stores, hunting & fishing emporiums, etc., or those selfsame hardware and H.I. stores and wrap, wrap, wrap in whatever color or texture you’d like, and you can find round craft wood pieces there, too, so you’ve got all the parts without waiting for serendipity to gift you with a rope basket.
Love this!!!
Any hints on where to find such a basket? Also, what color of minwax all in one did you use?
I’m totally going to make this!
Thanks!
It looks amazing, I can’t wait to give it a go.